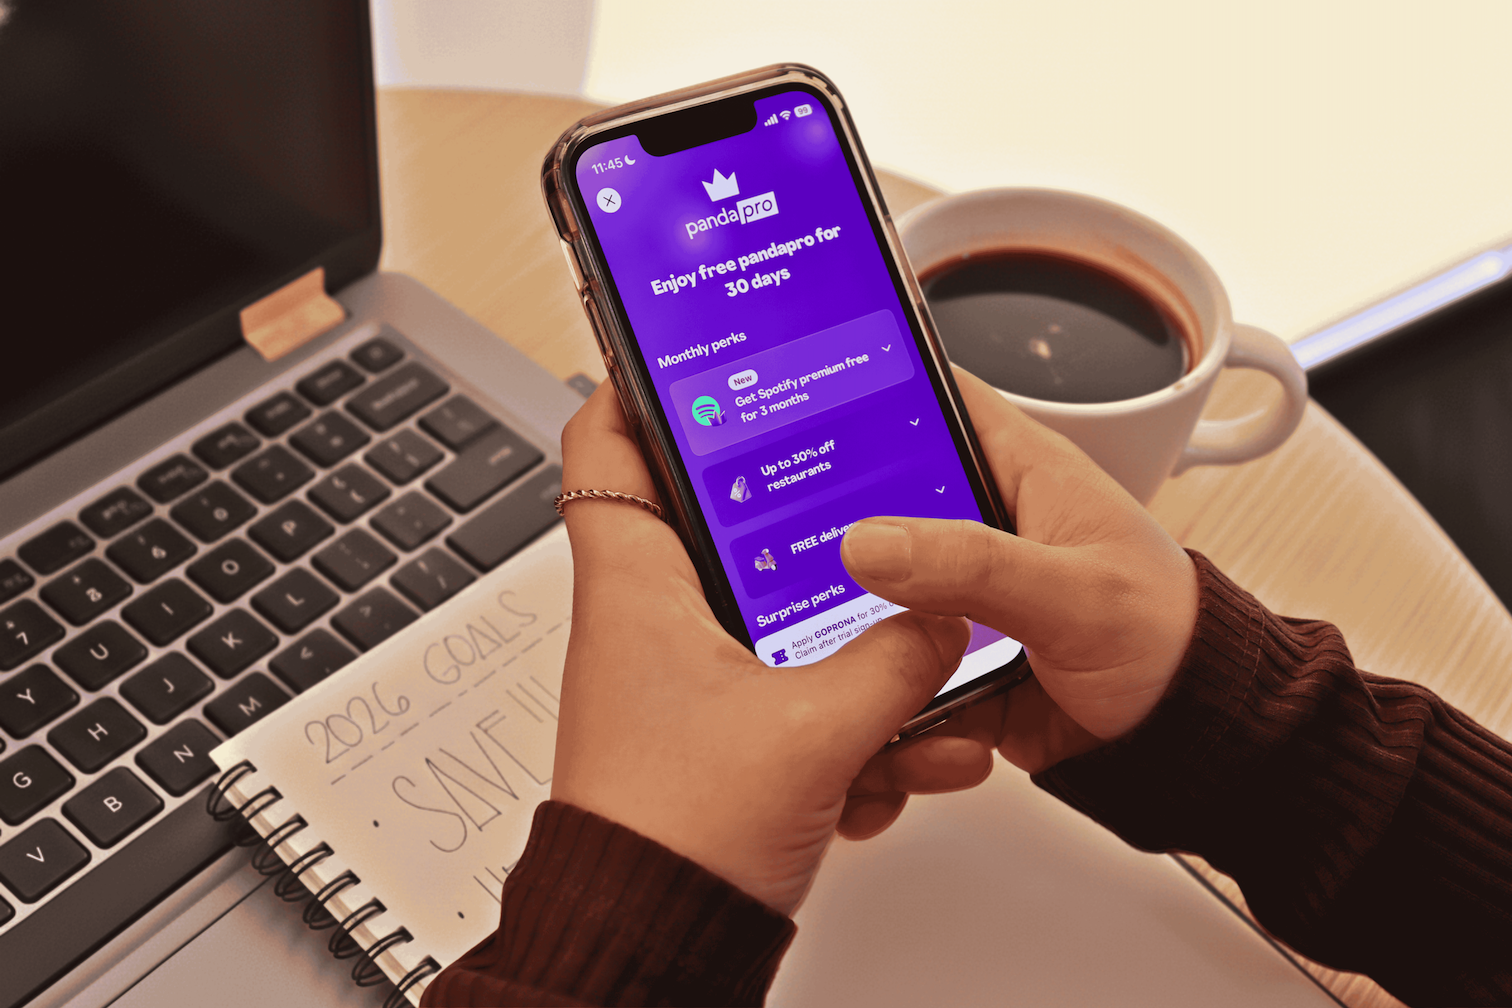
How foodpanda’s pandapro makes January the smartest time to go PRO
The new year often starts with good intentions: setting savings goals, cutting back on expenses, and recovering from holiday spending. But as routines pick up again, daily demands do not slow down. Convenience remains essential, even as budgets feel tighter. From January 22 to 31, Pro Weeks makes a timely return, giving pandapro subscribers access to exclusive, limited-time deals on food delivery, groceries, and pick-up orders. It reinforces that saving does not have to mean sacrificing convenience—especially as many continue to manage post-holiday expenses.
Better Value in Everyday Orders
Pro Weeks makes regular food orders more rewarding through Pro-exclusive savings. pandapro subscribers can enjoy up to 50% off on select restaurants, including familiar favorites such as KFC, Shakey’s Pizza, CoCo Fresh Tea and Juice, and Gong Cha—turning daily meals, coffee breaks, and quick cravings into more thoughtful, budget-friendly choices. For added flexibility, pick-up orders also come with extra value. pandapro subscribers can enjoy 10% off pick-up orders using the PICKUP code at select vendors, offering a cost-efficient option for those who prefer to collect their orders themselves.
Stocked, Sorted, and Still on Budget
Pro Weeks extends savings beyond meals and into household essentials. pandapro subscribers can get up to 30% off on pandamart, with discounts on trusted brands such as Nestlé, Unilever, and P&G. Subscribers can also enjoy ₱200 off on Puregold orders, valid with varying minimum spends. Take the hassle out of restocking your pantry and skip the supermarket trip entirely. Big savings, zero effort! Beyond upfront discounts, cashback vouchers like PROCB (5% cashback on select food and grocery orders) and PROGROCER (10% cashback on pandamart and select supermarkets) add extra value—helping budgets go further over time.
More Reasons to Stay Pro
foodpanda gives back to its pandapro subscribers through exclusive rewards that add value across food delivery, groceries, pick-up, dine-in, and more. During Pro Weeks, users can enjoy special subscription offers, including 30% off a 12-month pandapro plan with GOPRONA, alongside a limited-time 70% discount through PROWKND for select users on weekends. To make the most of the short run, Pro subscribers can also use the PROWEEK voucher, which gives ₱200 off on food and grocery orders with varying minimum spends from January 26-31. As the year begins and spending habits come back into focus, saving works best when it fits naturally into everyday life. With pandapro, convenience and value go hand in hand—turning good intentions at the start of the year into something more sustainable. With Pro Weeks available for a limited time, this window offers a clear opportunity to secure Pro-only savings while they last.
About foodpanda:
foodpanda Philippines currently operates in 192 cities and municipalities across the Philippines and is continuously expanding. foodpanda is a subsidiary under Delivery Hero, a worldwide leader of the food delivery industry. For more information, visit www.foodpanda.ph.
Through the foodpanda website or via the new iOS and Android apps, customers can enter their address and view a curated list of restaurants and shops serving their neighborhood. Once they have found their choice, they can place an order in the comfort of their home or office, paying online through foodpanda’s secure platform or via cash-on-delivery The order is then carefully prepared by the restaurant or shop, picked up by the foodpanda rider and delivered straight to their doorstep.
foodpanda brings timely, sulit offers to help keep holiday budgets manageable.
foodpanda is rolling out its biggest savings event of the year, just as households become more mindful of their spending. As the holidays kick in, so do the familiar rush of gatherings, shopping lists, office celebrations, and last-minute cravings. It is often the period when expenses naturally rise, making practical deals more important than ever.
This is where Pro Weeks becomes especially helpful. From November 20 to 30, 2025, it offers timely, meaningful savings through exclusive food delivery and grocery perks for pandapro subscribers. With nationwide deals that deliver real savings, it is the ideal moment to finally catch up if you are not yet a pandapro subscriber.
Irresistible Food Delivery Deals for the Busiest Season
This year’s food delivery lineup brings major savings, with discounts up to 30%, making holiday favorites even more affordable for pandapro subscribers. Cravings from McDonald’s, Jollibee, CoCo, Gong Cha, Wendy’s, Shakey’s, Domino’s, Greenwich, and many others become easier on the wallet throughout the campaign. These offers are boosted further by the Pro-exclusive free delivery perk for orders starting at ₱200, turning every meal or merienda into a smart, timely choice. Pickup orders also get 10% off with the PICKUP code for a minimum spend of ₱99.
Pro users in Quezon City and Makati also get access to additional perks through city-specific codes. By using QCPRO or MAKATIPRO, members can enjoy an extra 20% off on select restaurants. With deals this strong, enjoying your favorite holiday cravings becomes even more budget friendly.
Holiday Grocery Shopping Made Lighter
As Pro Weeks delivers big value on food cravings, it also extends thoughtful savings to holiday grocery needs. pandapro subscribers get up to 30% off on essentials from pandamart and ₱100 off from Robinsons Supermarket, plus ₱69 off delivery fees to help keep checkout costs in check. With the added 10% cashback on grocery orders through the PROGROCER code, households can stock up on pantry staples, noche buena ingredients, and even last-minute needs without navigating mall crowds or overspending. This combination of strong pricing and doorstep convenience makes Pro Weeks a reliable partner during the holiday rush.
A Year of Perks for Less
One of the standout highlights of this returning Pro Weeks run is the special offer on pandapro subscriptions. With the GOPRONA code, users can get 30% off a 12-month plan, giving them a full year of free delivery perks, exclusive vouchers, and ongoing discounts. It is a practical long-term savings move that often pays for itself after just a few orders, especially for users who rely on foodpanda for regular meals, cravings, and grocery runs.
Why You Shouldn’t Sit This One Out
With all Pro Weeks offers available only until November 30, it is a timely opportunity to enjoy valuable savings. Alongside the main deals, Pro subscribers can also take advantage of additional vouchers like PROWEEKS, which gives ₱200 off for select Pro users from November 20 to 30, and PROFLASH, offering ₱500 off on select vendors from November 28 to 30. In a fast-paced holiday season, the extra benefits that come with being a pandapro subscriber can make everyday moments easier to manage. With foodpanda making the holidays more affordable through Pro Weeks, now is the perfect time to make the switch.
About foodpanda:
foodpanda Philippines currently operates in 192 cities and municipalities across the Philippines and is continuously expanding. foodpanda is a subsidiary under Delivery Hero, a worldwide leader of the food delivery industry. For more information, visit www.foodpanda.ph.
Through the foodpanda website or via the new iOS and Android apps, customers can enter their address and view a curated list of restaurants and shops serving their neighborhood. Once they have found their choice, they can place an order in the comfort of their home or office, paying online through foodpanda’s secure platform or via cash-on-delivery The order is then carefully prepared by the restaurant or shop, picked up by the foodpanda rider and delivered straight to their doorstep.
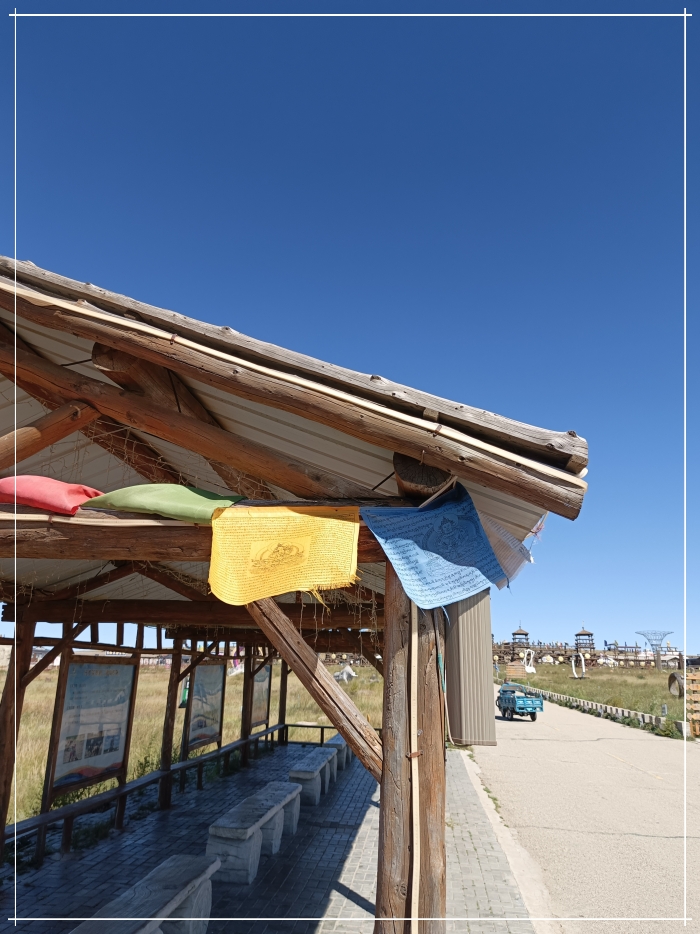
On our first day, we left Hohhot City early for Xilamuren Grasslands, to experience a glimpse of traditional Mongolian way of living.
Grasslands are generally open and continuous, fairly flat places that receive more rain than deserts but less precipitation than forests. In grassland regions, the climate is ideal for the growth of grasses only. The low precipitation rates are enough to nourish grasses but not enough for a forest of trees. Despite being dry, the temperature at day time is below 20 degrees Celsius.
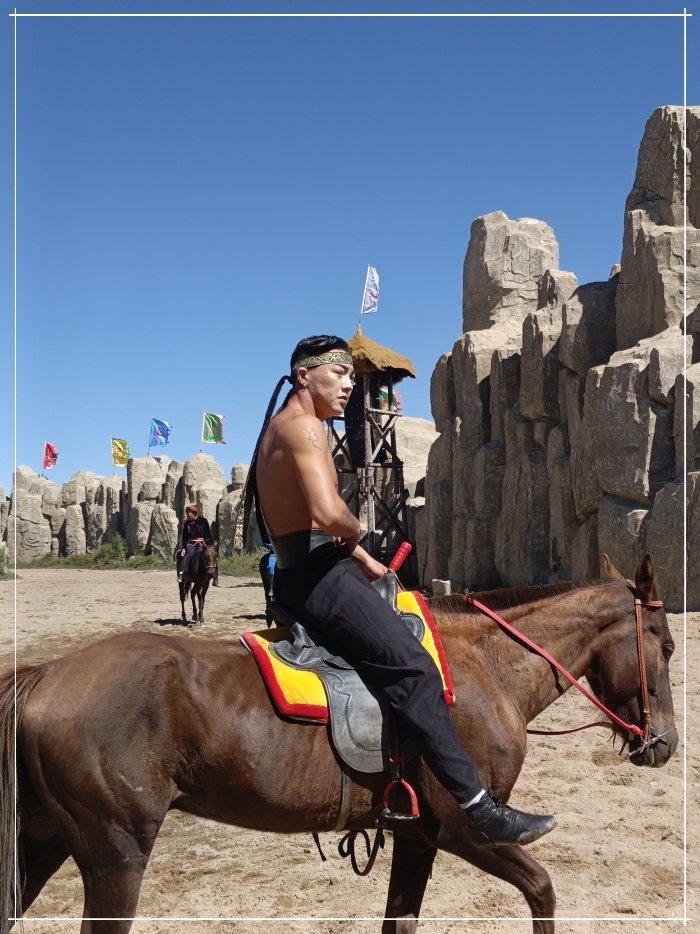
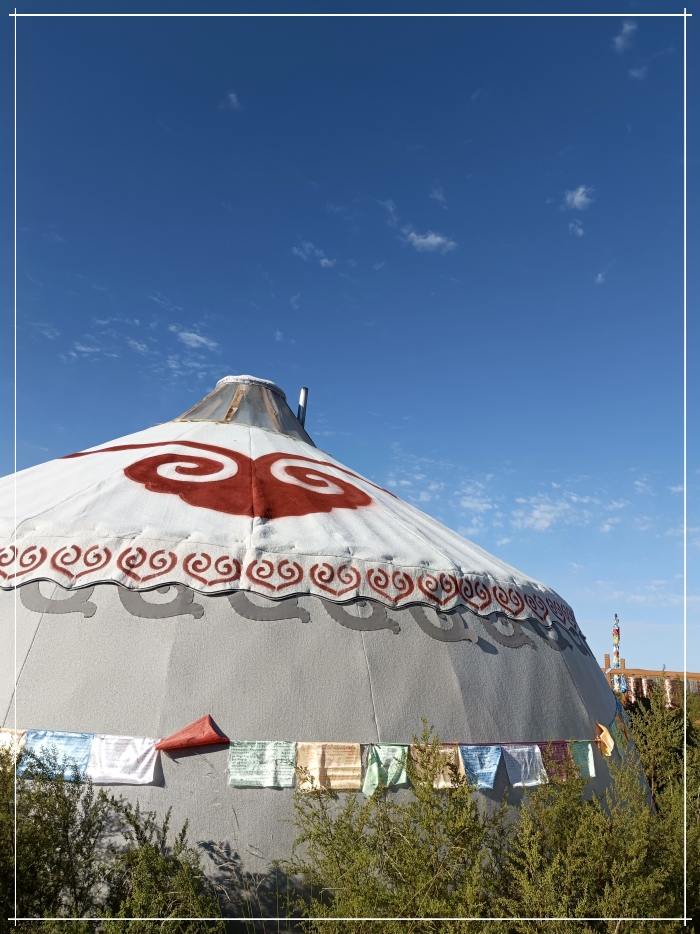
In the Grasslands, we got to stay at a Mongolian Yurt (Meng Gu Bao Tent). The temperature at night drops to as low as 4 degrees Celsius. Good thing the tents have mechanical heaters (not so traditional after all). We spent the night on socials and a few bottles of traditional Mongolian Liquor made from fermented milk. The bottle looks very nice, too. At daytime we also got to enjoy various activities as horseback riding and archery lessons.
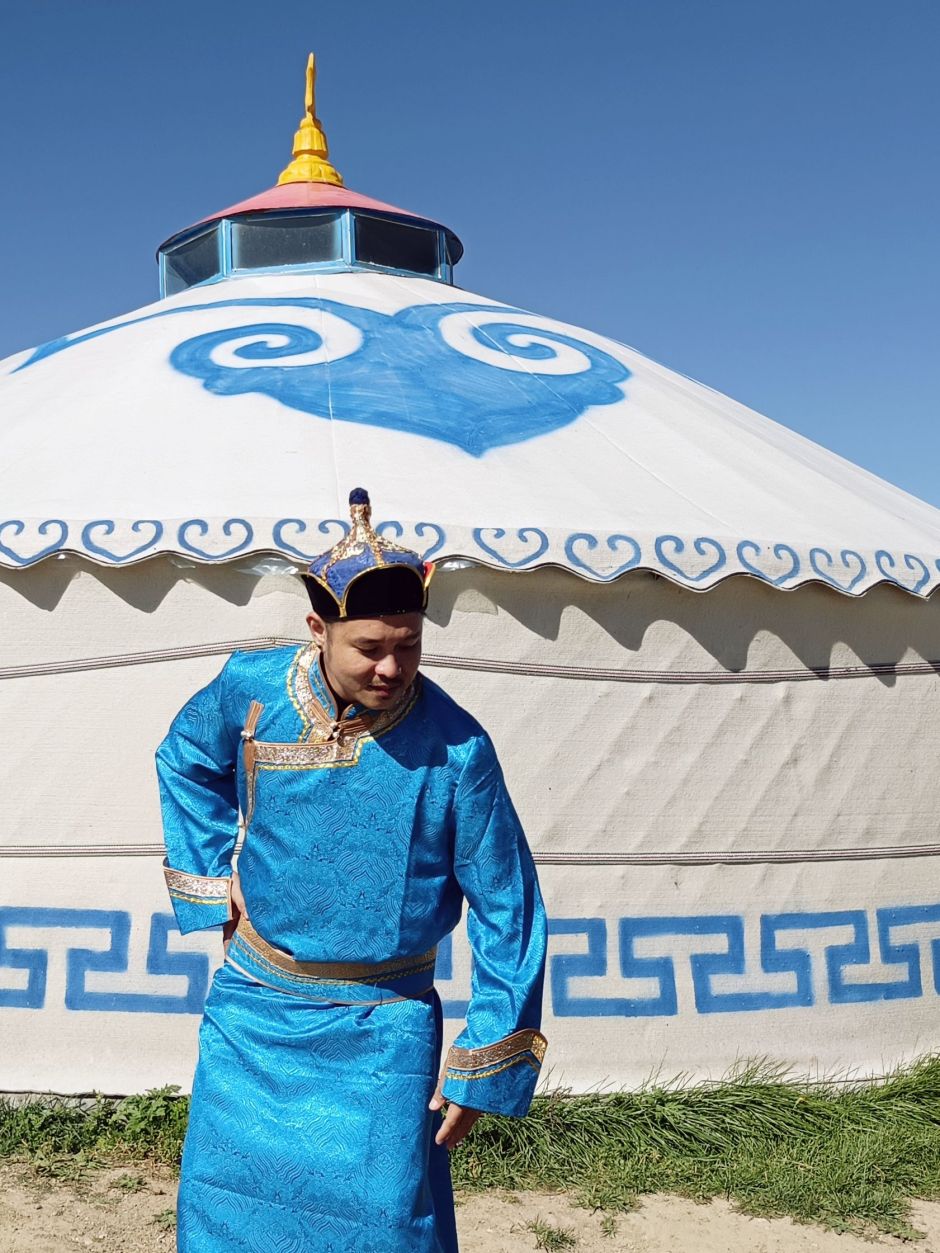
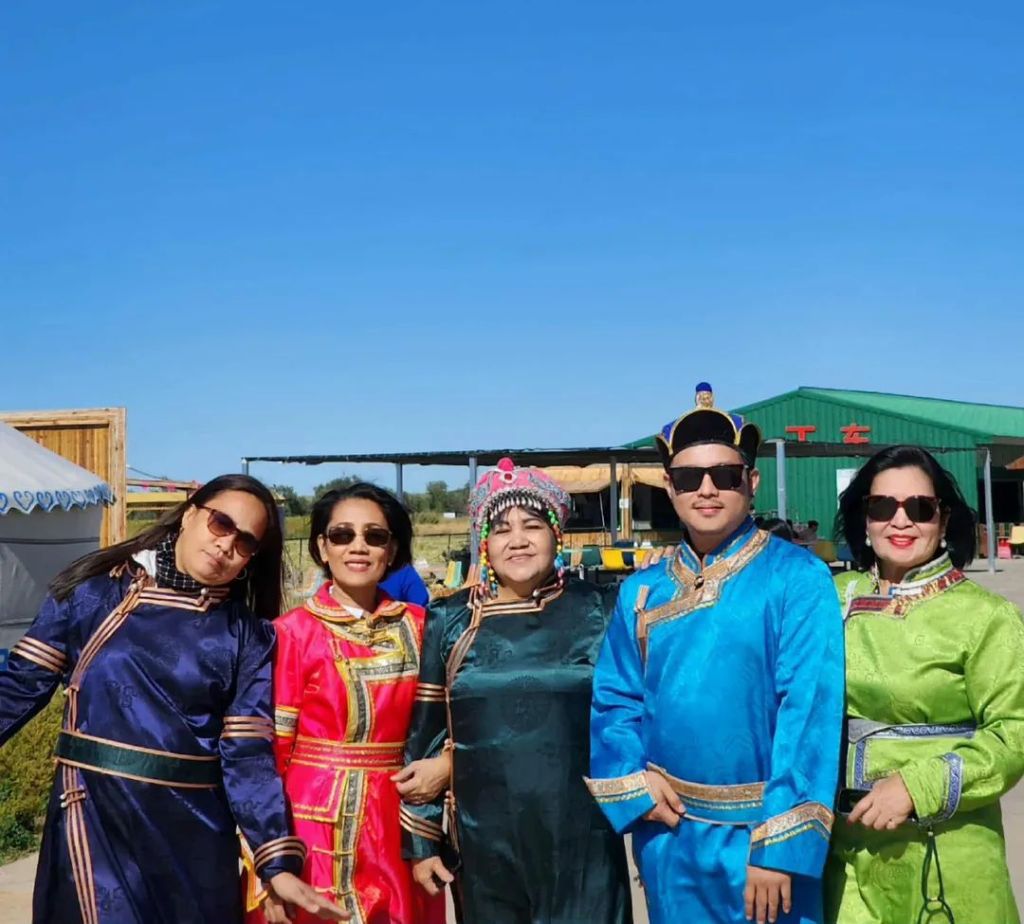
Here’s me wearing a traditional costume under the clearest blue sky of Mongolia.
Throughout my stay, I was hooked on local yogurt, which Mongolia has always been famous for. Yogurt (Isgelen Tarag) is a staple in the Mongolian diet. The cultural significance of yogurt dates back to the time of Genghis Khan, and it remains an important part of nomadic life and culinary tradition.
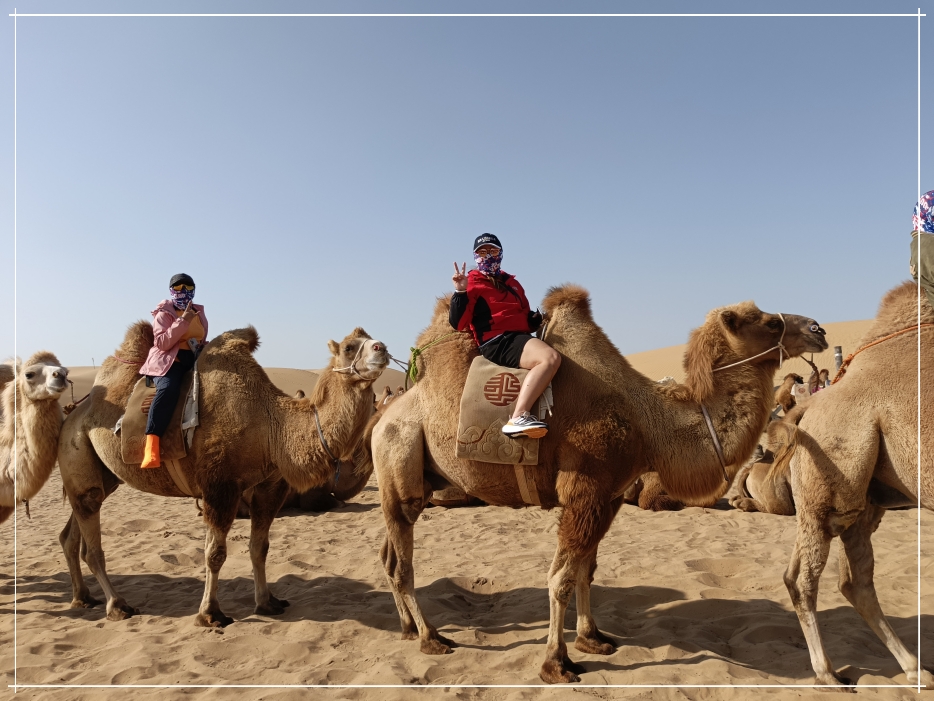
On our second day, we transferred to Kubuqi Desert for a nomadic desert experience. The camel ride excursion was definitely the highlight of the day.
We spent the rest of the day at Yinken Whistling Dune Bay – an Amusement park in the middle of the desert. We went for off-road surfing, go-karts, zip lines and roller coaster ride.
We also had a quick visit Ordos City, famous for Lamb meat and beef hotpot.
The remaining days, we spent at Hohhot City, which is the capital of Inner Mongolia. The city is strongly Chinese-influenced, with a touch or Arabic, as the territory also share some history with the ancient folks of Central Asia.
Here’s me feeling cute at Shini Zhao Temple in Hohhot.
Hohhot City’s vibe is far from the status of Beijing or Shanghai in terms of Commercialism. Somewhat a provincial vibe IMO; but all the necessary modern conveniences are there. Food was hefty and great, and everything’s fairly affordable.
This Peking Duck is by far the best duck-meat viand I have ever tasted. I could actually compare it to lechon baboy, with a thin layer of fat under the crispy-roasted skin.
We also had a quick visit to the Inner Mongolian Museum, which houses the largest number of collected dinasaur fossils in Asia. Inner Mongolian desert is also a treasure trove of prehistoric remains, as these vast dry lands are ancient. Oil and natural gases are also being mined from the grounds of this territory.
Where we stayed – Hamptons by Hilton Hotel in Hohhot City, with superb breakfast buffet.
With the tour Buddies. This tour was arranged for us by Uno Turismo agency based in Quezon City.
This year marks the 12th anniversary of my travel blog, iamjosemanuel.com. To commemorate this special milestone, I am listing down the best and most memorable cities that I’ve visited so far. I already lost track of the number of cities I’ve been to; probably more than a hundred, including domestic.
I’m limiting this list to five favorite cities outside the Philippines. No doubt, old-world Architecture plays a major influence for me to form this list; my love affair and fascination with the ancient times.
1. The Uniquely-Beautiful Venice, Italy
Venice is heaven for ‘Old-world’ enthusiasts. Venice’s well-preserved architectural style is uniquely defined by a hybrid of Gothic Italian and Islamic elements, since this city has also been under the rule of Muslim/Turks back in the days. The vibe of Venice, hindi exactly the same as what you see in Milan, Rome and Florence. Kakaiba. Unpolished.
I’ve stayed in Venice for 3 days. I did not take any arranged tour, I just glided my way through its maze-like streets. When I say, maze-like, ganito yun.
There’s something unique about a city floating in water, and the gondolas swaying their way through the canals and lagoons. I clearly remember getting lost during a late afternoon stroll, nakarating ako sa isang empty neighborhood of old buildings. Walang tao dun, tas’ biglang umulan. Found shelter at a random roofed hallway, and stayed for around an hour. Naka-idlip ako nun. Scary din to a point, but sobrang memorable. After the rain, it took me a while to find my way back. Inabutan ako ng dilim. See more of Venice in this 2015 blogpost link.
2. Florence, Italy
Ok, bias kase more than one entry from Italy, but the old-world charm of Florence is impossible to not talk about. Florence to me boasts the most well-preserved “Italian Renaissance” era there is. Those treasured artworks, sculptures and the perfectly-maintained Santa Maria del Fiore (Duomo de Firenze) are worthy of all the admiration its been getting. Compared to Venice, Florence is more on the polished, expensive vibe, where everything is manicured and well-maintained; and I love them both.
Sali ko na ang Leaning tower of Pisa sa entry na ito, since it was just an hour away from Florence. Florence and Pisa are easy to navigate, relaxed and less crowded compared to Rome and Milan. See more on this link.
3. Cusco, Peru
Cusco is more than just the gateway to Machu Picchu. The romantic,old-world charm of this well-preserved Latin City is a beauty on it’s own. Kaso sobrang layo nya sa Pinas. But if I’d be given a chance to go back to a destination in Latin America, definitely, I am choosing Cusco in a heartbeat. Sobrang ganda, especially Plaza de Armas and the overlooking view of San Blas.
Japan has a lot of amazing cities, but Kyoto is definitely on top of the list. Kyoto is known for its profound serenity and timeless charm. A bit touristy, but indeed, there’s so much to see (if you prefer exploring Old-world Japan). I think Kyoto is one of the most photogenic, if not the most photogenic place I’ve visited so far. Sakto din siguro I visited during autumn when everything was golden.
Kyoto is also a good base city to explore Central Japan. Nara and Himeji are easy day trips from Kyoto.
5. Bagan, Myanmar
Last on my top five is Bagan.
Bagan in Myanmar is an ancient city, a historic capital, and a UNESCO World Heritage Site famous for its thousands of temples and pagodas. If you are into mysterious/elusive, old-world vibe, then truly, Bagan offers exactly that experience.
Sobrang photogenic, yet somewhat out of radar, because it is difficult to get to, even if nasa Southeast Asia lang din sya. Truly, my trip to Bagan is one for the books. And if given a chance, I’d definitely return in a beat; and I’d love to take you guys with me.
OK, step by step guide on how to apply for Tourist VISA to the USA. I’m making this post as simple as possible, with screenshots, so you know what to expect. DIY po itong application ko. I did not apply through an agency.
Disclaimer lang muna. First, this process is as of July 2025. There may be updates in the future, along with the transitioning of the US Administration. Second, this guide solely gives light on US Tourist Visa Application for Filipinos living in the Philippines; Non-immigrant po at walang plano mag TNT. To be specific, B1,B2 ang term nila for regular tourist visa. Lastly, this guide does not guarantee your approval. Depende po sa ganda. Charot! Pero di nga, if you find visa application overwhelming, mag agency po tayo for more chances of winning. ems! If mag agency po, please check on reviews first kase dami scammers today.
My application in a gist:
Magpapicture ng 2×2
Accomplish the DS 160 Application form online (For tourist B1,B2)
Pay the Visa fee
Schedule Appointment for Photo & Biometrics at VAC, then for Interview at the embassy
Personally attend the scheduled Photo/Biometric and interview
First step: Magpapicturesa studio. inuna ko ito kase the softcopy/jpeg file is needed during the second step. You will also submit 2 copies of this during the interview at the embassy.
Photo requirement: 2 x 2 inches, square, without borders. The applicant’s head (measured from top of the hair to the bottom of the chin) must measure 25 mm to 35 mm (1 inch to 1 3/8 inch); the applicant’s eye level must be 28 mm to 35 mm (1 1/8 inch to 1 3/8 inch) from the bottom of the photo. NO EDITING OF ANY SORT. NO EARRINGS FOR MEN. You will need both the printed copy 2×2 and the raw file to upload. A US visa photo must be a JPEG (.jpg) file, 600×600 to 1200×1200 pixels, with a square aspect ratio and a file size no larger than 240 KB.
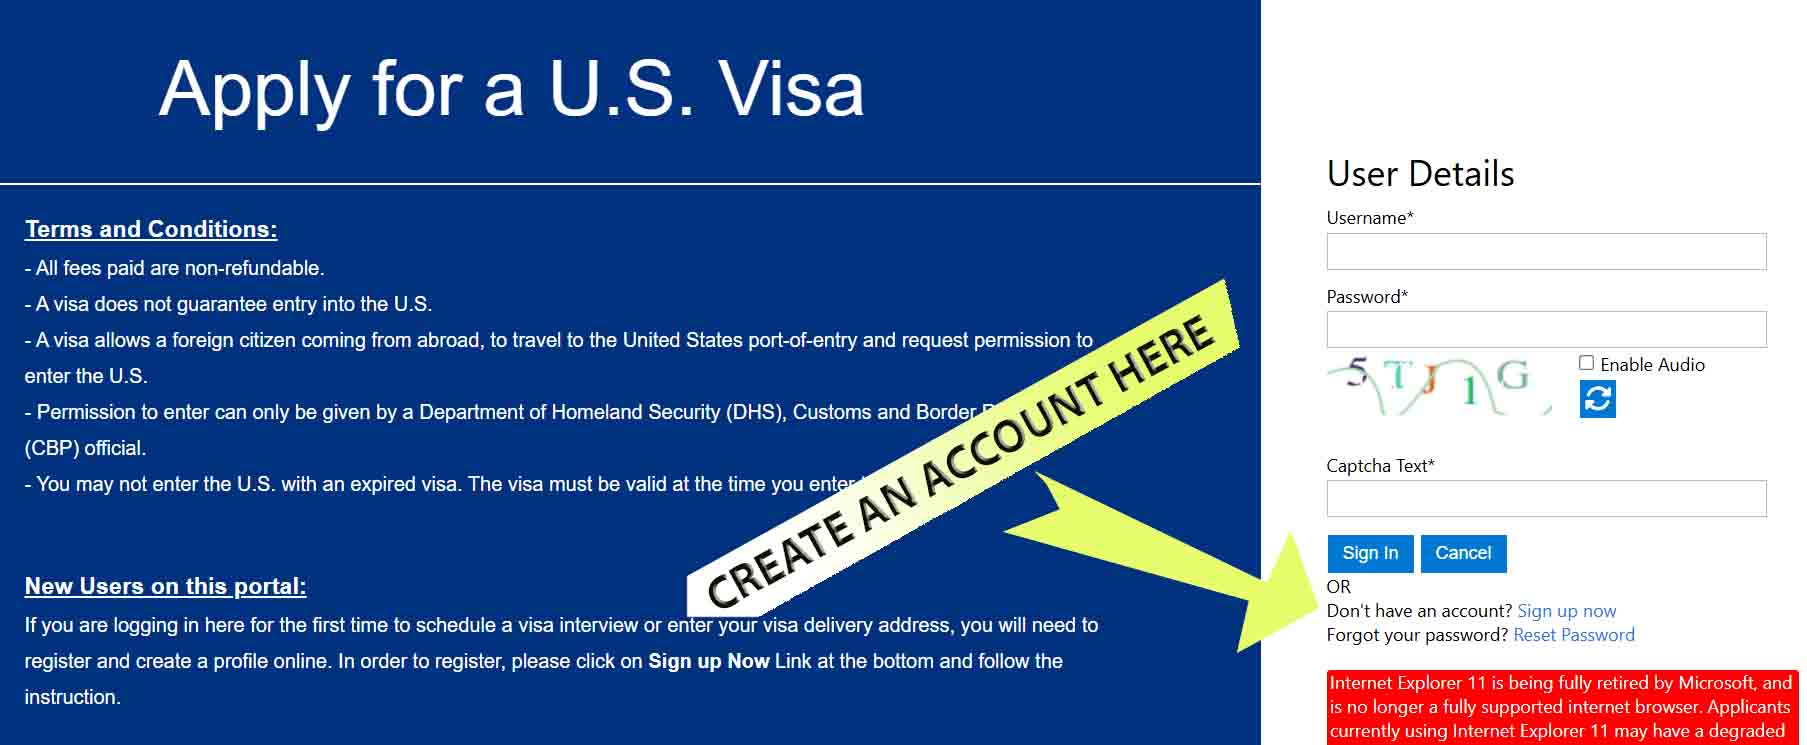
Second Step: Accomplish the DS 160 Application form online. Log in at ustraveldocs.com , choose Philippines as base and non-immigrant Tourist B1/B2 as visa type. You will be asked to create an account before proceeding. Sign up with your valid email, contacts and assign verification questions. For Reference, ganito to ang look ng site.
After signing up, you will automatically be redirected to the DS 160 page, as shown below. (https:// ceac.state.gov/genniv/). After sign up and all, select “Start an application” and you will be given a unique Application ID. Take note of this so you can retrieve your application if mag close. Note that you don’t necessarily have to accomplish this form in one seating. Pwede naman po save2x.
Ok, this is the part where you will give personal information, travel plans, work, education etc. See the screenshot below, ito po ang starting page. Mahaba po ito pero basic questions lang naman, just like any other visa application. Answer truthfully. Re the travel plans, not necessary naman po may return ticket na or what. Just give your intended dates and what you want to do.
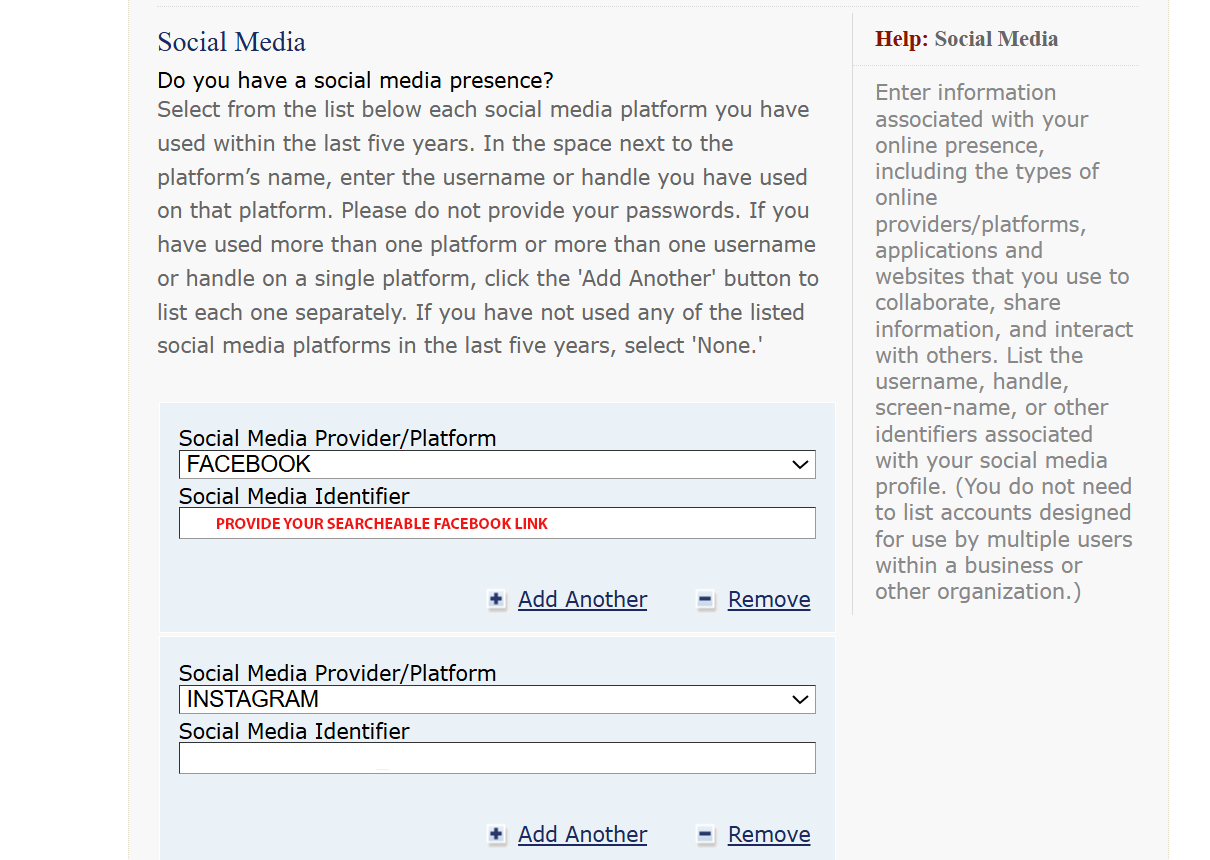
You have to declare everything that’s being asked. Your income, profession, your previous jobs, including the name of you ex-boss or HR, your travel history the last 5 years (if any), and yes po, DECLARE all SOCIAL MEDIA ACCOUNTS set on public mode. I submitted my Facebook, IG, Tiktok and this website that you are currently at.
DS 160 will also ask you for a contact person in the US. Friend, relative or what. Needed po contact and address niya. I was told na may cases, tinatawagan po ang declared contact for verification. Though hindi po tinawagan akin. You also have to declare the organizations you belong to.
Here are some other questions that you have to address. Answer truthfully lang po.
After completion, upload the 2×2 photo file, then review muna. Edit if you have to. Make sure kaya mo mapanindigan all the declared info, as these MAY be asked again during the personal interview.
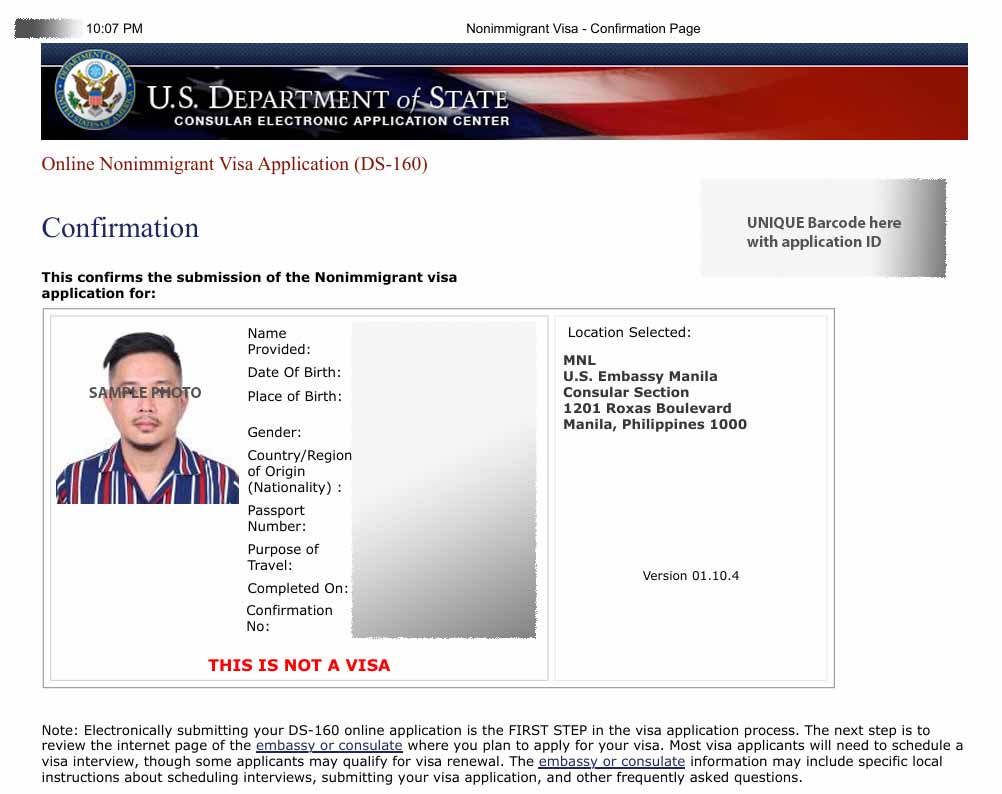
After submission, you will be given a CONFIRMATION LETTER. ganito yun.
Overwhelming ba mag DIY Application? oh mag agency ka na. If ok pa, the read on.
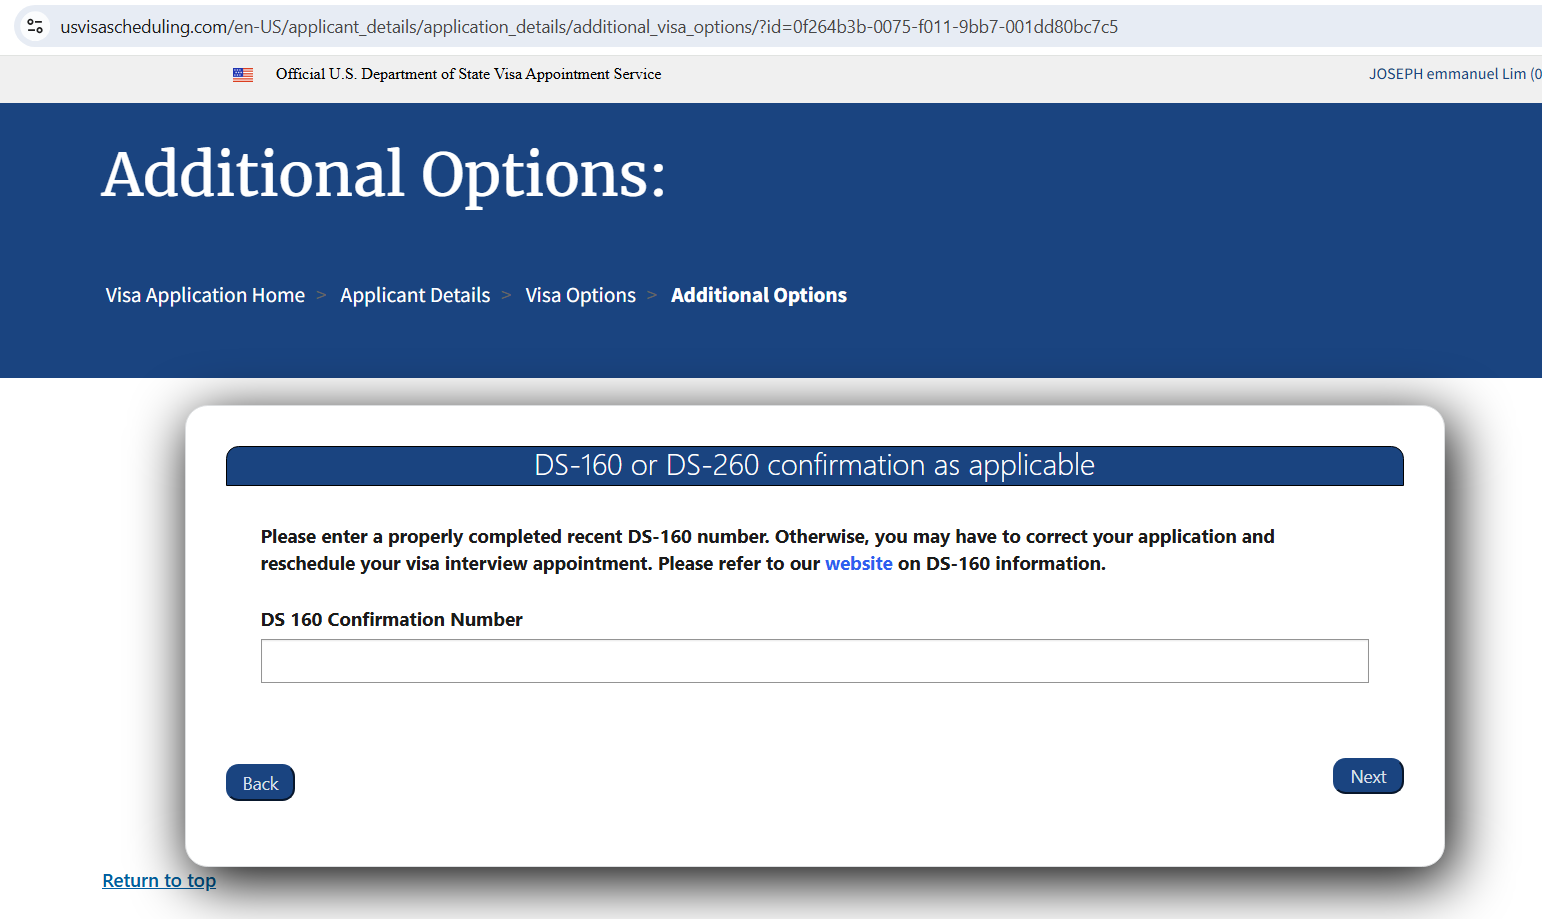
Third Step: Payment of Visa fee before you set the interview appointment. This is done at another website —> usvisascheduling.com. See screenshot below. Sign in with your valid email and contact, log in, then start new application for interview. You will be asked to encode the application number that was given to you with the submitted DS 160 form kanina; nasa upper right side ng confirmation letter.
Just go through the steps until you reach the payment interface. Yes po, payment muna before you get an access to available dates for interview.
The cost of Regular Tourist Visa B1/B2 is 185 USD or 11,100 Pesos as of July 2025. After this, you will be prompted with a Slip/Notice of payment with instructions on how and where to pay. Download and print this slip and submit nyo po sa teller, as they will need to encode also your details at time of payment. Sa RCBC po ako nag-pay, over the counter cash deposit. I also brought with me sa bank my passport at yung DS 160 confirmation letter, just in case. The slip looks like this.
After payment, sabi you have to wait 24 hours for validation. As in my case, I paid at the RCBC Branch nearest sakin at 9 am, and I had my payment reflected na sa website by 10 am. You can check this sa USVisadocs.com account ninyo.
Fourth Step: Select appointment date for Photo and Biometric (fingerprint scanning), and a separate date for interview with the embassy.
Yes po, two appointments: one for Photo/biometrics enrollment and the other for the interview at the embassy.
Previously, the collection of biometrics is done on the same date as with the interview at the embassy. But with the new visa application system, you are required to schedule a separate appointment to the newly launched Visa Application Center (VAC) at Parqal Mall in Parañaque (Manila) for your biometrics enrollment. I read may Visa Application Centers na din daw sa Cebu at Davao that accepts this step. Google nyo na lang. As with my case, Manila po ako nag-process.
To schedule, log in again on your USTravelDocs.com account. Once the payment has already been reflected in your account, you may now proceed with the scheduling. You will first select a date for the biometric, then afterwards, the site will lead you to the available dates for interview.
IMPORTANT: The date of biometric and the interview could be one week apart to a month. That is why it is crucial to apply for visa early, if meron po tayong fixed date or event kailangan mapuntahan sa US. I say 6 to 10 months prior to your desired date of flight.
Overwhelming na ba ng todo? again, pwede po mag hire ng agency to assist you.
After selecting the dates and respective time slots, you will be given slips with your details. Download and print this along with other documents necessary to submit.
Fifth Step: Attend to the scheduled appointments. Yes po, ako na taga Gensan, lipad po tayo to Manila on the dates, and mindful tayo sa timeslot assigned.
Photo and Biometrics Address: US Visa Application Center (VAC). Third Floor, Parqal Mall Building 8, Parañaque, Metro Manila. Phone: (02) 7792 8988. Pretty straight-forward transaction here.
Interview: Embassy of the United States of America. 1201 Roxas Blvd, Ermita, Manila, 1000 Metro Manila.
My interview was scheduled at 8 am, but I was already outside the embassy as early as 5:30 am. Mainit po around 6:30 na. FYI. Pipila po tayo sa labas tlga under the harsh environment. Madaming checking at stages before makapasok sa building mismo.
Essential Documents na dinala ko, as specified in the confirmation letter:
Current-valid passport
previous passports with travel history.
DS-160 Confirmation Letter: (DS-160). Color-printed. US Letter-sized paper
Appointment Confirmation Slips. Color-printed. US Letter-sized paper
Photographs: Dalawang 2×2.
Visa Fee Payment Receipt: Deposit Slip. Photocopy and original.
Supporting Documents na Dinala ko din: PSA Birth Certificate, Valid PRC IDs, Latest ITR ko, at latest bank statement with average daily balance; pero itong bank statement, hindi na po ito hinanap ng interviewer.
If you are employed, needed po to bring your company id and certificate of employment. As per my case, practicing professional po ako. So i brought my PRC ID and the ITR.
I highly suggest you place all your documents in a clear plastic envelope.
Nagdala din po ako black ballpen. I noticed madami nagbebenta ballpen sa labas for 50 pesos.
Hindi po ako nagdala ng Cellphone. Bawal po. Iniwan ko po sa hotel. Bawal din water or food.
The procedure inside the embassy: may initial validation with a filipino employee ng embassy. Parang front desk. Then after this, pasok po sa isang bigger room with windows for the interview proper.
– If your application is approved, they will take your passport. – If your application is rejected or denied, they will tell you right away.
The Interview proper took only five (5) minutes sa case ko, o less pa. It’s very quick because most probably, applications have been evaluated even before the interview. Likely, they already have a tentative decision prior to your appointment, and the interview is just for validation/consistency of declared details as per your DS 160 form. As per my experience, I was only asked what my job is and the purpose of my travel to the US, which I answered “just for vacation/holiday”, and done!
So yun po ang process ng application ko. I clearly remember na generous yata sila sa pag-grant during our date. Lahat kami sa line, magkasunod na approved.
Formula to get an approval? Prove your ties with the PH. As per my case, I feel that my job as a Licensed Architect here for several years already, gave them an impression that I have no plans of finding work in the US, and that my job is stable. My travel history probably gave a good impression as well. Financial situation? I don’t think so, as the officer never asked me to show any document pertaining to that. Baka lucky day ko lang din gid.
In doubt with your chances? I say again, go get an agency to assist you.
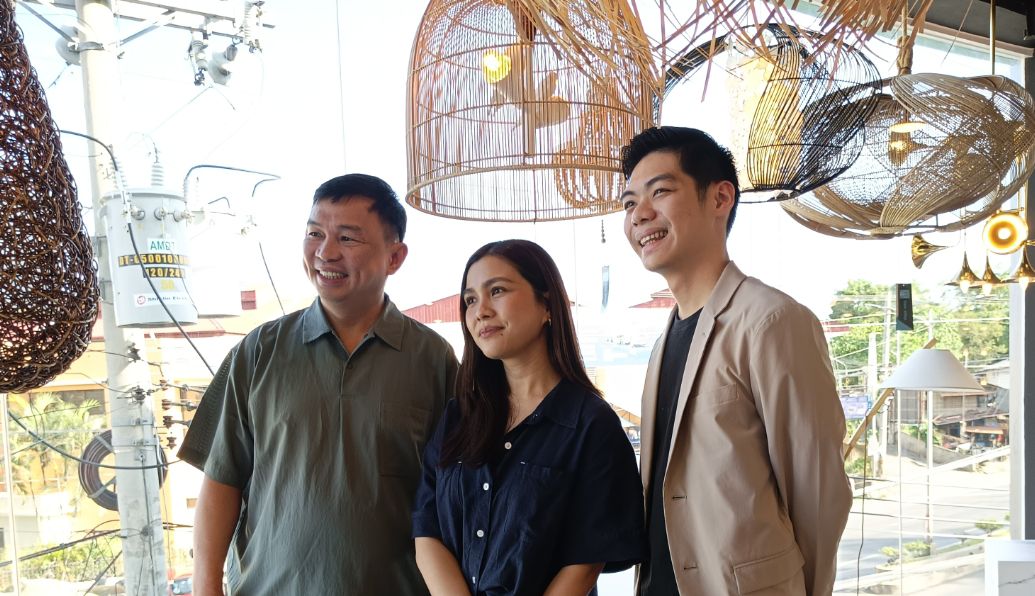
Davao City, Philippines — ilaw atbp., the country’s leading name in lighting solutions, recently celebrated the first anniversary of its first branch in Mindanao. Opened on July 30, 2024, the Davao branch represents a significant milestone in ilaw atbp.’s 26-year journey.
More than just a retail store, it’s a symbol of the company’s ongoing commitment to bringing innovative, high-quality lighting solutions closer to more Filipinos across the country. “Expanding in Davao was a necessary and meaningful step in our mission to light up more Filipino spaces, not just with fixtures, but with lighting that’s designed for each client’s unique needs and vision,” shares Edwin Pimentel, President and CEO of ilaw atbp. “With our own manufacturing facilities and strong relationships with both local and international partners, we’re able to offer exceptional lighting solutions that can be customized for any project.”
(left to right) Edwin Pimentel- CEO and President of Ilaw atbp., Trish Fajardo- Marketing Head, Aldwin Pimentel- Partnerships and Innovations head
The Davao branch, located near Davao International Airport, brings the full ilaw atbp. experience and expertise to Mindanao, starting with LitesPlus, the company’s in-house brand that offers a wide range of high-quality lighting solutions.
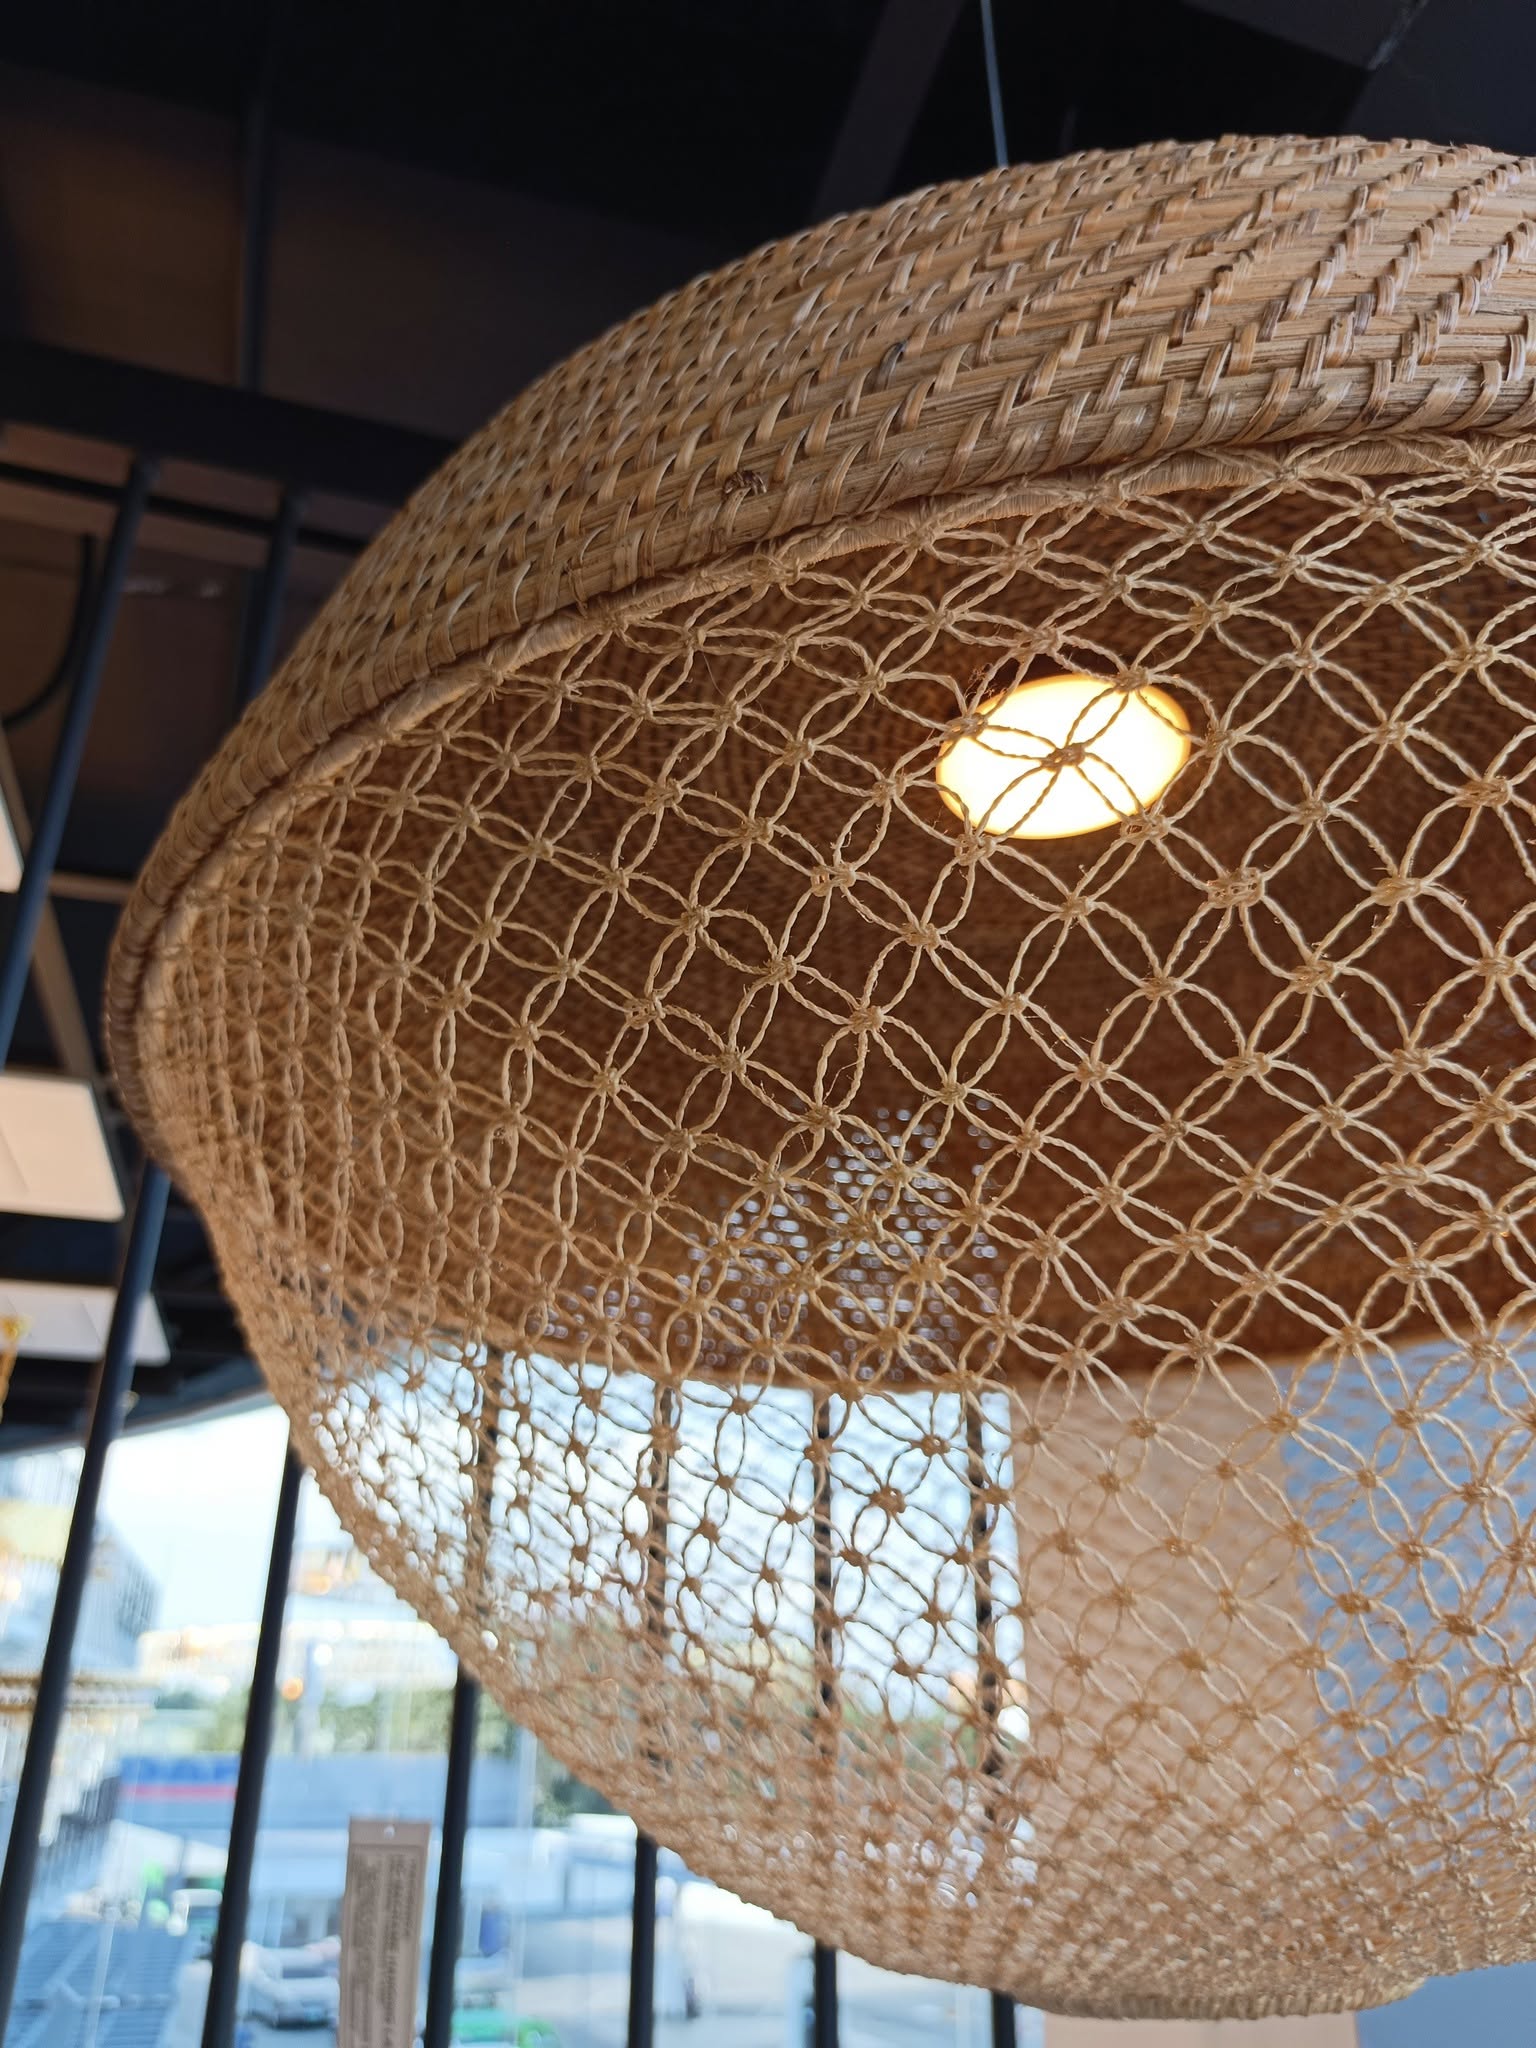
Ilaw atbp. also carry proudly Filipino pieces that highlight local artistry and craftsmanship, alongside the latest in smart home systems and energy-efficient technologies.
One of many handcrafted pieces of ilaw atbp., created in collaboration with Artisans from different provinces of the Philippines
Clients can enjoy personalized consultations with in-house interior designers, access to bespoke lighting design services, and custom lighting solutions tailored to residential, commercial, and large-scale developments. Since its opening, the Davao branch has become a trusted partner to architects, designers, developers, and homeowners, helping transform and elevate everyday spaces. As the brand continues to grow, one thing remains clear: the mission to brighten lives and bring world-class lighting solutions to every corner of the Philippines continues with passion and purpose.
ABOUT ILAW ATBP., CORP. ilaw atbp. is a premiere lighting and electrical solutions provider in the Philippines. For over 25 years, ilaw atbp. has been trusted by businesses, developers, designers, and homeowners to bring their spaces to life through expertly designed lighting solutions.
NUSTAR Resort & Casino Cebu proudly sets “Rhythms of Wellness,” a month-long celebration throughout September 2025 dedicated to holistic well-being. With the vision to establish NUSTAR as a leading wellness and lifestyle destination and a key driver for sports tourism in Cebu, this campaign aims to unite Cebu’s diverse wellness, sports, and lifestyle communities through meaningful partnerships and experiences.
“The theme ‘Rhythms of Wellness’ reflects how wellness takes many forms,” said Mr. Sean Knights, Chief Operating Officer of NUSTAR Resort & Casino Cebu. “Some days call for stride and energy, others for stillness and reflection, and others for strength and perseverance. Each weekend in September highlights a different rhythm, giving guests the chance to explore activities that match their own pace and path to well-being.”
Rhythm of Stride: NUSTAR Run Club
The wellness activities taking place over the month open on September 7, 2025, with the launch of the NUSTAR Run Club, the integrated resort’s running community set to create a new pace — and space for fitness and fun. The inaugural activity will be for the first two sign-ups. Runners will experience scenic coastal paths in and around the resort, with opportunities to connect over post-run coffee and enjoy an upbeat day-club atmosphere with music at the Lighthouse.
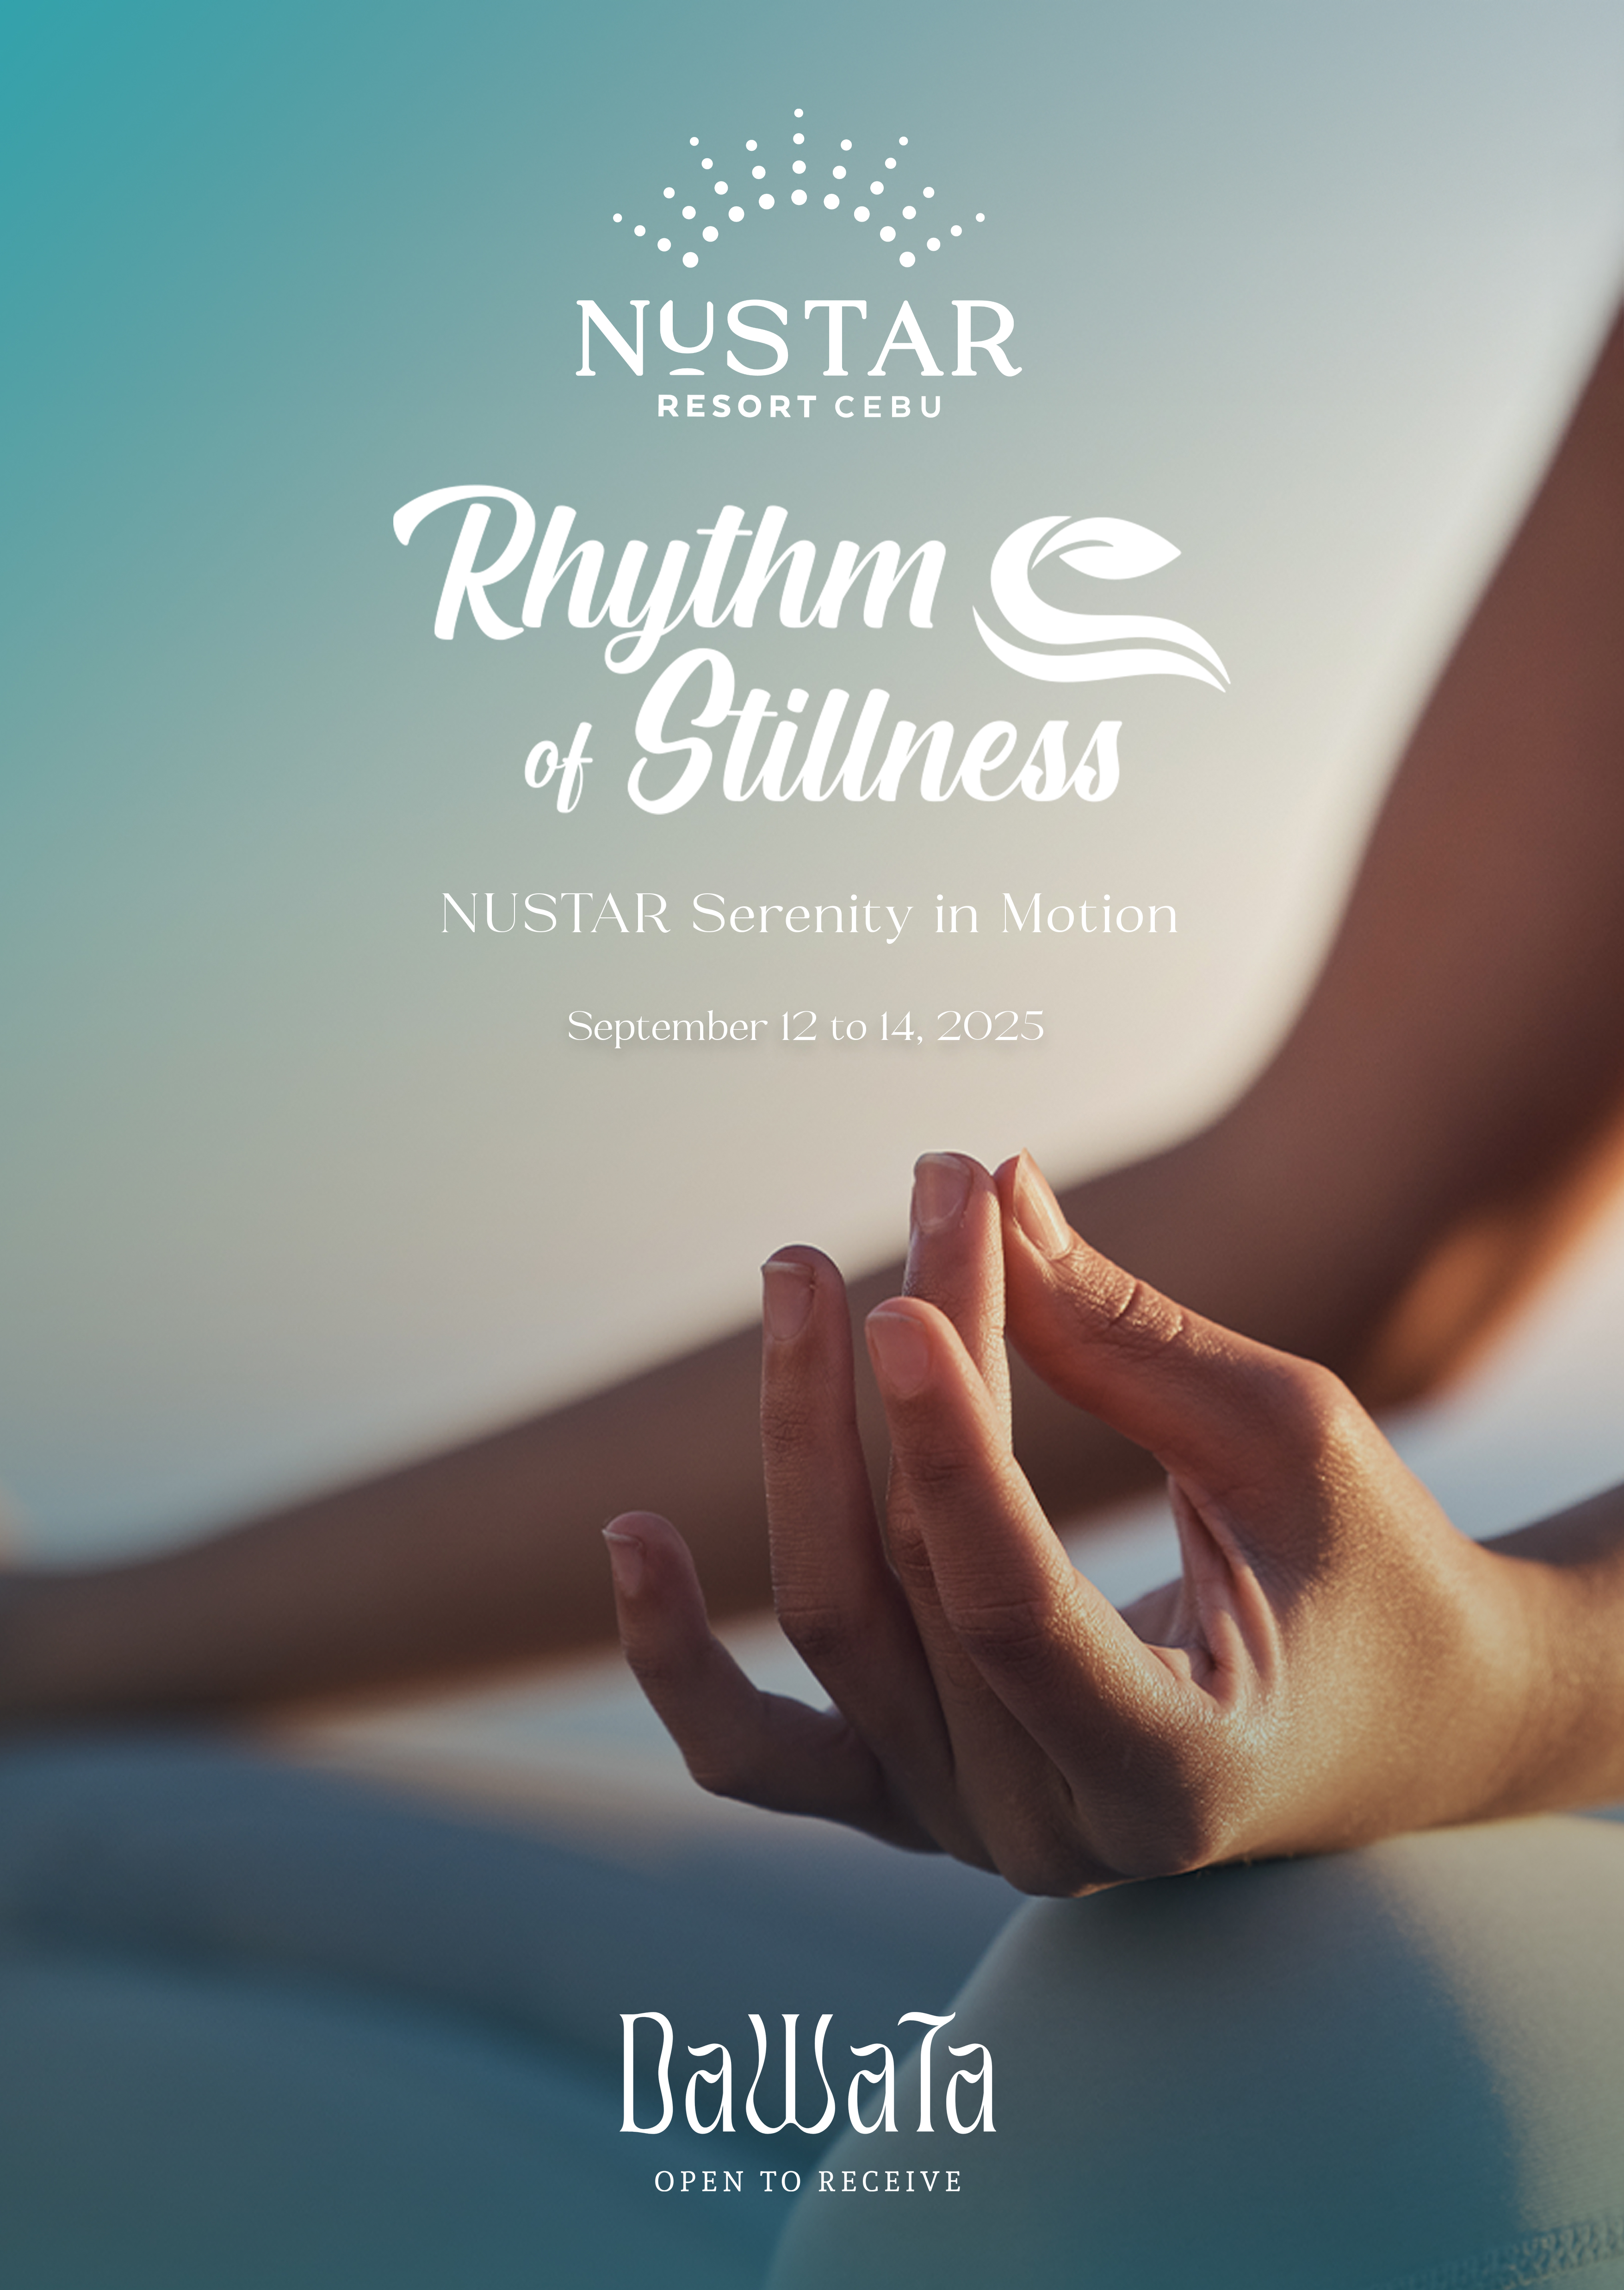
Rhythm of Stillness: NUSTAR Serenity in Motion
The second weekend shifts the focus inward with NUSTAR Serenity in Motion, happening September 12–14, 2025 in partnership with Dawata Wellness. Dawata is a highly regarded and widely popular yoga and wellness community, known for its expertise and commitment to holistic well-being. This three-day retreat is designed to promote mental wellness through guided activities. Guests can take part in tea rituals, meditation circles, sunrise yoga, sound baths, group healing workshops, and ocean breathwork paired with an ice bath experience and more. Participants who register on or before August 15, 2025, can take advantage of an Early Bird rate of ₱1,750 per day. Starting August 16, regular rates will apply: ₱2,000 for the first and third days, ₱2,500 for the second day, or a special bundled rate of ₱5,000 for full three-day access, per participant.
Rhythm of Strength: NUSTAR Dragon Boat Regatta
The month concludes with a show of teamwork and endurance at the NUSTAR Dragon Boat Regatta 2025 on September 20–21, 2025. In collaboration with Philippine Accessible Disability Services, Inc. (PADS) Foundation, the regatta will feature a 200-meter course set along the NUSTAR Boardwalk. Teams will compete in a range of categories, welcoming paddlers of all levels at a registration fee of Php2,500 per person. Another NUSTAR Signature, this event aims to support and promote Sports Tourism here in Cebu.
“Wellness means something different for everyone and that’s why we created Rhythms of Wellness,” said Ms. Katrina Mae de Jesus, Assistant Vice President for Business Development of NUSTAR Resort & Casino Cebu. “It’s about offering choices, from active pursuits to quiet retreats, so guests can engage in the way that suits them best. As a premier destination, we strive to innovate ethically, engage our communities meaningfully, and design events and activities that not only entertain, but endure.” NUSTAR aims to set the tone for wellness-centered events in Cebu by combining world-class facilities with strong community partnerships. This September, NUSTAR invites everyone to discover their own rhythm of wellness. For more details, visit http://www.nustar.ph or contact (032) 888 8282.
About NUSTAR Resort & Casino Cebu NUSTAR Resort & Casino Cebu (stylized as NUSTAR), the Philippines’ first and only premier integrated resort in the Visayas and Mindanao regions, offers world-class entertainment, luxury accommodations, diverse dining, and curated retail. Owned and operated by Universal Hotels and Resorts, Inc. (UHRI), NUSTAR is home to the region’s largest gaming floor, The Mall – the first and only luxury shopping mall in the area, Fili Hotel, The Boardwalk, and the ultra-luxury NUSTAR Hotel. Explore our offerings at www.nustar.ph.
NUSTAR Hotel, the first ultra-luxury hotel in Cebu recently earned a place in the coveted Michelin Guide list of recommended hotels this 2025.
This distinction places NUSTAR Hotel among an elite collection of hotels worldwide, each recommended by the prestigious Michelin Guide for excellence in design, architecture, service, personality and exceptional guest experiences.
Michelin Guide inspectors are themselves seasoned travellers and experts in design, service and hospitality. They travel the globe and inspect hotels anonymously to ensure an unbiased evaluation. Hotels are assessed based on these five criteria and those which excel are recommended for the Michelin Key, a distinction that recognizes exceptional hotels.
A Landmark Moment for Cebu and Philippine Tourism
The addition of the NUSTAR Hotel into the 2025 Michelin Guide Hotel List marks a major achievement for the Philippine hospitality industry, which has long been dominated by international hotel brands.
“The NUSTAR Hotel’s presence in the prestigious Michelin Guide is a proud and significant milestone not just for NUSTAR Hotel, but for Cebu and the entire Philippine hospitality industry,” said Sean Knights, Chief Operating Officer of NUSTAR Resort and Casino Cebu. “This recognition affirms our unwavering commitment to delivering an exceptional hotel product, allowing us to promote world-class experiences that celebrate Filipino culture, elevate service excellence and redefine the boundaries of luxury in the region.”
Along with the Fili Hotel which opened earlier in 2022, the NUSTAR Hotel opened in 2025 as the second of three hotels rising above the NUSTAR Resort & Casino, a prominent icon on the southern coast of Cebu City. The integrated resort complex is operated by Universal Hotels and Resorts Inc. (UHRI), the hospitality and development arm of Gokongwei Group. Since opening, the hotels have distinguished themselves as hallmarks of modern Filipino hospitality at its finest, blending premium accommodation, world-class service and deep cultural identity.
The NUSTAR hotel has 223 spacious rooms and suites and three expansive sea-facing villas. A defining feature of hotel is personal butler service, provided by a team of butlers trained by Heilbron Hospitality, one of the world’s most respected institutions in hospitality training.
This recognition by the Michelin Guide resonates beyond the hotel itself, heralding a breakthrough for Philippine tourism and the country’s confidence and readiness to welcome discerning luxury travelers seeking authentic and meaningful travel experiences delivered with genuine Filipino warmth.
More information and reservations are accessible from the hotel website http://www.nustar.ph or thru the Guest Services Center (+63 32 888 8282).
About NUSTAR Resort and Casino Cebu
NUSTAR Resort and Casino Cebu (stylized as NUSTAR), the Philippines’ first and only premier integrated resort in the Visayas and Mindanao region, offers world-class entertainment, luxury accommodations, diverse dining, and curated retail. Owned and operated by Universal Hotels and Resorts, Inc. (UHRI), NUSTAR is home to the region’s largest gaming floor, The Mall – the first and only luxury shopping mall in the area, Fili Hotel, The Boardwalk, and the ultra-luxury NUSTAR Hotel. Explore our offerings at www.nustar.ph.
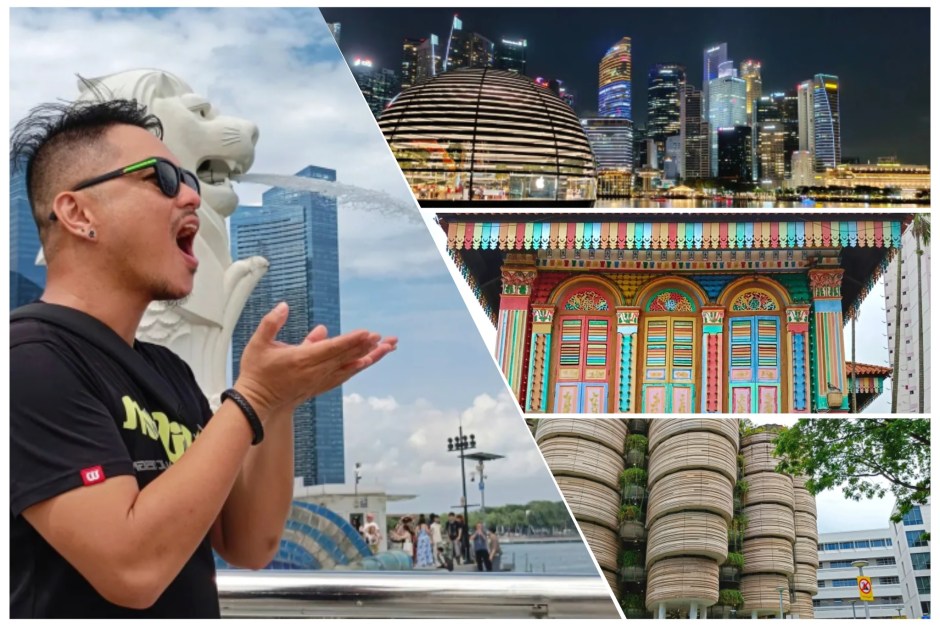
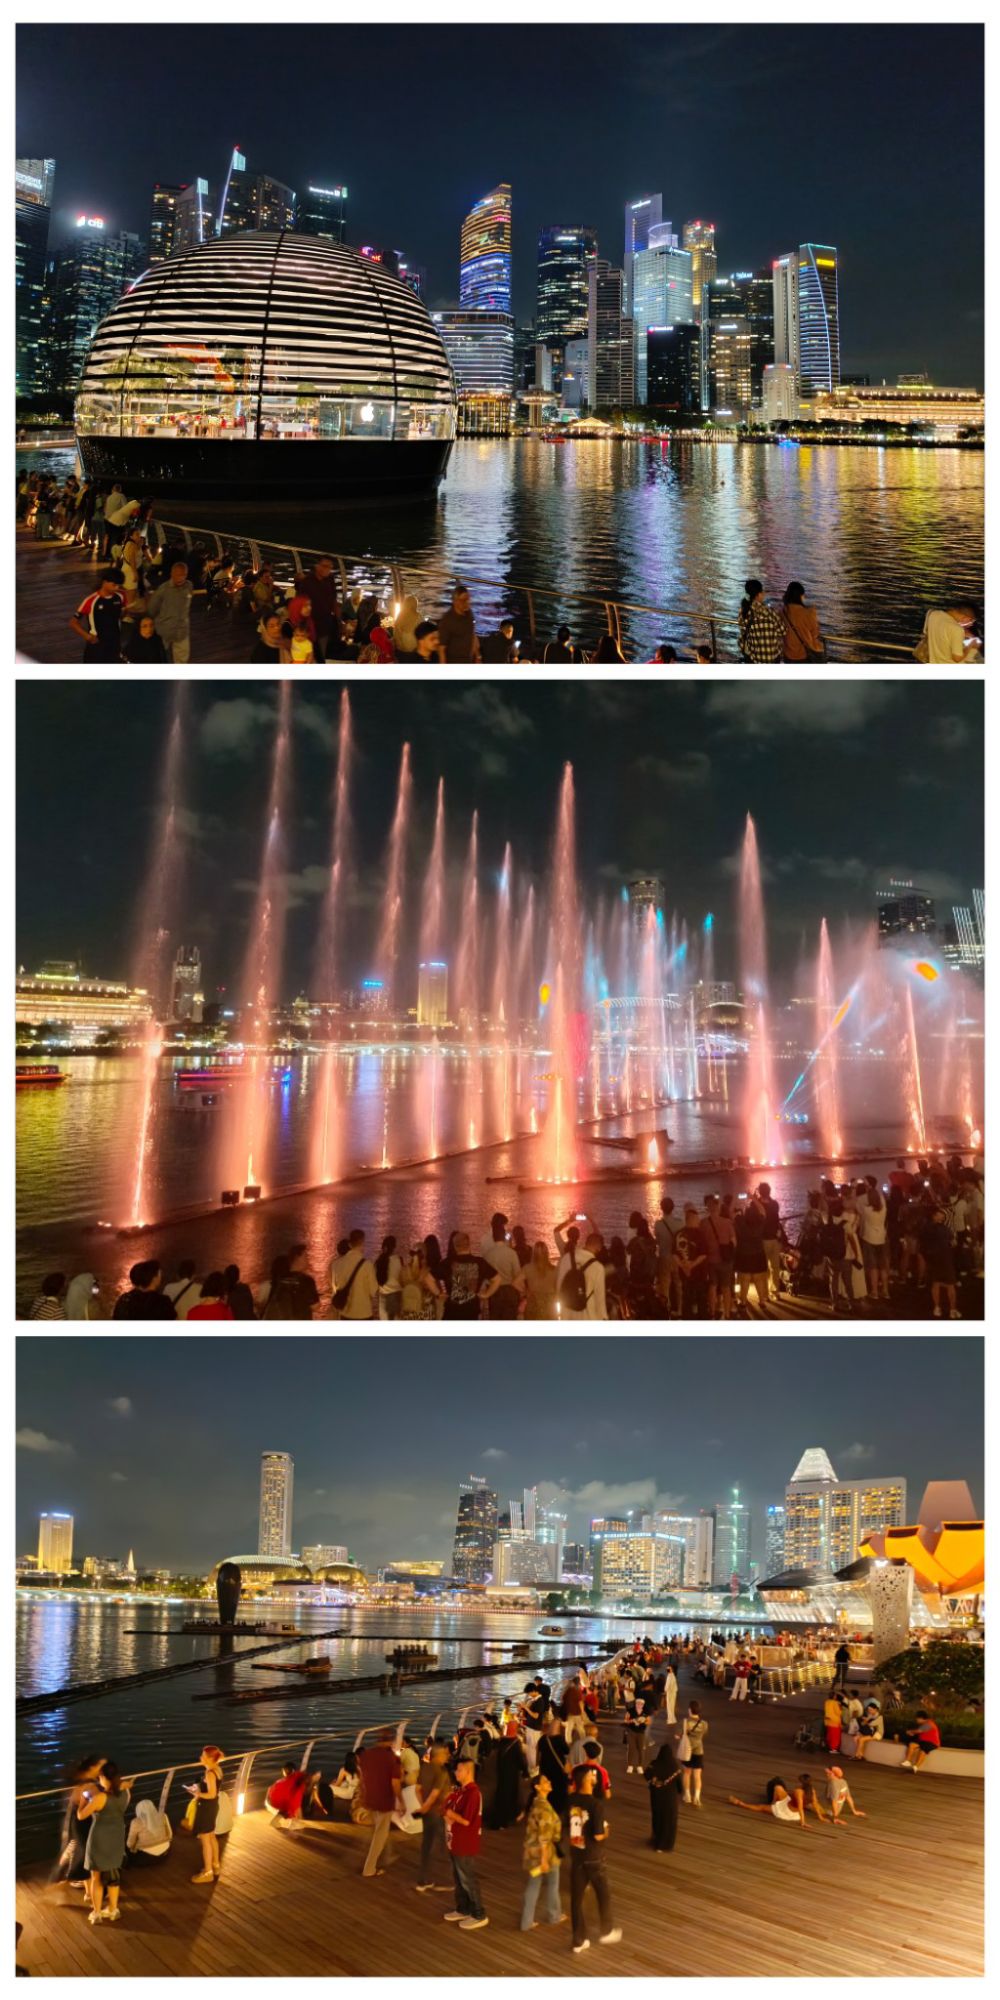
Yes, yes. Singapore is known to be expensive. But with the right research and preparation, there are actually a lot of great things that tourists can do, without spending a dime on entrance fees.
The secret to maximizing your Singapore trip: The Singapore Tourist Pass and an ample amount of Data to stay online.
THE SINGAPORE TOURIST PASS– buy this at Changi Airport and you get unlimited train and bus access around the whole Singapore within the desired number of days. I bought the 5 days pass for 45 SGD, but there are 2 and 3 days package as well, for less. I also downloaded the SG MRT (Train) app. The bus routes, I checked from time to time on google. As such, staying connected is necessary. I purchased a LOCAL DATA SIM (Singtel) via KLOOK, which I conveniently claimed at Changi airport upon arrival. The Klook lady at Changi T2 assisted me re the sim registration. The Singtel Sim only cost me less than 400 Pesos, and 100 GB yun ha. Na-appreciate ko gid ang Klook ba.
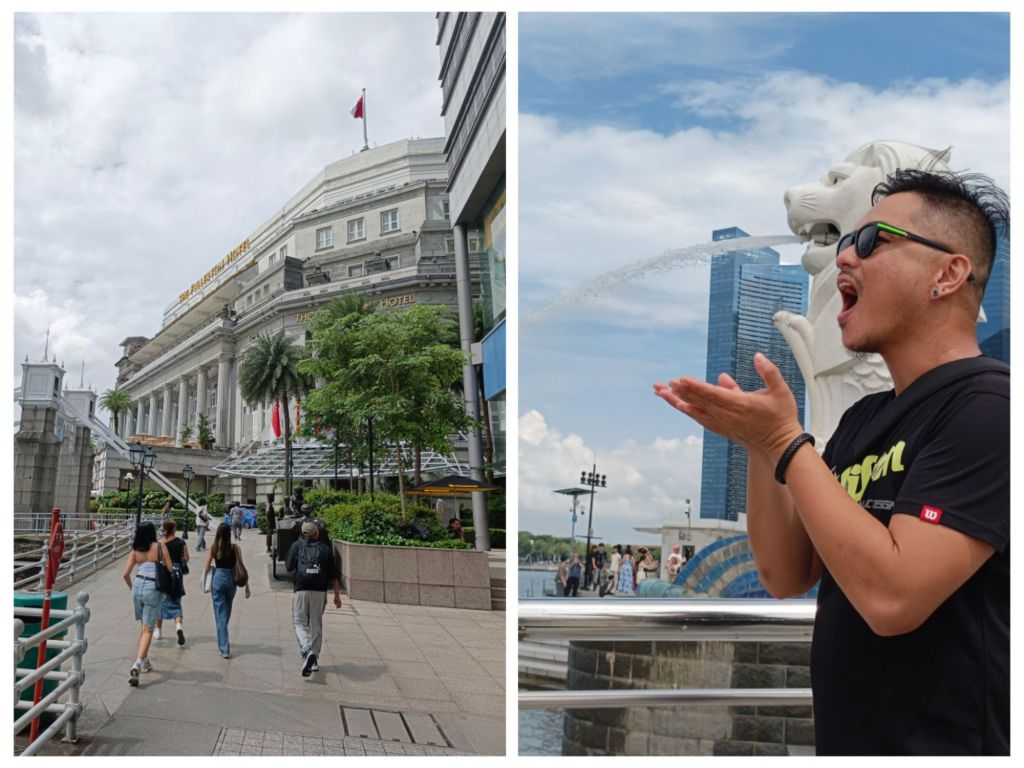
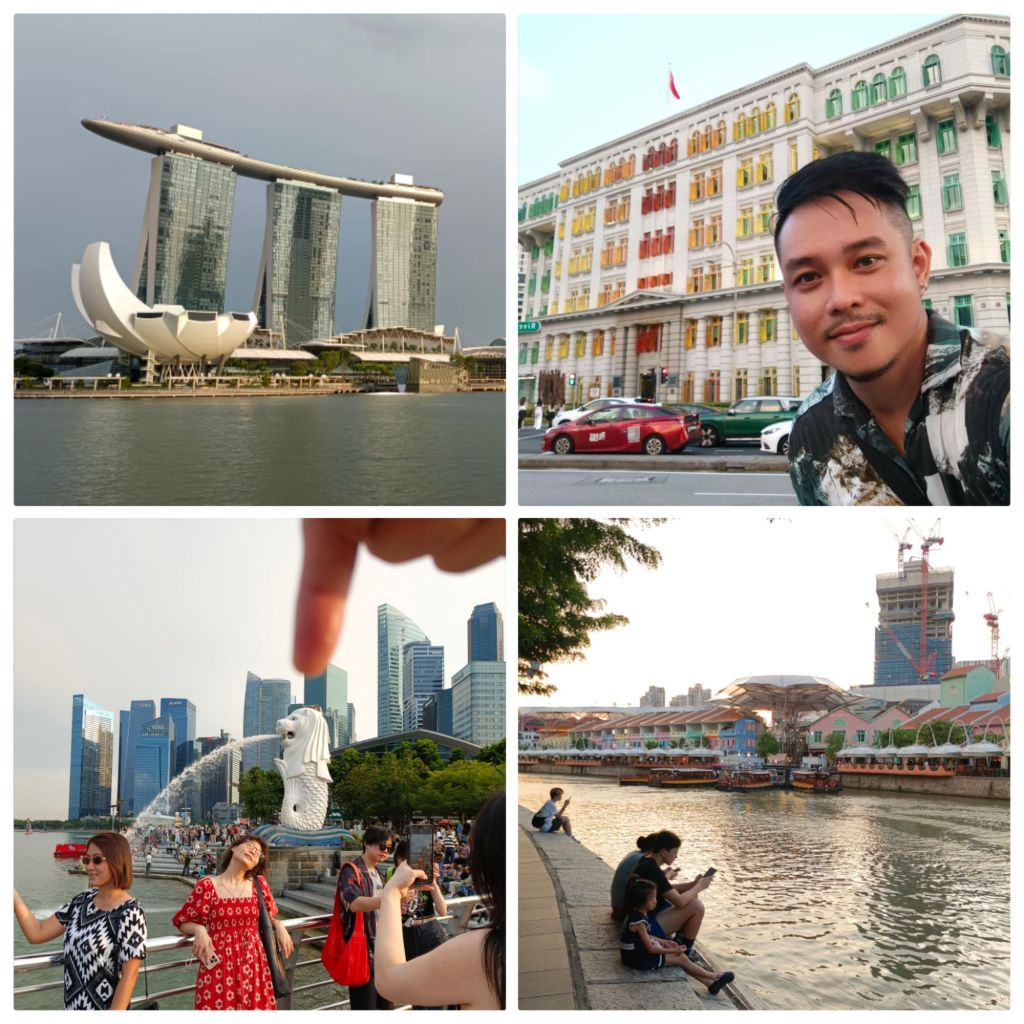
So yun pag tourist ka and first timer, syempre aaura ka dun sa Merlion and the Marina Bay area, which I also did. The whole of Bay area and Singapore Central Business district is actually very interesting to see. Importante lang gid may data ka.
Marina Bay Sands, Fullerton Hotel, Old City Hall, Clark Quay and all those colorful buildings along the way. Walkable ito lahat.
Visit the NANYANG TECH UNIVERSITY. Madami interesting Architecture sa loob ng campus. And these buildings area free to visit naman pero wag ka na pumasok sa mga lecture floors ha. Baka mapreso ka. Matagal ko na pangarap magvisit sa campus. In fact, I once aspired to study here, kaso the financials will not work for me. The piled-up circular building below is known as The Hive. It is one of Nanyang Tech’s marvelous architectural feature.
To get there: PIONEER Mrt then take the Bus 179 na iikot sa buong campus. Dami din cheap eats around, kasi nga students ang market ng area.
Another architectural marvel that I did not miss to visit was The Geneo Mall at Kent Ridge Park. It is one of Singapore’s newest mall na palaban ang interiors, featuring engineered wood arches, glass louvers, lots of indoor greens and an ample skyklight to brighten up your day. Char. Bsta maganda ito and the Mall is directly attached to Kent Ridge Metro Station.
To get there: Kent Ridge MRT.
At syempre colonial mentality tayo, I also made time to see the Newest Starbucks in Singapore sa Chinatown, malapit sa Buddha Tooth Relic Temple. They also say this is SG’s prettiest Starbucks and I will not argue with that. This store is set up in an old colonial/heritage house. If you are a Starbucks merch collector, this branch has the most SG items available.
How to get there: Chinatown MRT or Maxwell MRT (which is harap lang ng Buddha temple). And while you’re there, mag Maxwell food center na din kayo mga auntey.
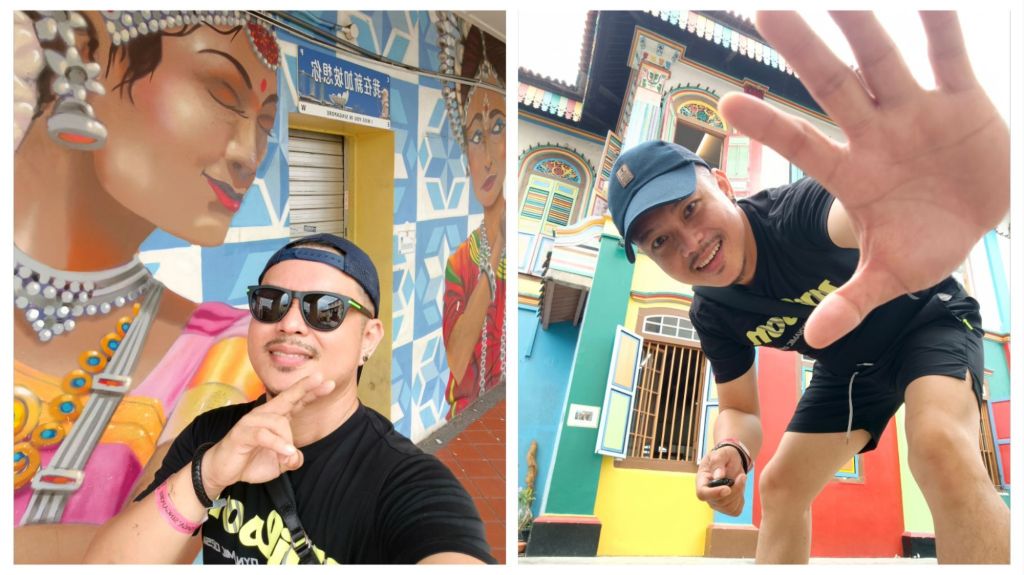
Explore Little India. Little India is also a very interesting district to explore, kase sobrang unique at foreign din ng vibe nya. Yes, madami po Indians sa Singapore, so much that they were able to form a dedicated area. I posted several tiktok videos of me exploring Little India. Check nyo sa link dun sa dulo ng article na to.
No secret, Little India din ang cheapest area in SG to stay and for foodtripping. I swear, sobrang hefty ng meals dito.
How to Get there: Little India MRT station and explore on foot. If you can, go to Mustafa Center for cheap shopping. The Cheapest in the island, legit.
You’ll find the colourful House of Tan Teng Niah in the heart of Little India – it’s a fav with the instagrammers! 😍 Also pag nahanap mo na building na ito, the food center in front of this serves the best Chicken Biryani and Masala in my opinion.
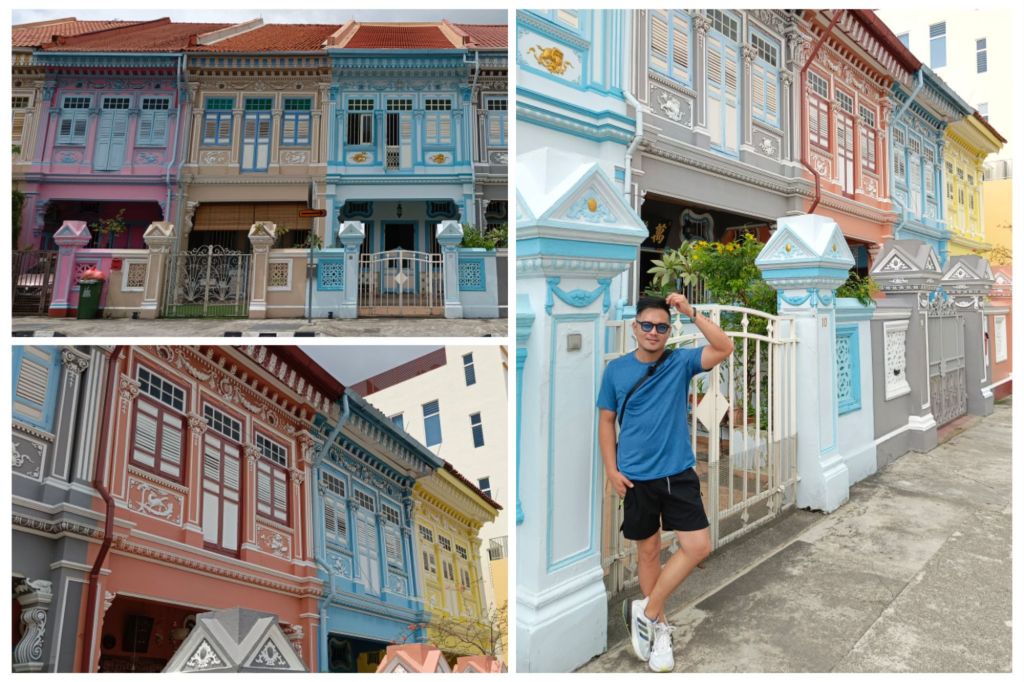
Another interesting place to see in SG are the well- preserved Peranakan Houses at Joo Chiat, malapit sa Old Airport Road. Peranakan Houses are colonial Portuguese-Chinese residences of the earlier days, owned by the Mestiso Chinese of the middle to upper middle class. Very Vibrant ng area na to, fit for pictorials and all that kineme.
Hot to get there: Bus lang po. I remember 154 basta google mo nalang. Also madami din Vietnamese restaurants na affordable dito na area, aside sa Chinese restaurants, of course.
And while in Peranakan, I looked for this Ay Yeeh Soon Kueh, a traditional Chinese-Singaporean food stall that is often visited by locals. Nasa likod lang ito ng Peranakan Houses. Naenjoy ko din ang vegetarian (bamboo shoot) dumplings at sticky mushroom and rice. Affordable also.
Ok pag sawa ka na sa view from the ground, try mo naman ang panoramic view of the Marina Bay from the 51st floor of CAPITA SPRING BUILDING. As much as gusto ko e-gate keep, pero eto na. Free ito ha. Wag kayong ano. May bar/Cafe din kase sa taas. mag chill ka dun. cool siguro din dito pag gabi. no?
How to get there: Walk2x ka lang sa Central Business District. Pangitaa!
Gardens by the Bay is also worth visiting, especially at night. The front area is a public (Free) place naman, you only pay the entrance lang pag papasok ka. Ok na ako sa labas, kapoy na din.
And to cap the night, see the Fountain Show at the Marina Bay Sands. I attended the 8pm show. this is free for all.
Cheap Eats : skip the malls and fancy restaurants. Go for Hawkers Center and Food Courts. Happy na ako dun. Promise.
Featured meals below : Masala Chicken Biryani Rice from the food court in Little India, the Old Airport Road Wanton Noodles and the Laksa meal I had from the foodcourt at Pioneer Station on my way to Nanyang University. Mura ito lahat. 5 to 8 dollars.
Bonus Ganap: Experience the Suntori Robot Barista at Duty Free Departure lounge of Changi Terminal 2. Free lang ito din. Surprise nga ako nahanap ko to. Go check out the Robot Barista on my Tiktok here.
Where I stayed: Spacepods at Paya Lebar, near the Singapore National Stadium, because I watched Lady Gaga Live in Concert. See Snippets of Mayhem Singapura here. I will post about concert preparations separately. Dami ko din tikal about that.
As a certified foodie, sampling on local dishes is something I look forward on every trip. Here are Five hefty and memorable local meals I had from my recent trip to Central and South America. All cheap and casual.
Carne Mechada Casado (Costa Rica)
Casado is a traditional complete meal in Central America, consisting of rice, black beans, plantains, salad, a tortilla, and a protein. I had this at a food court inside public market in San Jose. Their public market is probably the cleanest, most well-maintained public market in any third world country.
Bandeja Piasa (Bogota,Colombia)
I had this hefty plate of Bandeja Paisa, so i can try various dishes in one seating. Bandeja Paisa is a traditional Colombian dish that contains beans, rice, arepa, traditioinal chorizo, plantain, chicharrón, avocado and marinated ground beef (like arroz cubana). I’ve noticed that Latins serve avocado as a side without any sweeteners; in contrast to us who only appreciates the fruit when it’s mixed with something sweet and creamy.
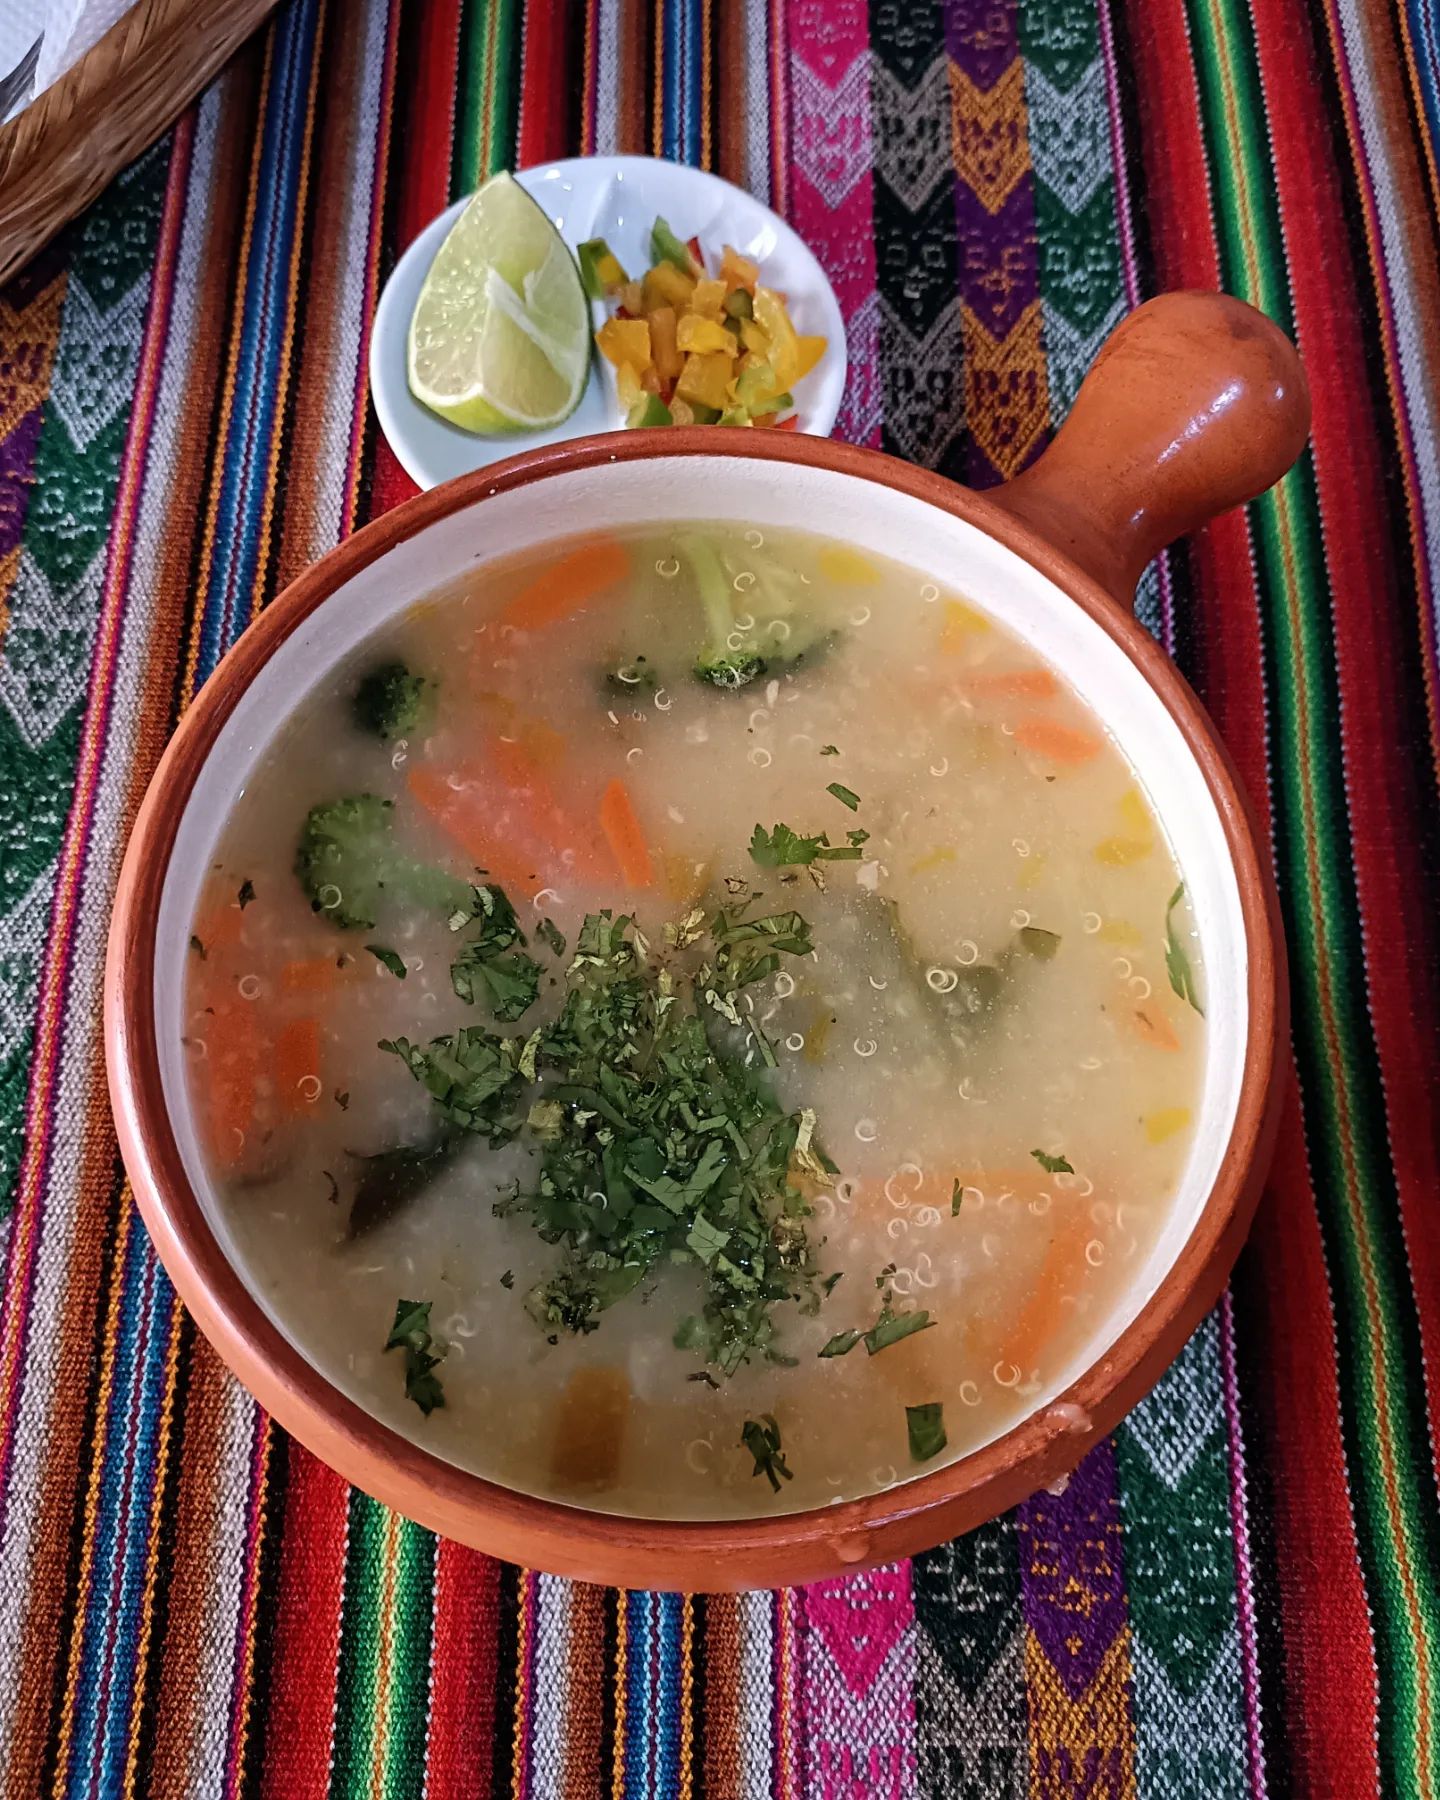
Trusca Frita (Ollantaytambo,Peru)
One of my fave set meals in Peru. trusca\trout is a local\Peruvian freshwater fish. Taste is very comparable to our local bangus, except that trout isn’t as boney. Speaking of fish, Peruvians are also popular with their Ceviche (raw fish salad), but for this trip, I had to pass on it. I avoid raw fish dishes whenever I can.
Trusca is usually served with Quinoa Sopas. Originating from the Andes Regions of Latin America, quinoa is a common and cheap carb consumed in Peru. Meanwhile, quinoa is quite expensive here in Ph.
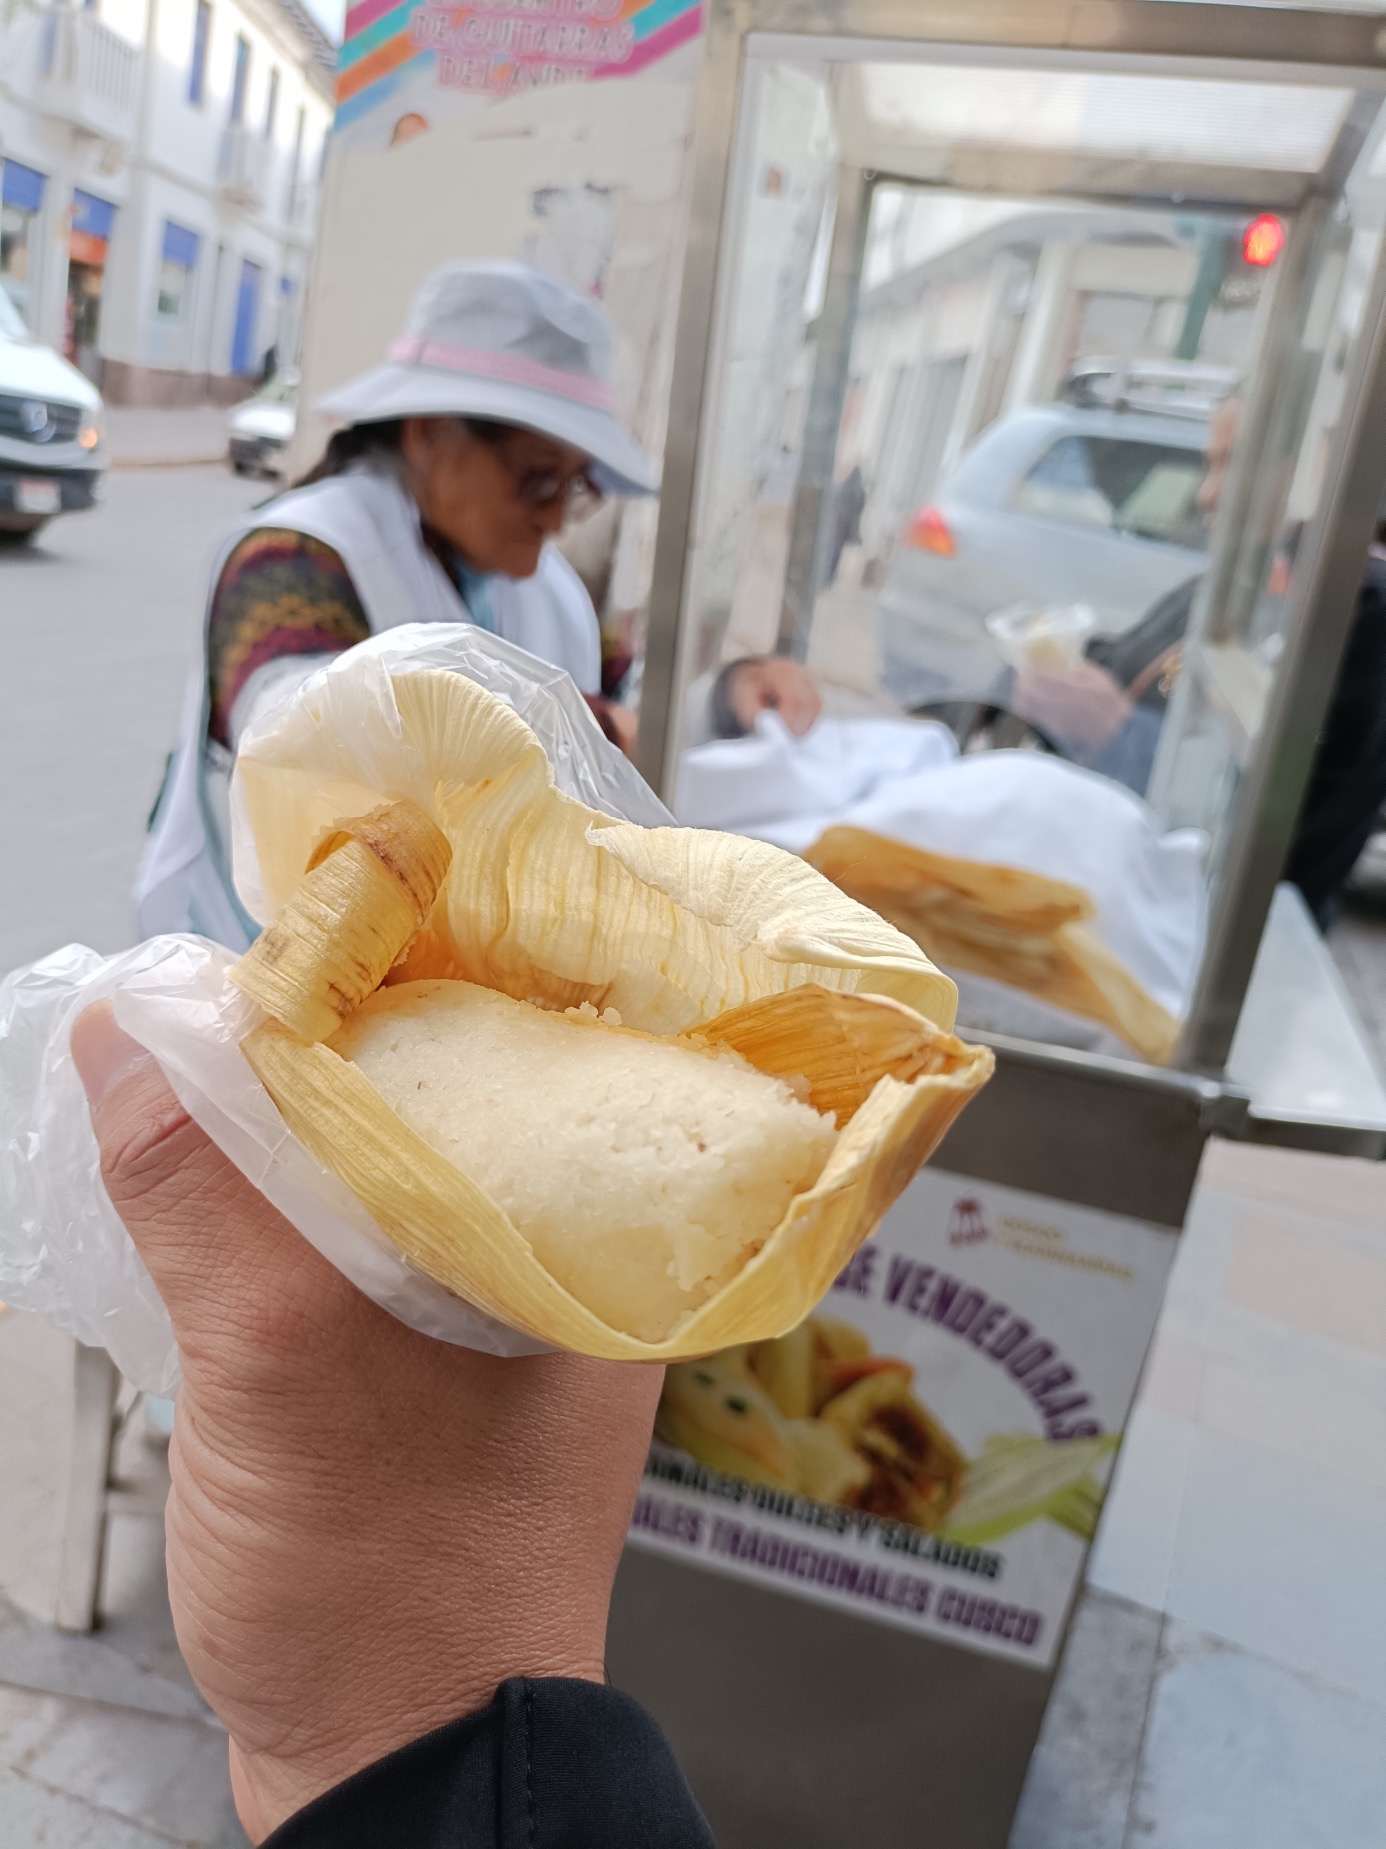
Peruvian Chicken BBQ (Cuzco,Peru)
The Butterflied chicken, marinated with vinegar and spice rub, slow-cooked on the grill and served on a bed of brown rice and Salsa. Not in photo, but this is served with traditional Aji Verde or the spicy green sauce.
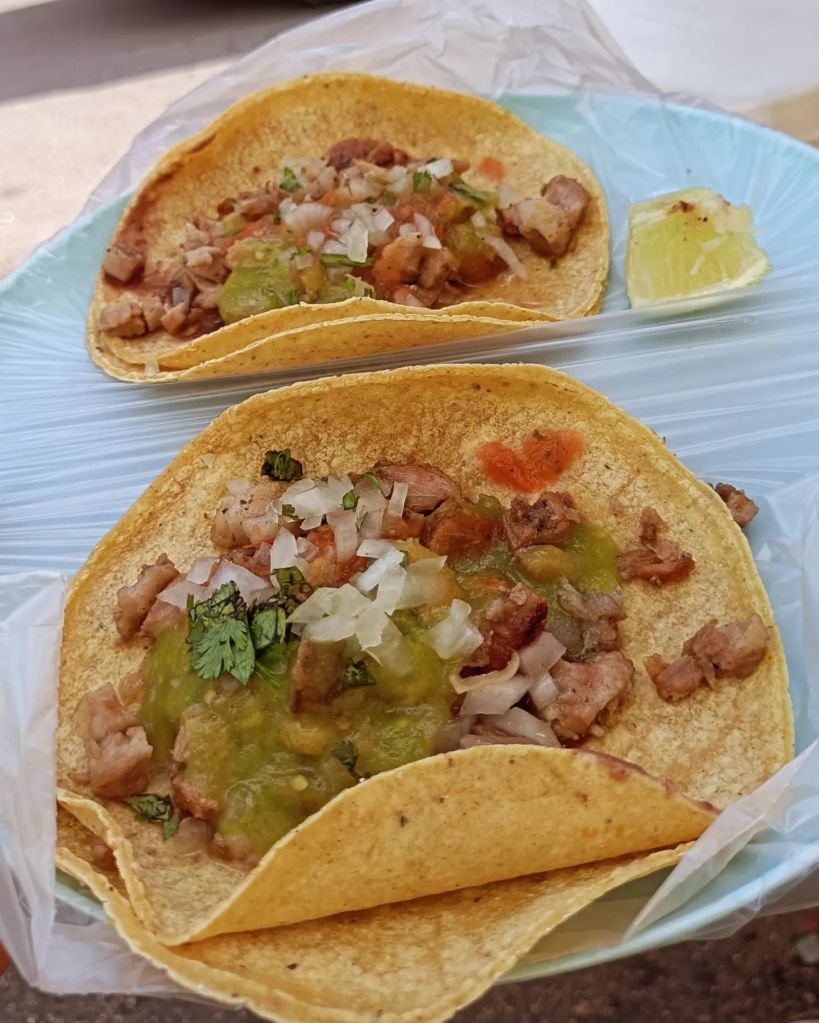
Street Tacos (Cancun, Mexico)
Taco is probably one of Mexico’s greatest contribution to the world. I had great tacos from random vendors, di ko na na-document lahat. Mahal dito sa Pinas pero street food lang talaga ito sa Mexico. Saya!
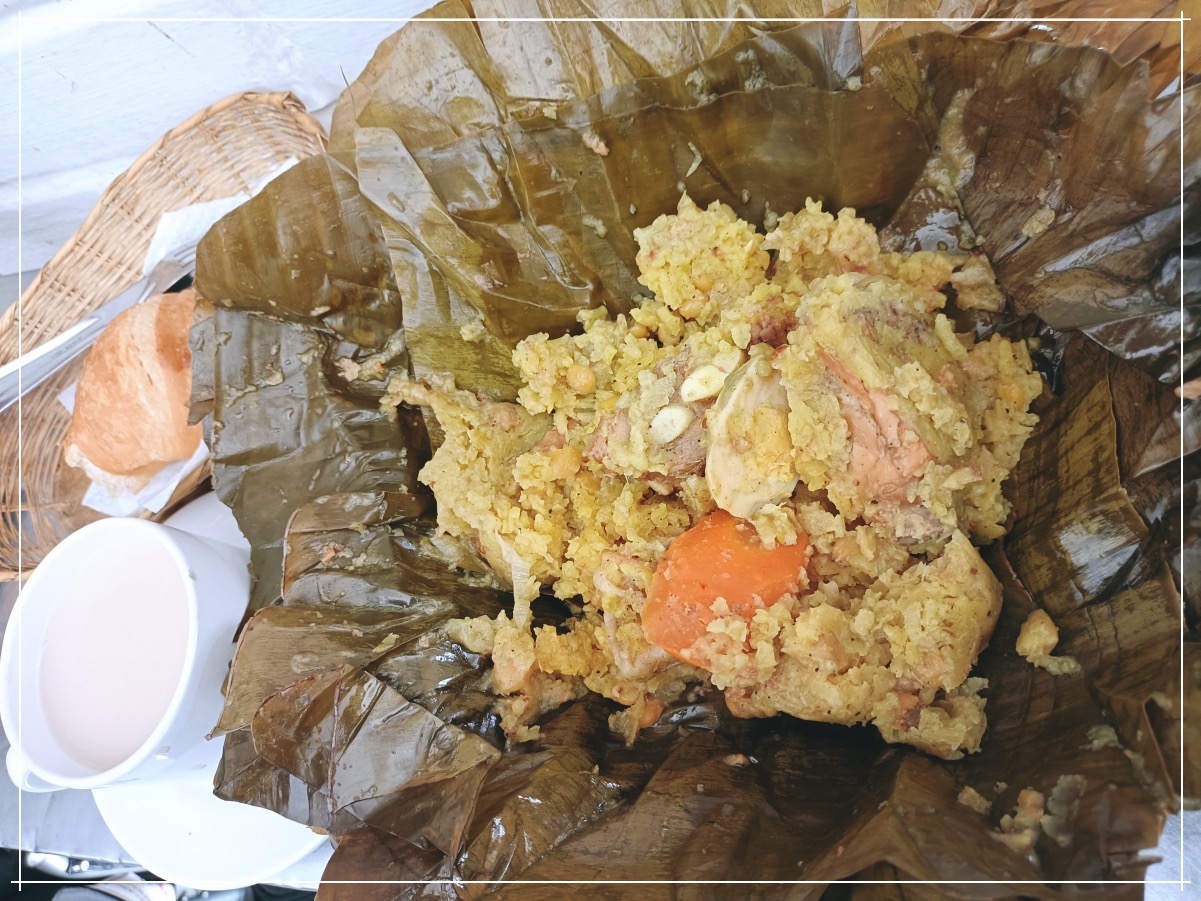
The Different Types of Tamale in Latin America. Tamales have a long history in Latin America, dating back to ancient civilizations and playing a central role in culture and religion. Tamales were originally created as a packed meal for hunters, warriors, and travelers. They were also considered sacred and were offered to the gods in rituals and feasts. Tamale is Latin America’s answer to our very own Pastil of Mindanao.
Tamale of Colombia. I’ve had different types of Tamale during my travel, but Bogota gave me the best one. It’s packed with fragrant yellow rice and corn combination, carrot slices and chunks of braised pork rib and chicken, plus complimentary bread and coffee. Mura lang ito, around 100 pesos if converted.
Tamale from Yucatan, Mexico. Yucatecan tamales can be prepared baked, steamed, or even buried, and are wrapped with different leaves, such as banana, almond, and holly leaf (hoja santa). Unlike Colombia’s rice-based pack, the Mexican tamales use corn dough as carbohydrates, then filled with pork or chicken, egg, ground pumpkin seed, chaya, or xpelón, which is a type of bean from the region.
Sweet Corn Tamale, Cuzco, Peru. I also tried tamale at its simplest form. This steamed pack is just filled with corn dough and sweet corn bits, wrapped with corn husk.
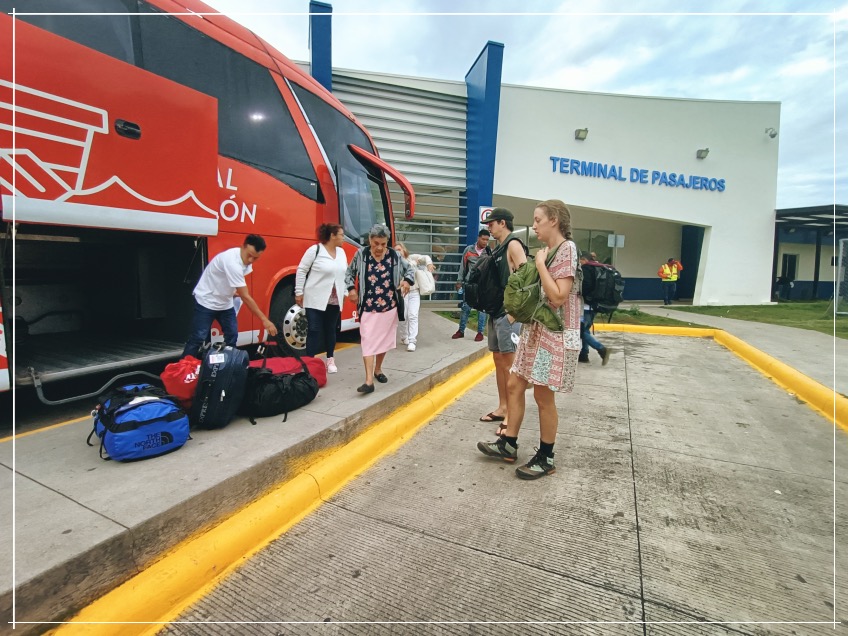
As backpackers, we like to tick as many countries as we can off our travel bucket list. Personally, gusto ko ng land travel kasi it’s cheaper, and I get to see more and eat more sa mga stops. Though crossing land border between countries is quite a challenge and scary compared sa airport set ups, I still wanna do it anyways. Ibang level of excitement, tbh.
This was my route: Costa Rica – Nicaragua – Honduras – El Salvador for 8 days. Supposedly kasali pa Guatemala, which should have been my last stop. But that time, major political rallies happened, that resulted to border lockdowns, as it was unsafe. I was forced to cancel my ticket from Guatemala to Los Angeles,USA, and instead booked a last minute flight from San Salvador,El Salvador. Around 25% of my unused ticket was refunded by Avianca Airlines.
Things to research on and prepare before travelling around Central America by land:
Visa Requirement
Travel between countries by land with Tica Bus Company
Land Border Crossing scenario with lots of small dollar payments and LANGUAGE BARRIER GALORE
Visa Requirement:
As far as I know, Philippine passport holders can enter Central America Visa-free only in Costa Rica. However, Panama, Nicaragua, Honduras, El Salvador, Guatemala and Mexico MAY allow Filipinos to enter their territory without a pre-approved travel visa, provided, you have a VALID and CURRENT US/American Tourist Visa. Though this policy may change, check updates nalang. During the time I travelled, my valid US Visa gave my weak Ph passport some added power, so to speak, in the Latins.
Upon my arrival in Costa Rica (by plane), not a single question from the immigration. Go lang ako ng go. Sabi ko nga on my previous post, PARANG PINAS LANG ANG COSTA RICA. The succeeding crossings however, ibang kwento na.
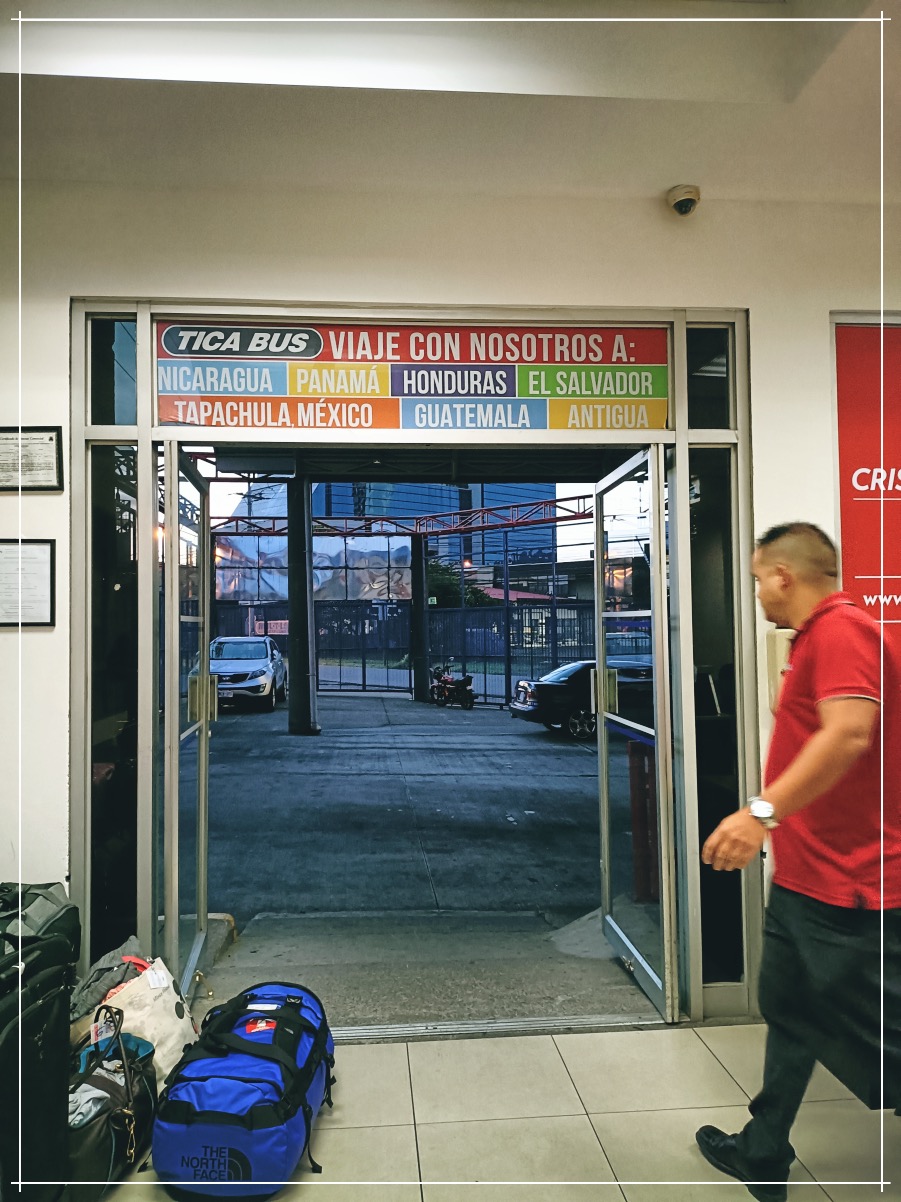
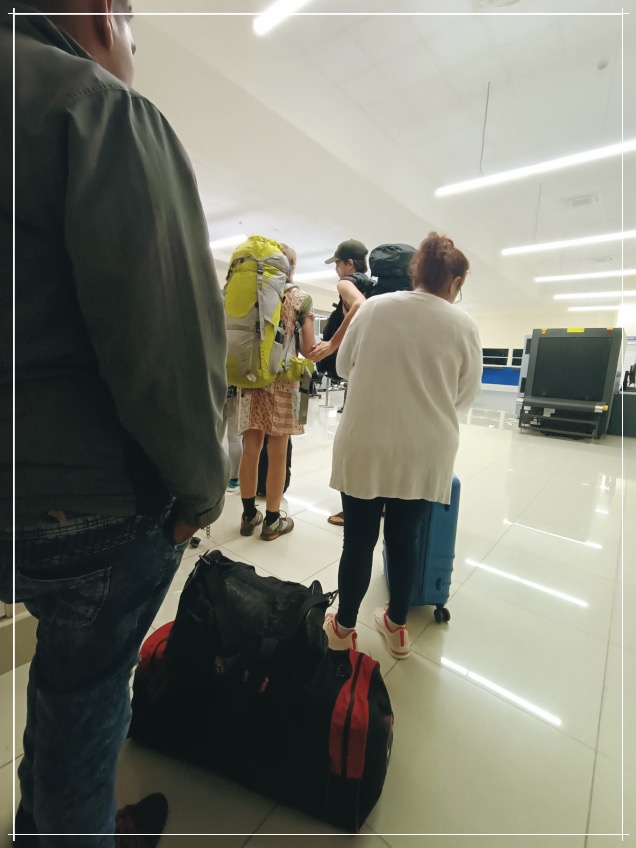
Travel between CA countries by land with Tica Bus Company:
Tica Bus is our Friend.
During my travel, I visited 4 Central American Countries. If i had the luxury of time, I would have visited more. I could have started my journey in Panama, then travelled by bus to Costa Rica, Nicaragua, Honduras, El Salvador, then proceeded to Guatemala, Belize and Mexico. These united Central American Countries are well connected by Tica Bus Company.
Added tip, I did a lot of readings and tanong-tanong on Tica Bus, to the point na I opted to choose a hostel that is relatively near the Tica Bus Terminal. FYI, iba ang Tica Bus terminal sa public bus terminals. Tica Bus, i feel is more oriented towards serving tourist.
Yes, possible na today to Reserve Tica Bus ticket online on this link. Just change the language to English sa top right corner. Website is pretty straight forward. Paid by card and reservation vouchers and receipt were emailed to me. The terminal locations are also given sa website.
Border Crossing Costa Rica to Nicaragua:
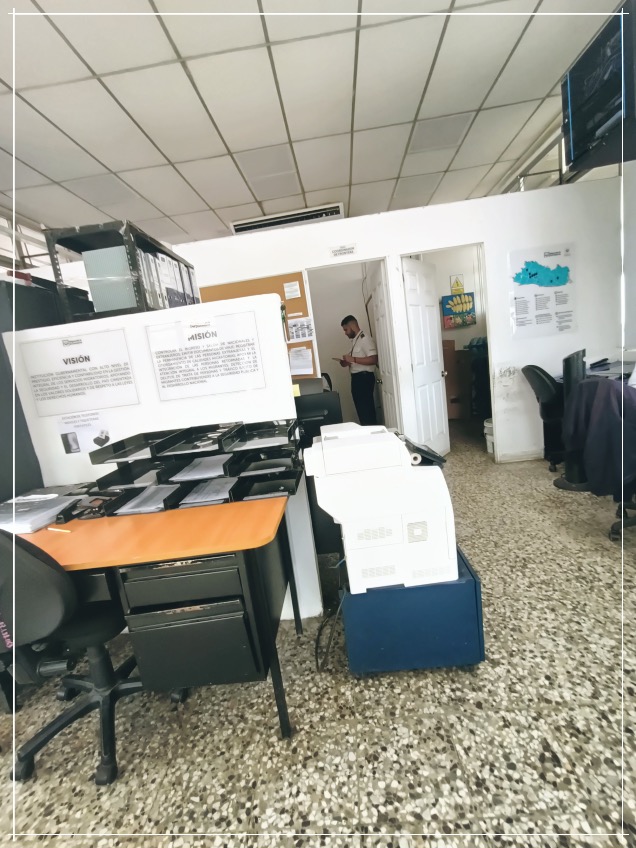
I took the 7:30 am bus from San Jose, Costa Rica to Managua, the capital of Nicaragua. Arrived in Managua at around 7pm na din. The border crossing came out OK. Though it required some few minutes of walking between border controls, thank God it did not rain. Bus fare: 33 USD
I paid an Exit fee of i think 7 USD at the Costa Rican Exit border control. Yes, may ganun. Kahit Visa Free supposedly for Filipinos, plot twist, may exit fee pala!
At the Nicaraguan entry-border control, I showed my Philippine Passport with Valid US Visa, so I was asked to line at a different booth. My passport was passed on by several officers. After a few minutes, I got it back. I paid a mandatory 10 USD for Tourist Card, which serves as my entry ticket to CA-4 countries (Nicaragua,Honduras,El Salvador and Guatemala). If I did not have a Valid US Visa, i will not be allowed to do such privilege, and would have to go through the embassies of each countries prior to my arrival. On top of this, I also paid 1 or 2 USD for whatever fees nun. Language was also challenging at the Nicaraguan border, though the driver of Tica bus assisted us on this.
BTW, At the border, there were freelance folks that offer change in money/currency. Though it is not advised but I changed 50 USD to Nicaraguan Cordoba. Money was authentic. I did not encounter any problem using it. Managua landmarks on photos below.
Border Crossing Managua to Honduras then to El Salvador:
From Managua, i took the 2 AM Tica Bus to San Salvador, the capital of El Salvador. Bus Fare: 63 USD. This took around 14 hours travel. I remember arriving at San Salvador pass 4 pm. The Bus route passes through Honduran Territory, as such, may border crossing moment ulit. This was actually the most difficult for me, among the land border crossings I did during the trip. Super Shady ng perimeter ng building nila. The Honduran officers never exerted any effort to speak English while talking to me. NGANGA moments. At the Honduran entry-border control, I was passed on by different officers. Most of them speak loudly, borderline shouting. I also paid a few dollars at the office, I remember paying 1 USD just to enter the border control building. Plus I think 2 USD more for Municipal Fee. As advised, BRING A LOT OF SMALL US DOLLAR BILLS when crossing borders of third world nations. We just passed through Honduras. Nag lunch lang ako dun. Di ko na nga maalala kung may mga exit fees pa nun; likely minimal though.
At the El Salvador entry border control, things went pretty straight forward na. All officers spoke English well. My passport took some time though. As the only Asian in the bus, I was asked to go to a different office. Again, my Valid US Visa was reviewed. The officer did a quick explanation though, which is nice. I paid not more than 10 USD to enter. I forgot what that was for. They provided receipt and ticket. At the El Salvadorean territory, you will definitely see and feel the upgrade on infrastructure. US dollar is also used as the national currency of El Salvador. Sobrang convenient nung arrival ko, as the San Benito Terminal of Tica Bus is just at the front of my Hostel.
Photo below is the room I was brought for some payments and waiting time. All other passengers (Local, American and Europeans) waited for me at the bus for almost 30 minutes.
My Central American travel ended in El Salvador. If not for the political rallies, I would have proceeded my land trip to Guatemala, which should have been the highlight of all these. I’ve always wanted to visit Guatemala City and Antigua. Oh well, in God’s time.
All in all, ok naman border crossings ko. Very few reference lang available for Land Border Crossing in Central America, especially for Ph passport holders. Big thanks to Escape Manila for all the tips, since he also did the same route, before me.
Will upload more for each CA cities I’ve visited, plus the hostel where I stayed. For now, dito muna. 🙂
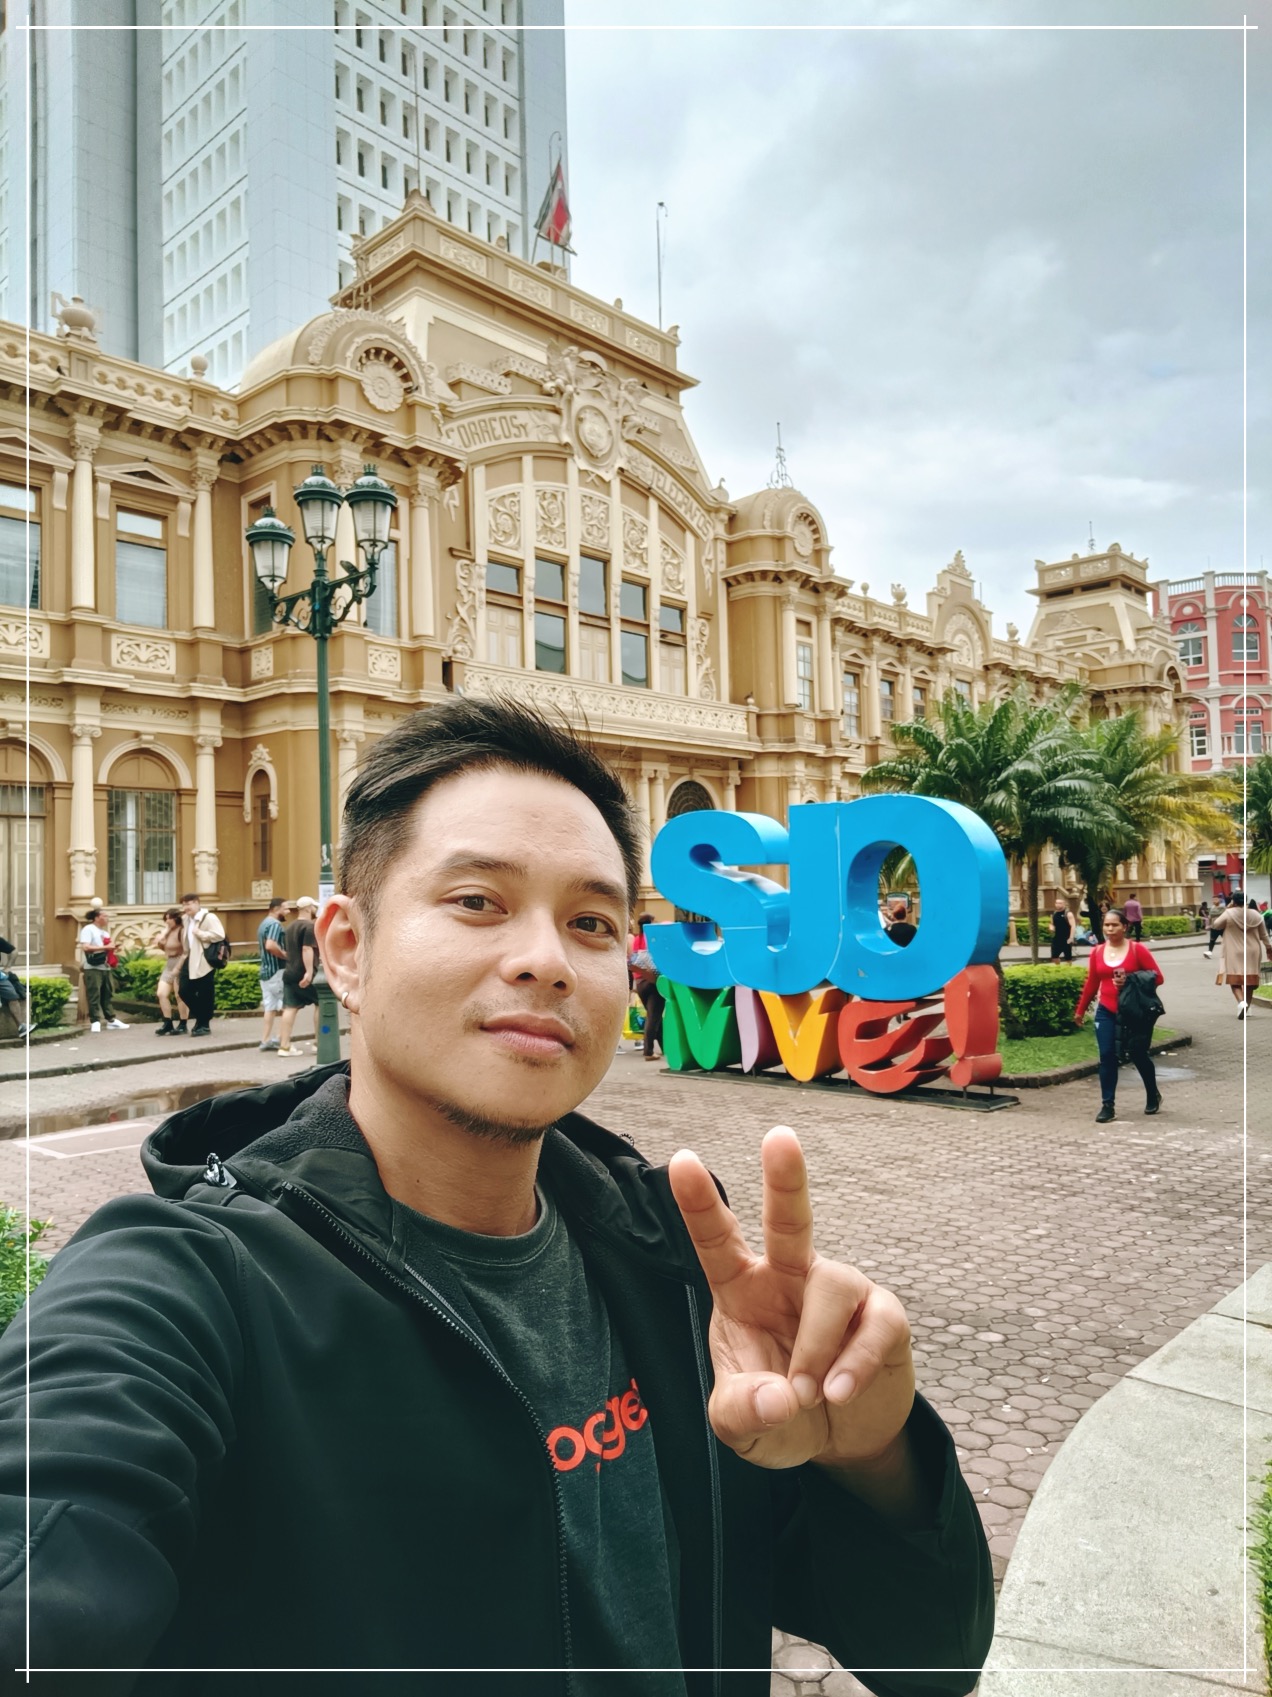
The moment I landed in San Jose, Costa Rica, I immediately felt the vibe that’s undeniably similar to my home country (Pilipinas). Not just on the obvious colonial Spanish influences we shared, but on the actual environment itself, since CR is also a tropical island-country surrounded by seas on both sides. With only around 50 sq. km. land area, the whole of Costa Rica is actually smaller than Mindanao, which has a land area of approx 95 sq. km. From above, the Costa Rican landscape is generally green with scattered mountain ranges. I’ve also seen patches of mineral-mining sites, which is very similar to the Ph. Hopefully though, their regulations are better than ours.
The weather in CR is hot/humid. I believe Ph shares the same latitude as CR and other nearby Central American Countries. The time I went there, i experienced rain scattered throughout the day. Also during arrival, I noticed that the airport interior looks super similar sa Arrival Hall of Mactan/Cebu I.A. The classic glossy marble flooring gave the vibe.
With the strong Spanish Influence, Costa Rica is still dominantly Catholic ’til today. The historic landmarks says a lot about it.
In San Jose, I stayed for two nights at Casa Colon Hostel, which is a pre-WWII mansion that has been converted to a hotel, then to an affordable hostel today. Quite memorable kase ako lang guest nun sa isang lumang bahay, like goodluck. The stay turned out very pleasant though. I rested very well.
The weather expectedly influences the lifestyle and way of living of the locals. I went to a public market in San Jose, and agricultural/harvested products are very similar to ours. The locals also dress almost exactly like us, and guess what? Madami din Ukay-ukay stalls dun, as well as sidewalk vendors! Here are some random shots I got during my free-days in the Costa Rican Capital.
The food I shared above is Arepa Venezuelana. Arepa is Latin America’s answer to European bread. But instead of using wheat or rice flour, arepa is made of corn flour, which is common in the area. The hefty white filling is actually chicken in cream sauce, which was very good. Hinanap ko snackhouse na ito via tripadvisor e.
I found the cutest Starbucks disposable cup in Costa Rica. Trivia, Starbucks owns Hacienda Alsacia, a 240-hectare coffee farm in Costa Rica, that serves as a global Research and Development facility and working farm for the global brand. The farm is open for visitors at certain times of the year.
The public market in San Jose is probably the cleanest,most well-maintained public market in any third world country. I enjoyed this “Casado” plate, which is a traditional combo meal in Central America, consisting of rice, black beans, plantains, salad, a tortilla, and a protein. For this plate, I had beef machado, which I find very similar to our humba na bisaya.
In all honesty, tinamad na ako mag tour around San Jose, as i was already on my third week of travel. Peru and Colombia (Bogota) took so much energy from me. Undeniably, these two were the highlights of my Latin American trip. Rio stressed my a lot, as such, naging pahinga ko na din actually itong stay sa Costa Rica. Mura din ang pagkain, but I actually started to crave for fast food na. lol
Filipinos are visa-free to enter Costa Rica, btw.
From San Jose, the adventure continues to Nicaragua by land/public bus. Dito na yata start ng pinaka mahirap na leg of the trip. Kwento ko later.
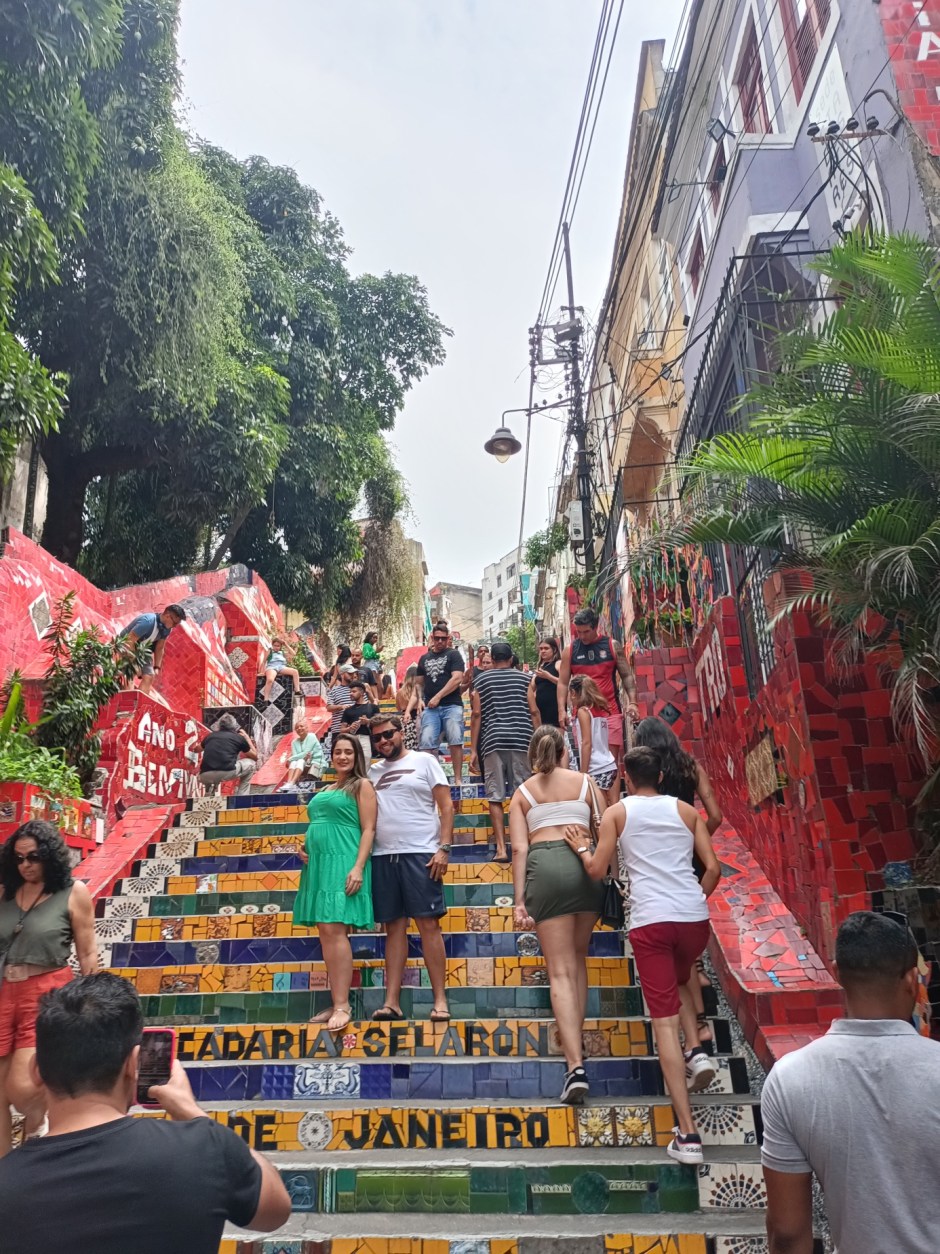
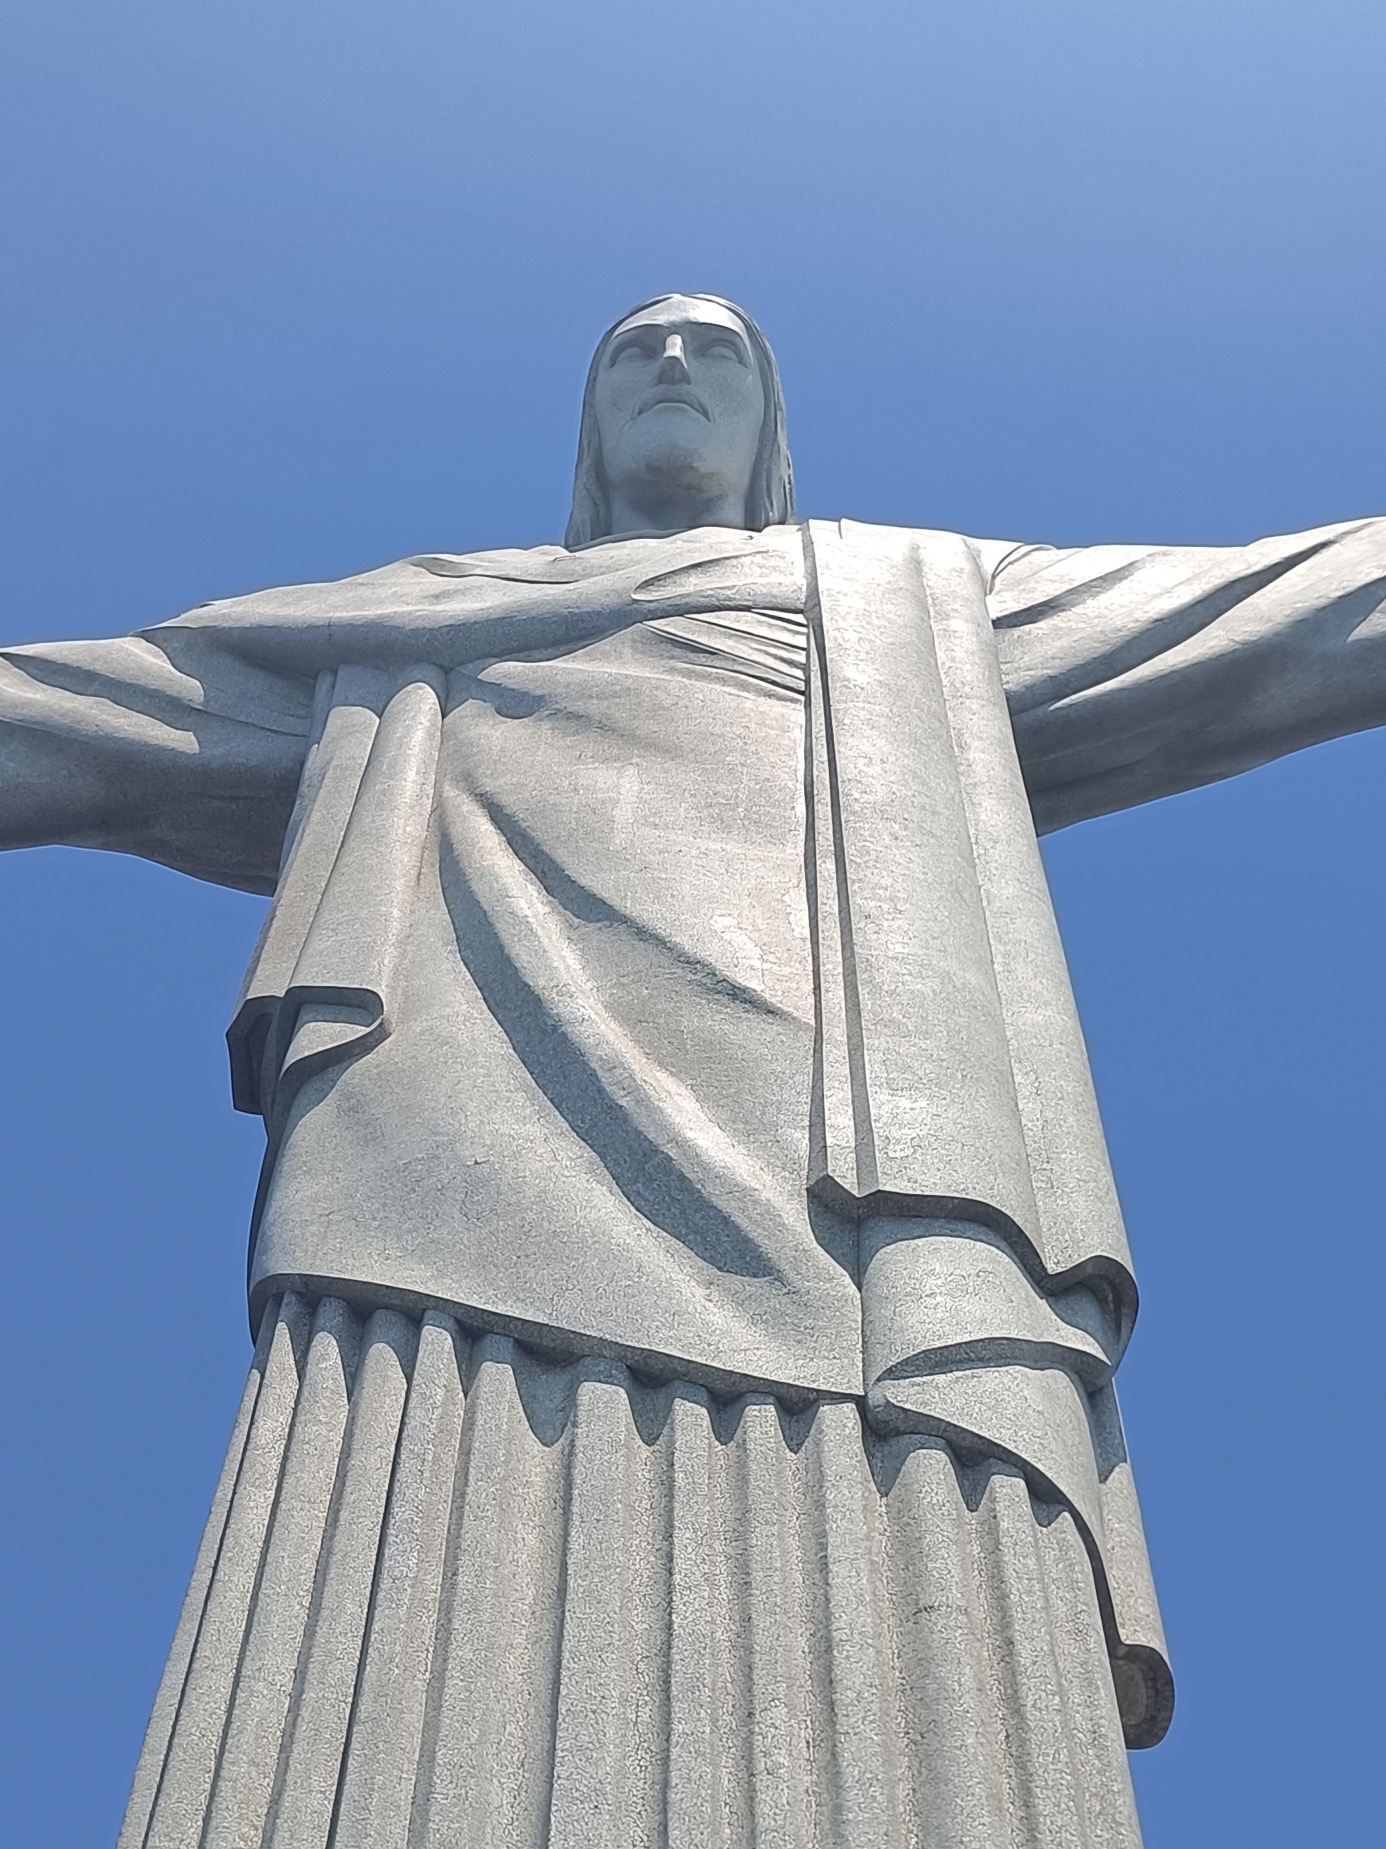
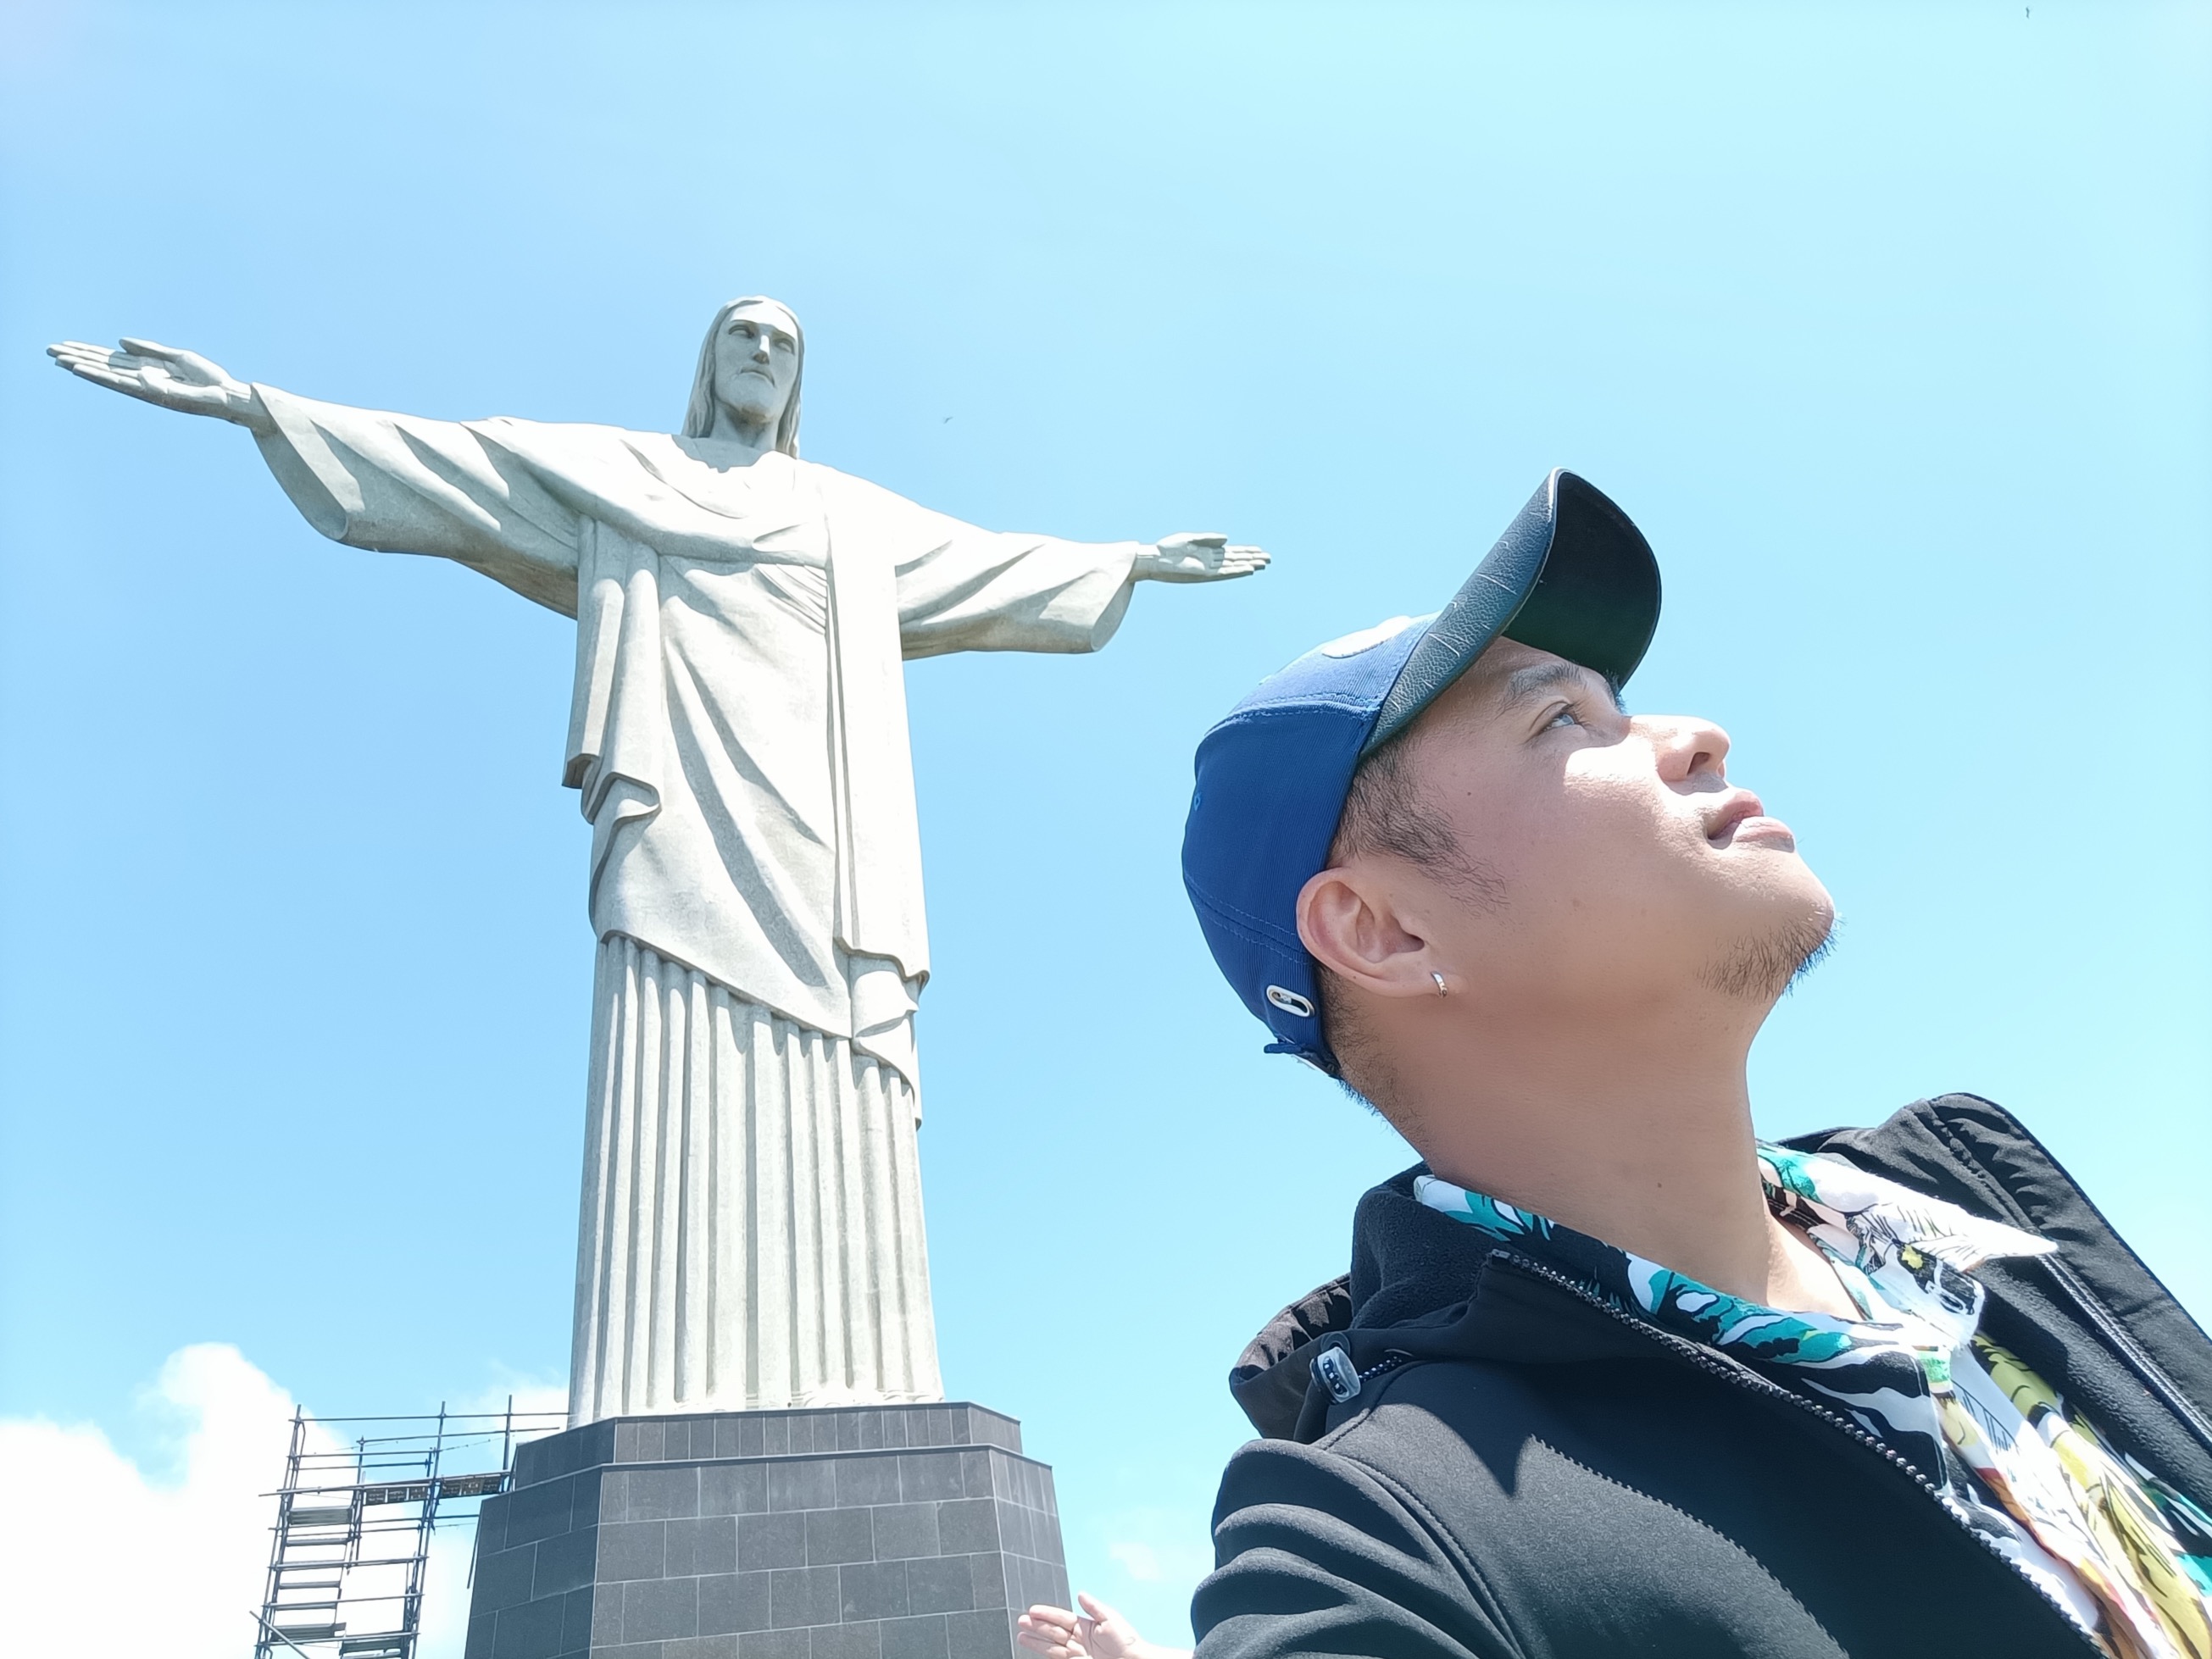
Though prior to the trip, I already got a handful of heads up that Rio can somewhat be notorious on tourists; especially solo travelers. I had friends from Cebu who got robbed, mobbed and harassed in Selaron (a popular tourist spot) in broad daylight. Yun cover photo ko, yan yung Selaron. Robbers took their passports as well, thus destroying their onward plans in South America. As such, I was double cautious all the time. Opted to stay in Rio for just two nights. My only priority was to visit the Christ Redeemer Sanctuary and I am done. See my Christ Redeemer blog post here.
Despite all the warnings, I still got scammed in Rio. Guess what? By an Uber driver. During my ride from the airport, I paid the driver with local currency-cash. But as soon as I was dropped off, I received a notification from Uber, saying that the most recent ride was charged to my credit card. It still puzzles my how the driver changed the mode of payment after the ride, since these choices are done by me, prior to the ride. I immediately made an incident report on this. However, i cannot use the app while the investigation is going. At di ko kaya yon! I needed a legit booking app more than ever in Rio. As such, ni let go ko nalang. doble tuloy kita ng driver sakin. Good thing it only happened once.
Another inconvenience I encountered in Rio was that all my Visa/Mastercard Credit and Debit Cards got declined immediately on my first attempt to swipe for food at Rio airport. The cards were from Eastwest and BPI, both local Filipino banks. I reported the incident to Eastwest Bank online support, yet they could not find any errors, saying that my cards have always been ready for international use. Meanwhile, BPI online did not respond to me. These cards worked well with other countries though. So yun, ni-let go ko na. Total, 2 nights lang naman ako sa Rio.
I had a friend who traveled to Rio na din (for work) pero never naman daw nagka problema credit card nya. However, Citibank at HSBC daw dala nya that time. As such, baka nga yung local banks ko lang ang nag-drama for the eme.
Isa din sa di ko nagustuhan sa Rio is dirty at daming homeless na high on drugs sa daan. Though galing naman ako sa Pinas so these street views should not be new to me. Pero malala talaga dun. O baka kasi sa old/historic district ako nag stay. kaya yun. Oh well. Isip ko nalang minor inconveniences lang ito compared sa iba.
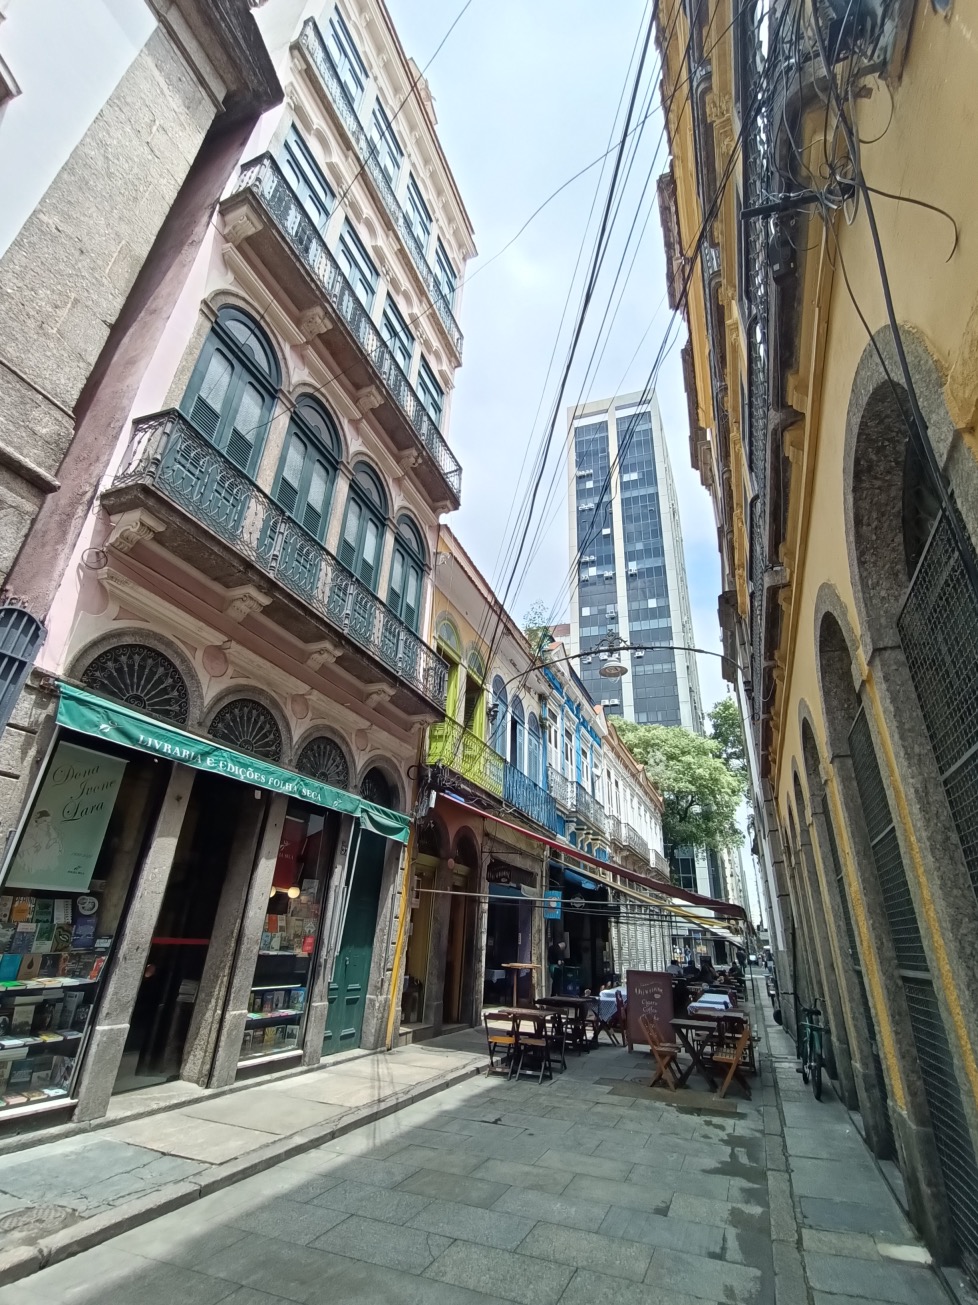
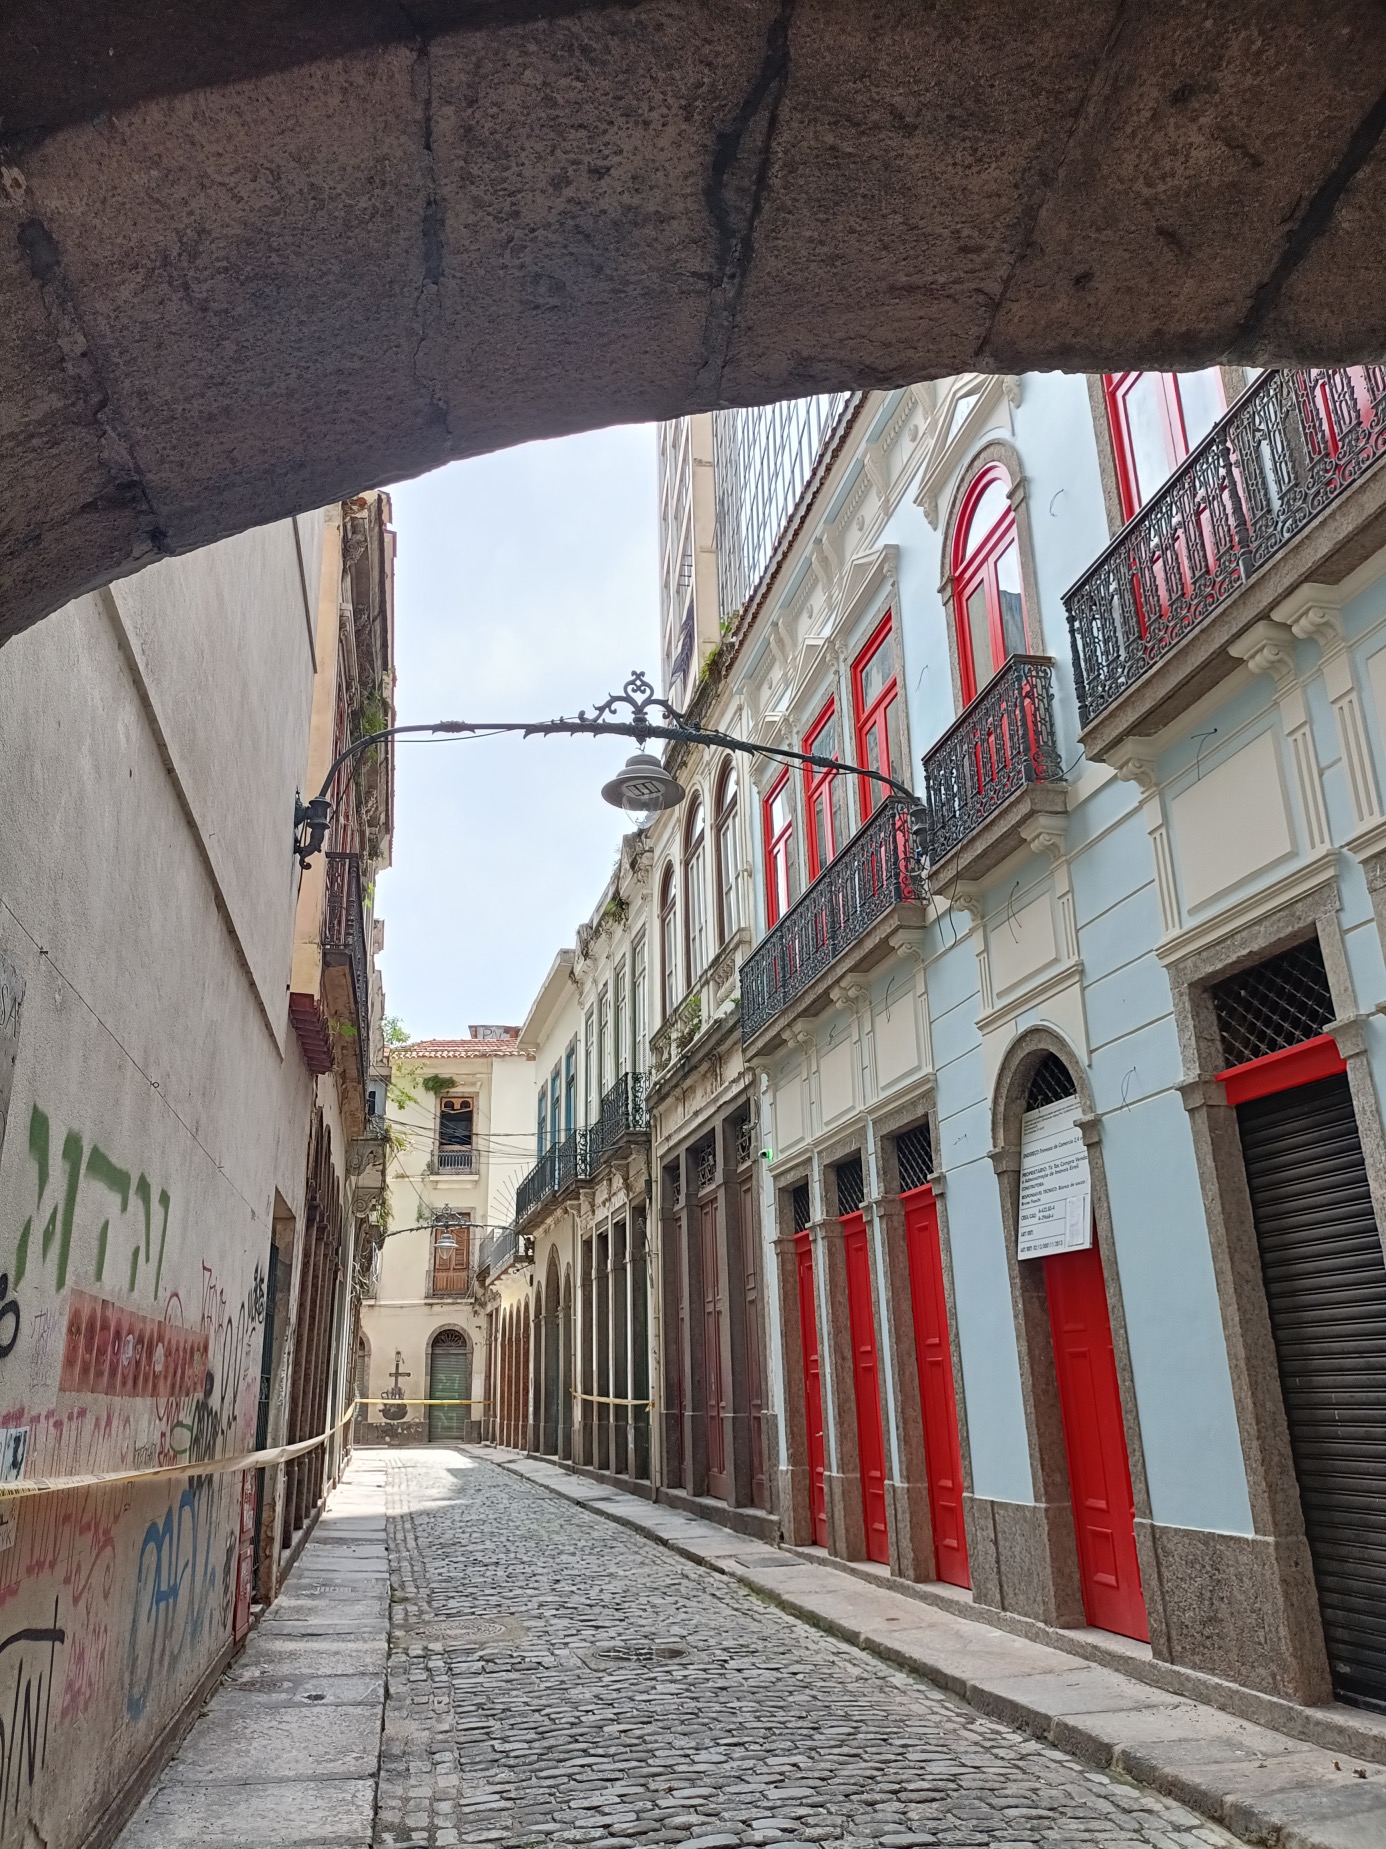
Despite all the inconveniences, I must also acknowledge that Rio is a visually stunning city with its evident colonial architecture influences, as well as its surrounding hills, beaches and ocean. The panoramic views from Sugar Loaf and Christ Redeemer Shrine in Corcovado are amazing.
I joined a Free walking tour once again with Guru walk during my first day and here are some random shorts around the old/Historic quarters of Rio:
Dami murals and splash of colors sa streets nila.
Spent a nice afternoon at Confeitaria Colombo, Rio’s oldest cafe & best dessert around! Cafe Colombo had been operating since 1860. I must also highlight that coffee in Rio is sooo Good! Brazil produces a variety of specialist grade, single origin coffees with a high-quality taste with notes of cocoa on their latte (a local barista told me this).
Here is how I spent my lazy 3-days stay in Bogota,Colombia on a thrift.
Joined aFREE WALKING TOUR with GuruWalk. When arriving a foreign city as a backpacker, the best way to a get quick familiarization of the place is by joining free walking tours organized by locals and long stay tourists alike. Free walking tours offer quick discussions on the city’s history, while passing by landmarks and relevant districts. Tours usually last for 2 hours, so prepare to walk that much. And with this, you can get insider tips on the nice places to eat, things to do for your succeeding days, and how to get around, as well as safety measures when touring. Guruwalk is just one of the large and reputable organizations offering free walking tours on key destinations around the globe, but there are several others. Feel free to check on tripadvisor for recos.
Our free walking tour took us around La Candelaria, which is the old/historic center of Bogota. Our tour ended at the foothills of Monserrat where there is a significant catholic shrine at the peak that can be accessed by a cable car. Most of my tour companions proceeded to the shrine on their own, but I planned to schedule my visit the next day, and opted to just stay in La Candelaria for a lazy afternoon stroll. Here are some more snapshots of this lovely city.
The sanctuary of Monserrate. The sanctuary of Monserrate in the eastern hills of Bogotá can be seen from almost anywhere in the city. It is located at 3,172 meters above sea level, at the top of Monserrate or Cerro de Las Nieves. Devotees walk up an almost two mile path to this traditional site of religious pilgrimage, which began in 1620 with the shrine of Our Lady of Monserrate. The basilica houses the image of the Fallen Lord of Monserrate, an effigy of Christ which, according to the faithful, performs miracles, and at the top visitors can walk the Stations of the Cross. The history of this sacred place dates back almost 500 years, from the early years of Spanish settlement in Colombian soil. The shrine also boasts a panoramic view of the whole Bogota City.
BOTERO MUSEUM. The museum dedicated to the works of reknowned Colombian figurative artist Fernando Botero. His signature style, also known as “Boterismo”, depicts people and figures in large, exaggerated volume, which can represent political criticism or humor, depending on the piece. He was considered the most recognized and quoted artist from Latin America. One of his most known masterpiece is his volumized version of Leonardo da Vinci’s Monalisa . Entrance is Free.
Aside from Botero’s works, the museum collection also brings together, some works of renowned artists as Picasso, Leger, Renoir, Monet, Dali, Giacometti, Beckmann, Freud, Calder, and Bacon. Each day near a thousand people visit the Botero Museum.
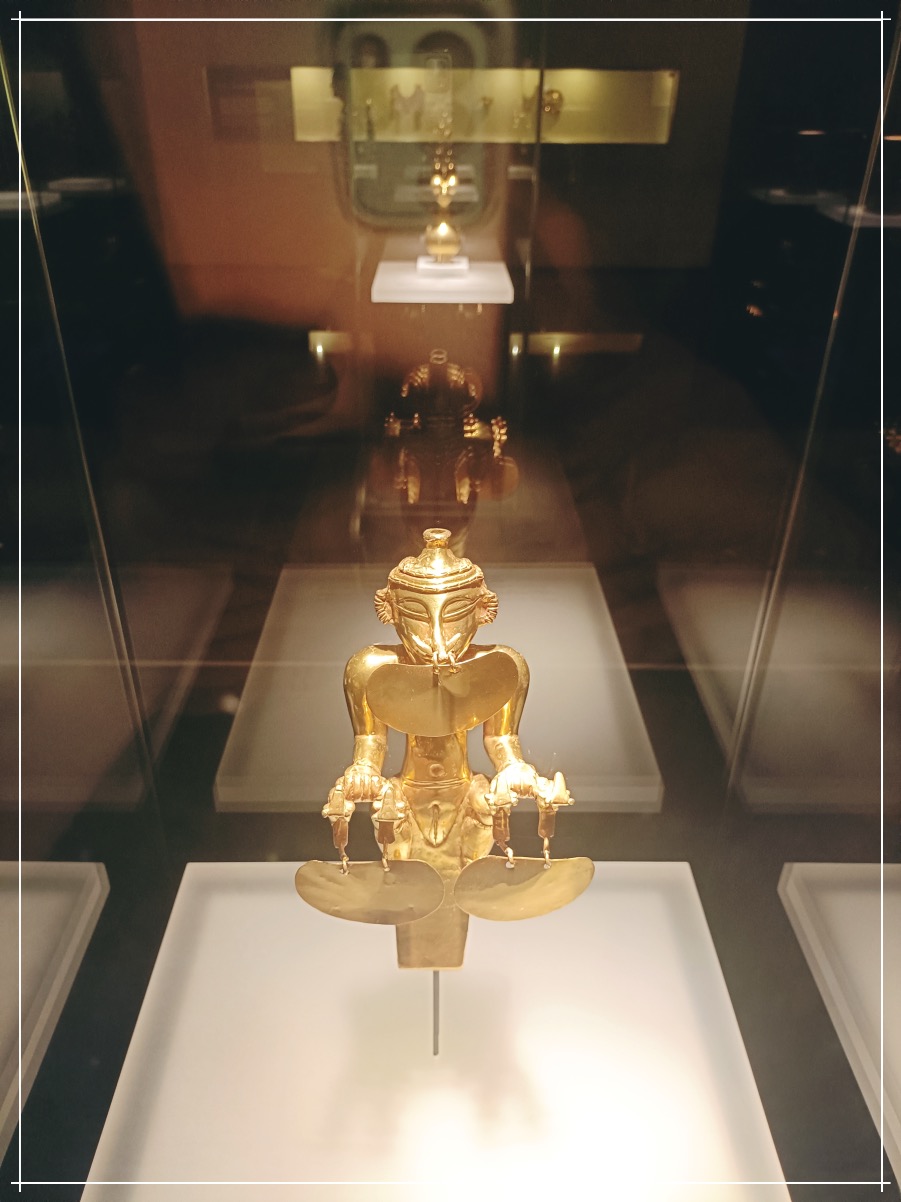
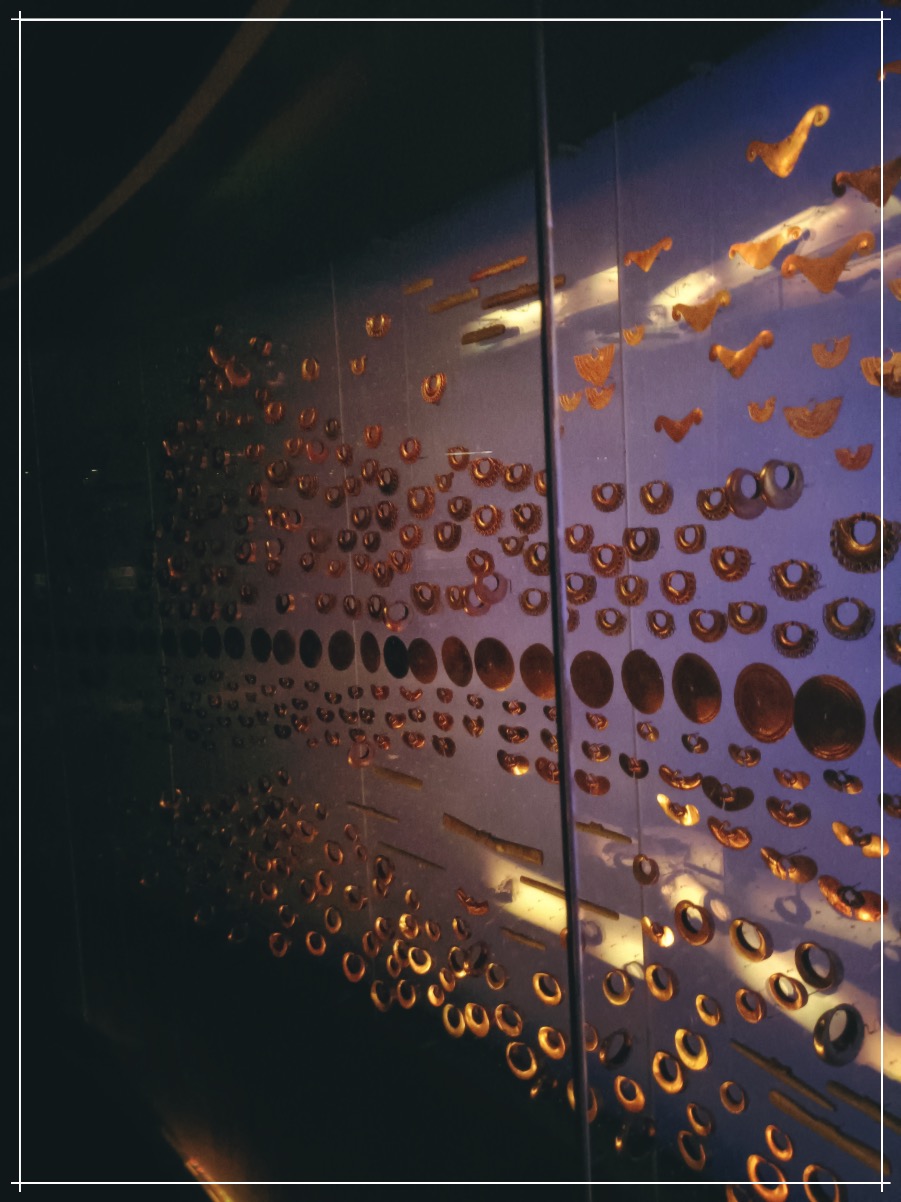
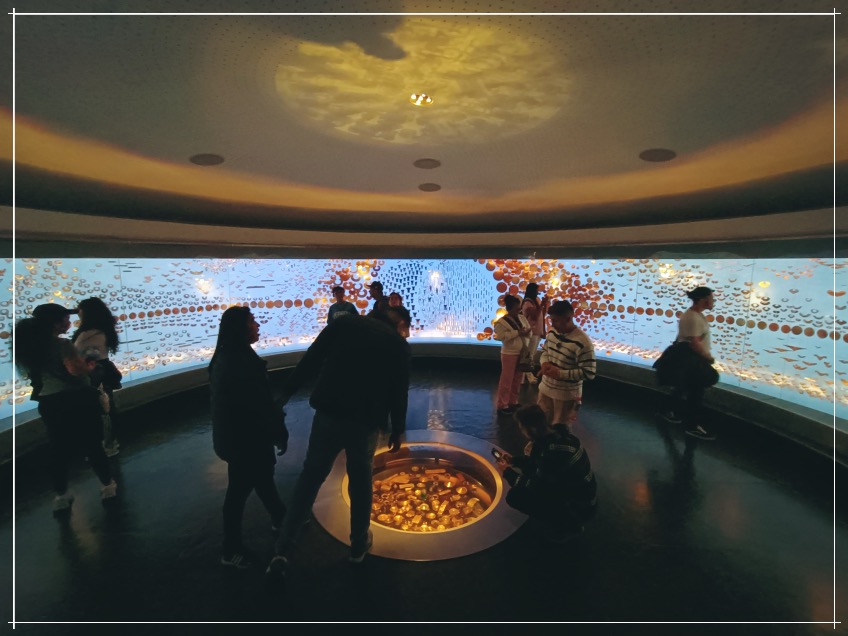
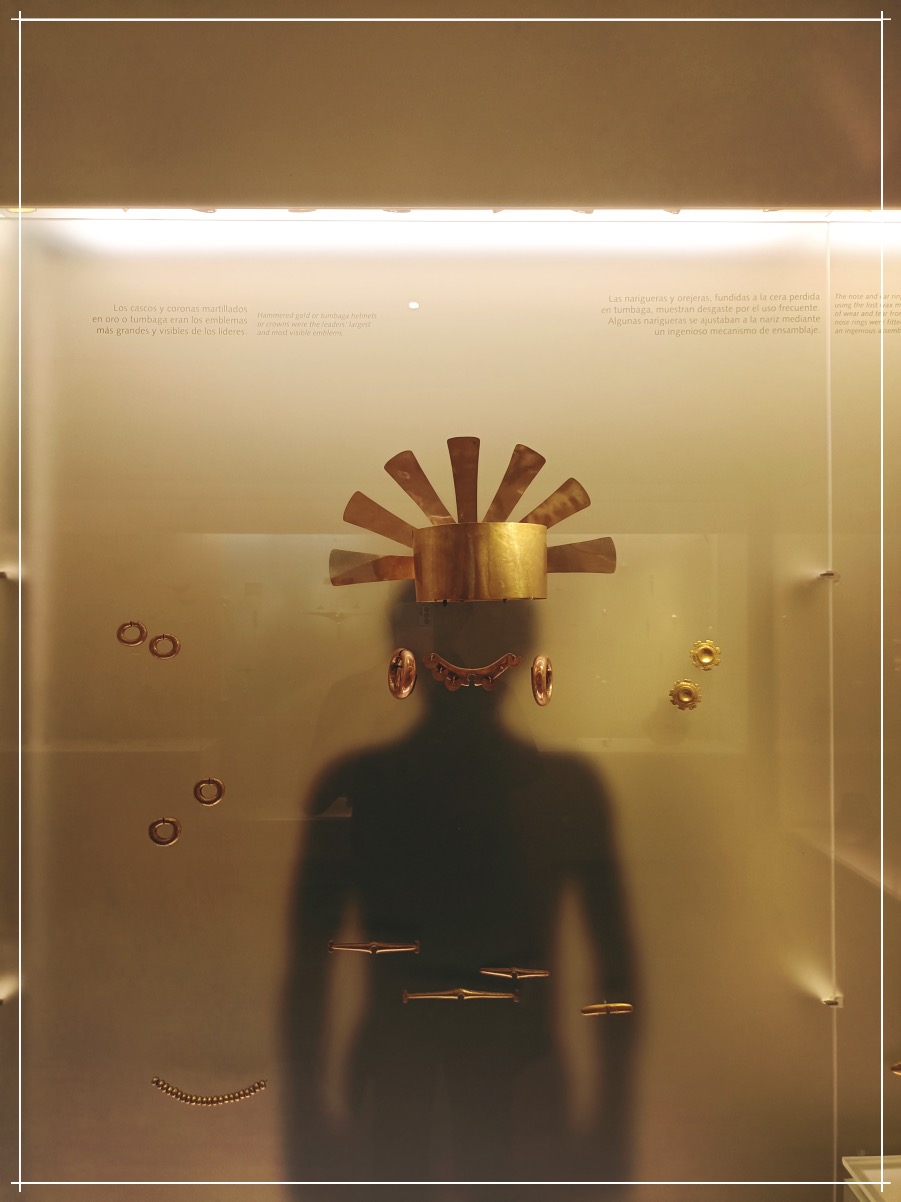
THE GOLD MUSEUM (Museo de Oro) of Colombia. This extraordinary museum offers a well-arranged display of recovered antique gold (real gold) from the pre-hispanic days of Colombia. It has 34,000 gold pieces, the largest collection of antique goldwork in the world, including the fabled Muisca Raft, which was said to have been recovered from a sacred lake. In 2018, National Geographic magazine named it one of the best museums in the history of the planet. Much of the antique gold pieces were used in daily life, as gifts or as part of sacred rituals in the indigenous Muisca and Tayrona cultures. Themed rooms with explanations give great insight into the artistry and significance of these indigenous cultures. Entrance is only 4000 Colombian Pesos (around 1 USD), yet you get to see so much.
My visit to the gold museum made me understand why the Spaniards back in the days were so thirsty to take over the lands and native people of Colombia; and that is for their Gold. Similar case also happened to the Incan’s of Peru.
Museums in Bogota also made me think how overpriced museums in the Philippines are. 🙂
The last day, i just spent on casual walks as well as foodtrip and cafe hopping. Check out my Colombian food blog here. Fruits and other produces are quite similar to the Philippines. Probably because of similar tropical lands, as well as strong Spanish influence.
Free days are the best days during vacation. With no itinerary to follow, I just walked around La Candelaria district of Bogota, enjoyed coffee, ate the best rice tamale for breakfast, and had a hefty 1″ thick steak for lunch. As a tropical country with fertile land, food is more affordable in Bogota; probably the cheapest of all the places I’ve visited in South America. Here are some of the memorable meals I had during my 3 days visit.
I’ve had different types of Tamale during my travel, but Bogota gave me the best one. It’s packed with fragrant yellow rice and corn combination, carrot slices and chunks of braised pork rib and chicken, plus complimentary bread and coffee. Mura lang ito, around 100 pesos if converted.
Ajiaco is one of the many regional Colombian dishes you can’t leave the country without trying. It’s a hearty soup made from three different kinds of potatoes, chicken, guasca leaves, with a half an ear of corn splashed in for good measure. Also served with a slice of avocado (locals mix them with the soup for added texture). I had this meal during my day tour at Monserrat Religious Shrine overlooking Bogota.
Meat is relatively cheap in Colombia. I enjoyed a thick slab of steak from Banquete Restaurante, a seated,full service restaurant in La Candelaria, serving good local dishes. This steak set cost me a little over 500 Php, i think; salad included. The red pepper\tomato gravy on top is mild. Not too hot. Picante as they say. Very different from our usual gravy here in PH. I also had freshwater shrimp ceviche as appetizer. Sobrang sarap nito. Shrimp is blanched (not raw).
Sealed the afternoon with churros and Tostao Coffee, an affordable coffee chain in Bogota. Also enjoyed random street chorizo arepas (sandwich) I think went back 3x on this street kiosk during my stay. Ibang level ang chorizos (sausages) sa Bogota, I tell you.
A memorable last dinner in Bogota. I had this hefty plate of Bandeja Paisa, so i can try various dishes in one seating.
Bandeja Paisa is a traditional Colombian dish that contains beans, rice, arepa, traditioinal chorizo, plantain, chicharrón, avocado and marinated ground beef (like arroz cubana). I’ve noticed that Latins serve avocado as a side without any sweeteners; in contrast to us who only appreciates the fruit when it’s sweet and creamy.
To close the meal, I went to try the hot chocolate drink at La Puerta Falsa, known as one of the oldest continuously operating cafe in the world. The drink is set with 2 types of bread of choice, butter and a slab of white cheese. Colombians usually melt the cheese with the hot drink. I did not like it. The mix of sweet taste of choco and the salty\sour cheese did not work for me. The cheese is excellent though… with the bread.
Some more random street food photos around Bogota. Fruits and other produces are quite similar to the Philippines. Probably because of similar tropical lands, as well as strong Spanish influence.
New Zealand is mainly divided by two large islands; the Te Ika-a-Maui of the North, named after the sacred fish of Maui, and the Te Waipounamu of the South, which means “rivers of green stone”. Popular NZ destinations like Auckland and Wellington is located in the North Island, while Christchurch and Queenstown is located in the South.
For this New Zealand trip, we spent most of our days in the South where my companion’s family resides. From Auckland, we flew 2 hours by Air New Zealand to Christchurch. We also did a road trip to Queenstown via Tekapo, which was the highlight of this vacation. I shall have a separate post on that. For now, here are some snapshots around the lovely city. Big shoutout and Thanks to Richmon’s brother, Eric, for hosting and touring us around.
We popularly see September, October, November as Fall/Autumn months as it happens across Europe, Korea,Japan and the Americas. It is different, however, on the lands down-under, as these months are Springtime. This is the perfect time to visit as the weather is expectedly favourable and colours are popping out everywhere. In addition, you still get to experience snow on the higher grounds (such as in Queenstown during our trip).
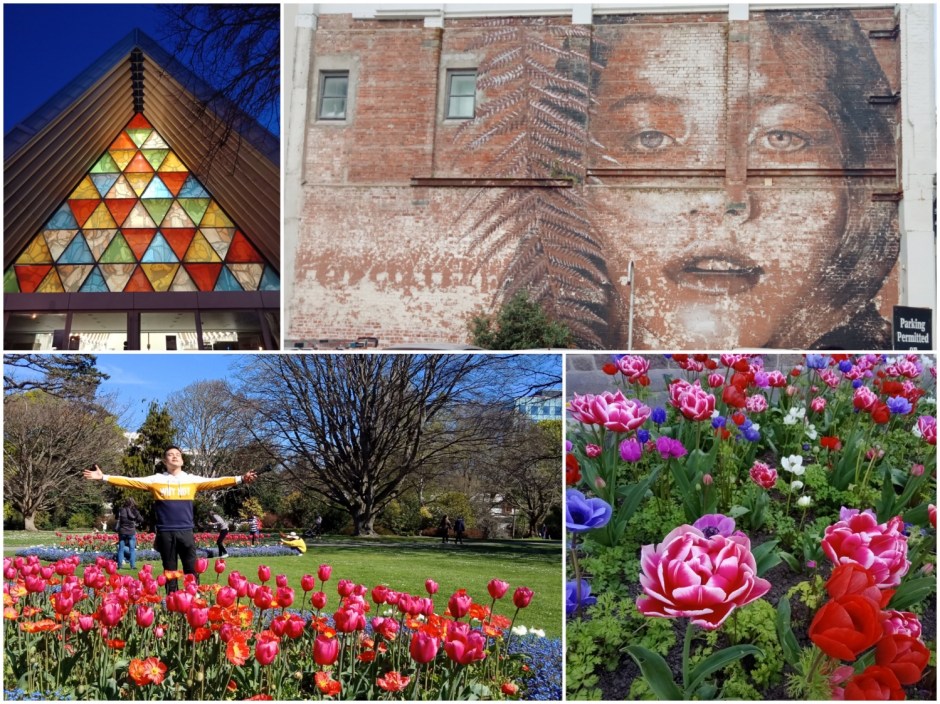
The Botanical Garden in Christchurch is a must see. The Museum is also located inside the garden compound. And it’s free of charge.
The City also boasts its Architecture. Streets are lined with contemporary buildings, using current materials and methods of construction. There are no high rises though; mostly low to mid-rise. Must sees are the The Cardboard Cathedral (a transitional Anglican Diocese of Christchurch with colorful facade) and the Hoyst Cinema Building. Check out the interiors as well.
The Cardboard Catherdral Facade
stunning interiors of Hoyts Cinema
Enthusiasts of architecture will definitely enjoy a stroll around the city centre, which is fairly walkable, with patches of greens and tree-lined parks and a charming- well cared stream the flows across the park. Wall murals and are also a thing around Christchurch.
Model model around the streets is also tolerated in Christchurch. Lol.
Drop by Rockpool bar at Hereford St. for some tummy fillers that will never disappoint. Their BBQ Ribs and Smoked Salmon Pasta are to die for.
Queenstown blog is up next. Stay tuned. =)
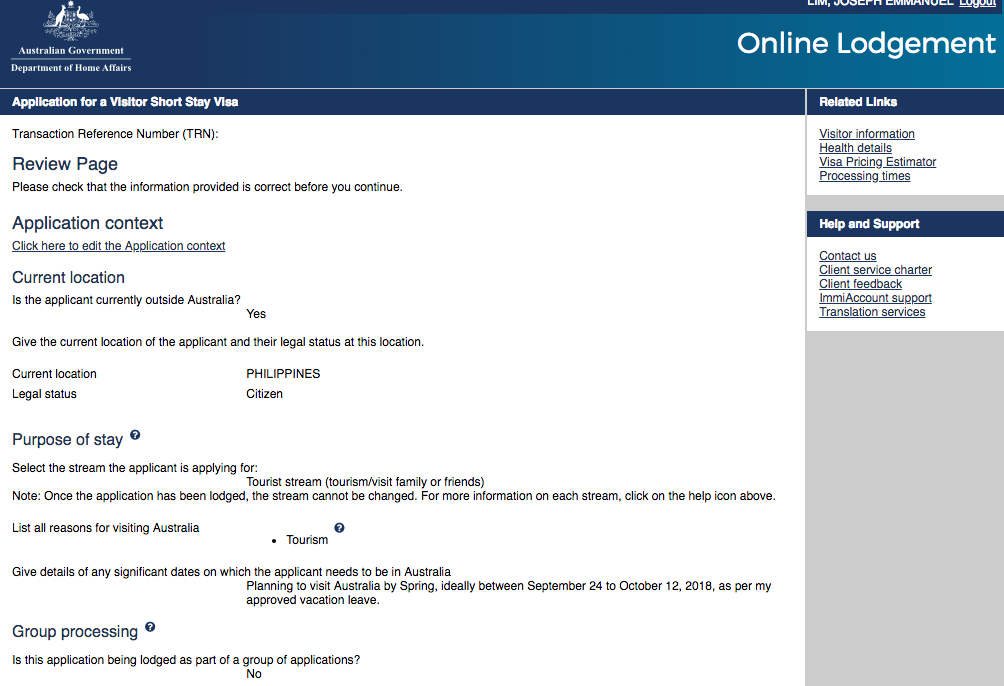
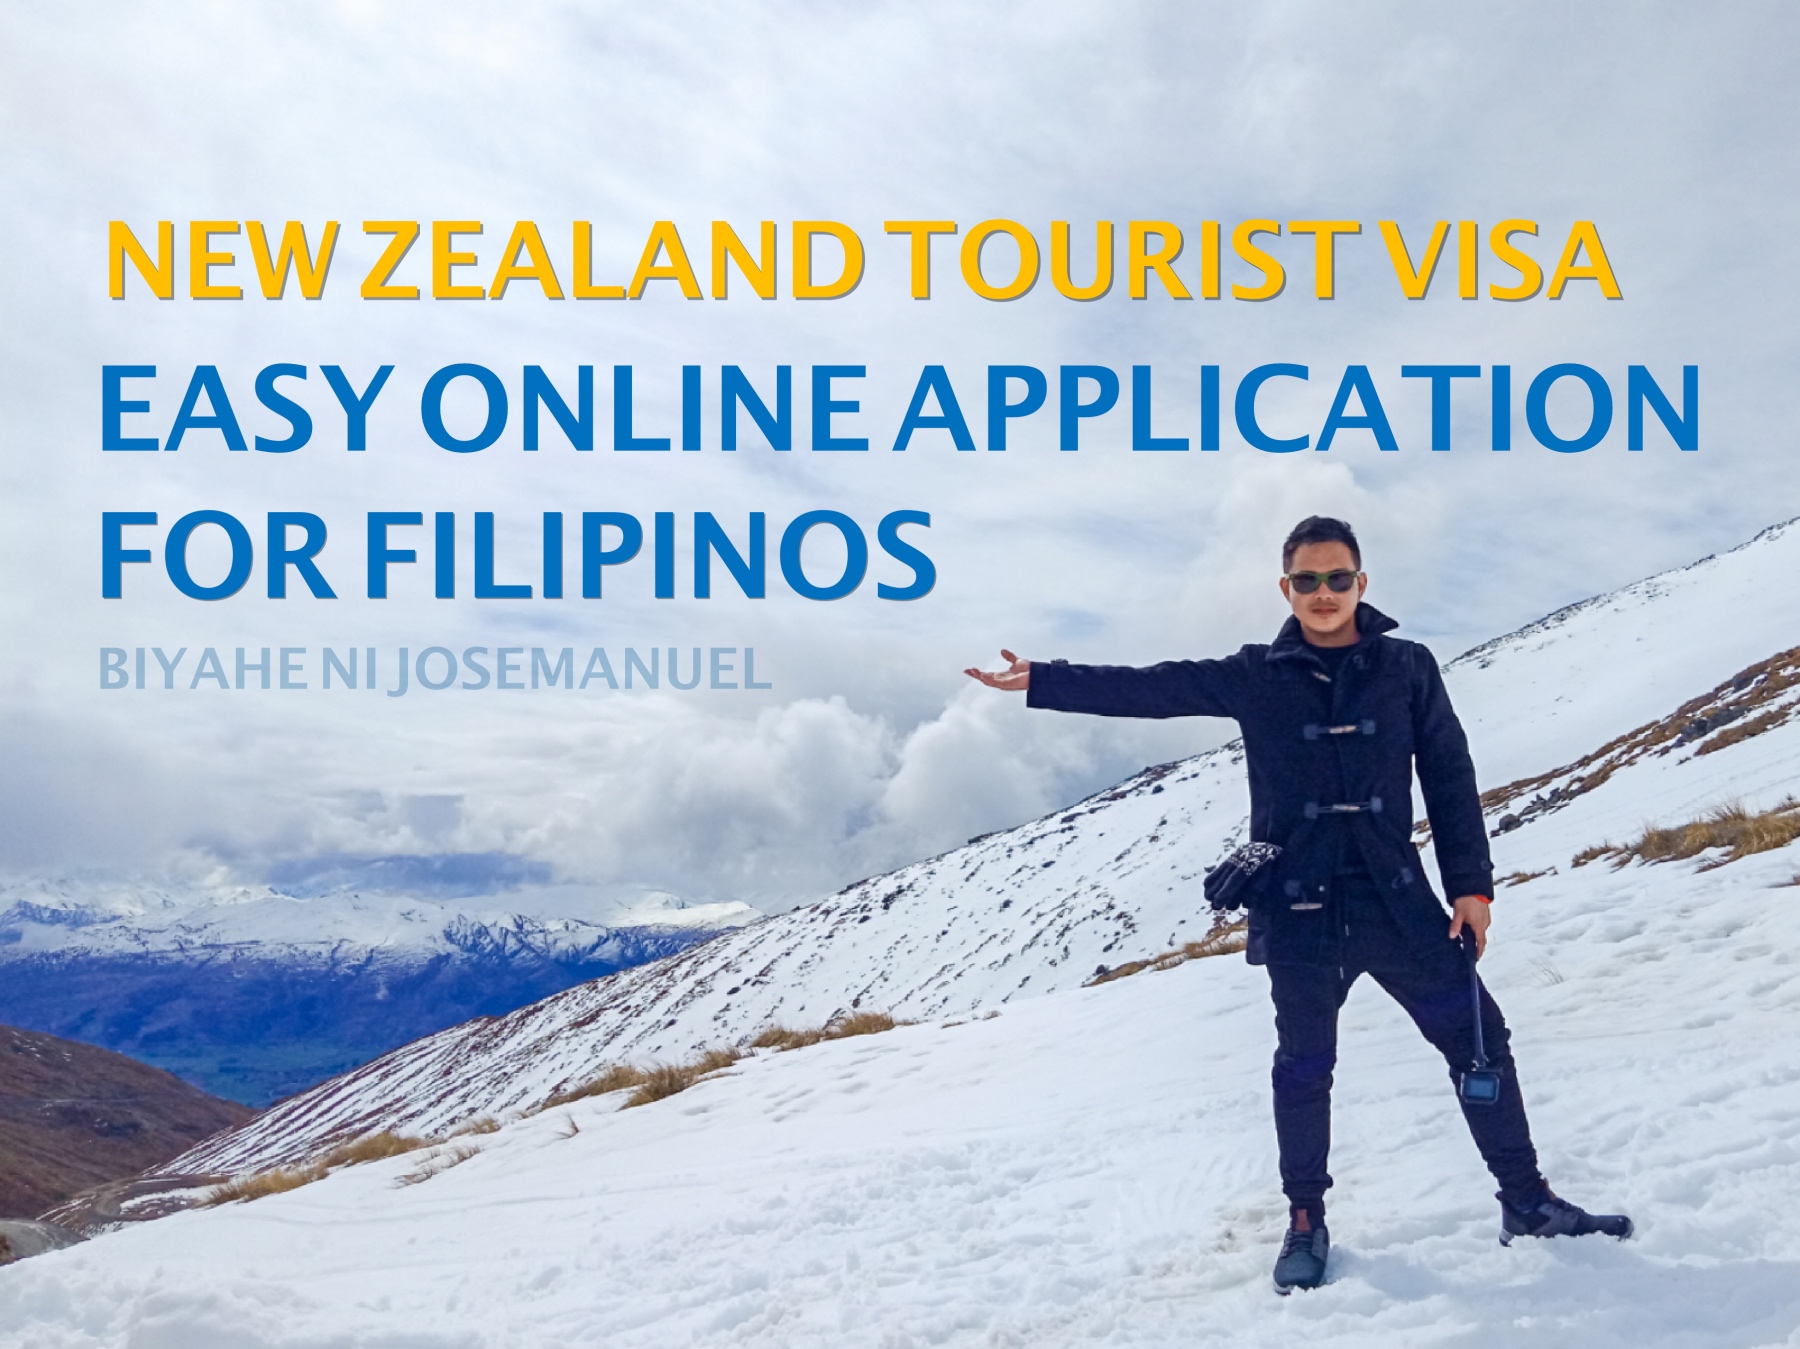
Going to NZ? Check out this EASY TOURIST VISA Application guide here link. https://iamjosemanuel.com/2018/04/22/new-zealand-tourist-visa-for-filipinos-2018-online-application-guide-with-photos/
Auckland Photos are also shared here. https://iamjosemanuel.com/2018/10/30/random-snapshots-aucklandnew-zealand/
Dreamy, surreal, unspoilt scenery. After visiting New Zealand, a whole new level of appreciation for a foreign land had been set.
Dream-like ocean views, lush green valleys, snow capped surrounding mountains, our short trip to New Zealand offered us a glimpse of good things that the country offers. The country enjoys peace, progress, opportunities and abundance. No wonder a lot of our Filipino friends opted to relocate there. Nasabi ko din actually sa sarili ko, ” I want to live here”.
Arriving in Auckland, me and Richmon opted to see in the capital city muna, before we headed to the south island where his family lives. In Auckland, we were hosted by Richmon’s relatives, Ate Mary Ann and Kuya Mario Molera, who’s been living in NZ already since the 1990’s.
Having only two nights to spend definitely wasn’t enough to see all the nearby spots. With out limited time, we opted to see the natural sceneries of the west coast, instead of driving to the popular Rotorua and Hobbiton down south. Together with our lovely hosts, we did a road trip west of Henderson to the surreal ocean views facing the Australian-Tasman Sea.
Here are some snapshots of our DIY west coast day tour plus a glimpse of Auckland downtown. All thanks to Kuya Mario and Ate Mary Ann! =)
Auckland International Airport gave the Middle Earth feels as these giant 16′ Dwarven statues greet you at the arrival lounge.
Arataki Visitors’ Centre
Arataki Visitors’ Centre
Arataki Visitors’ Centre
Muriwai Beach
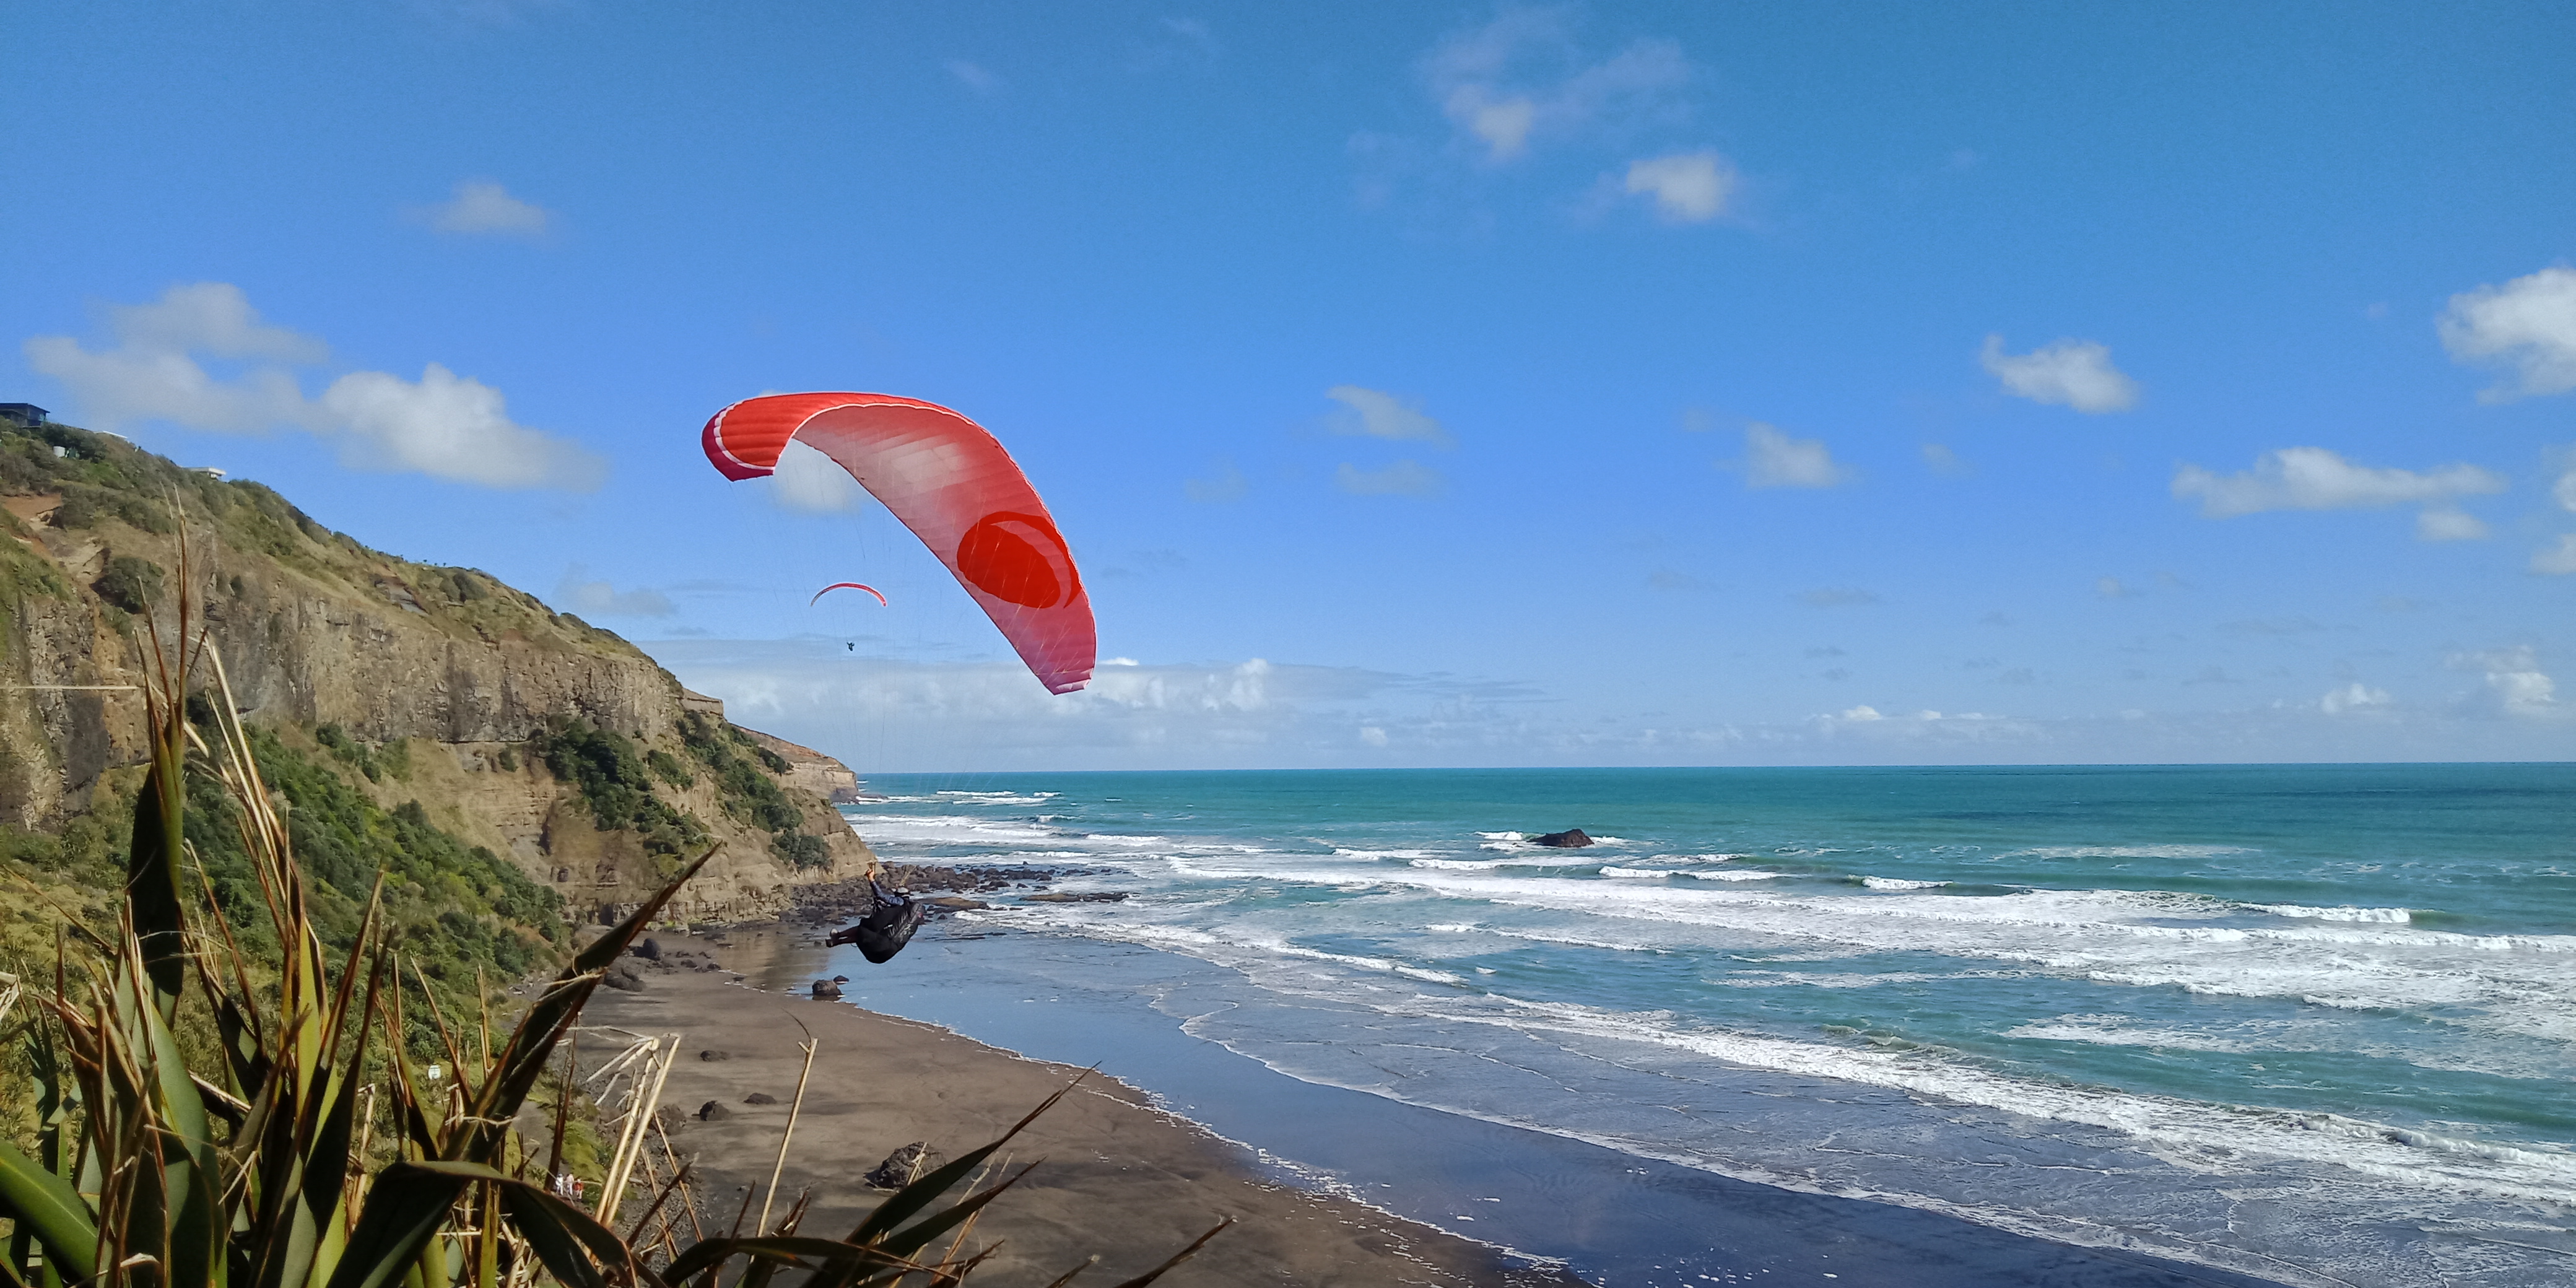
Paragliding around Muriwai Coast
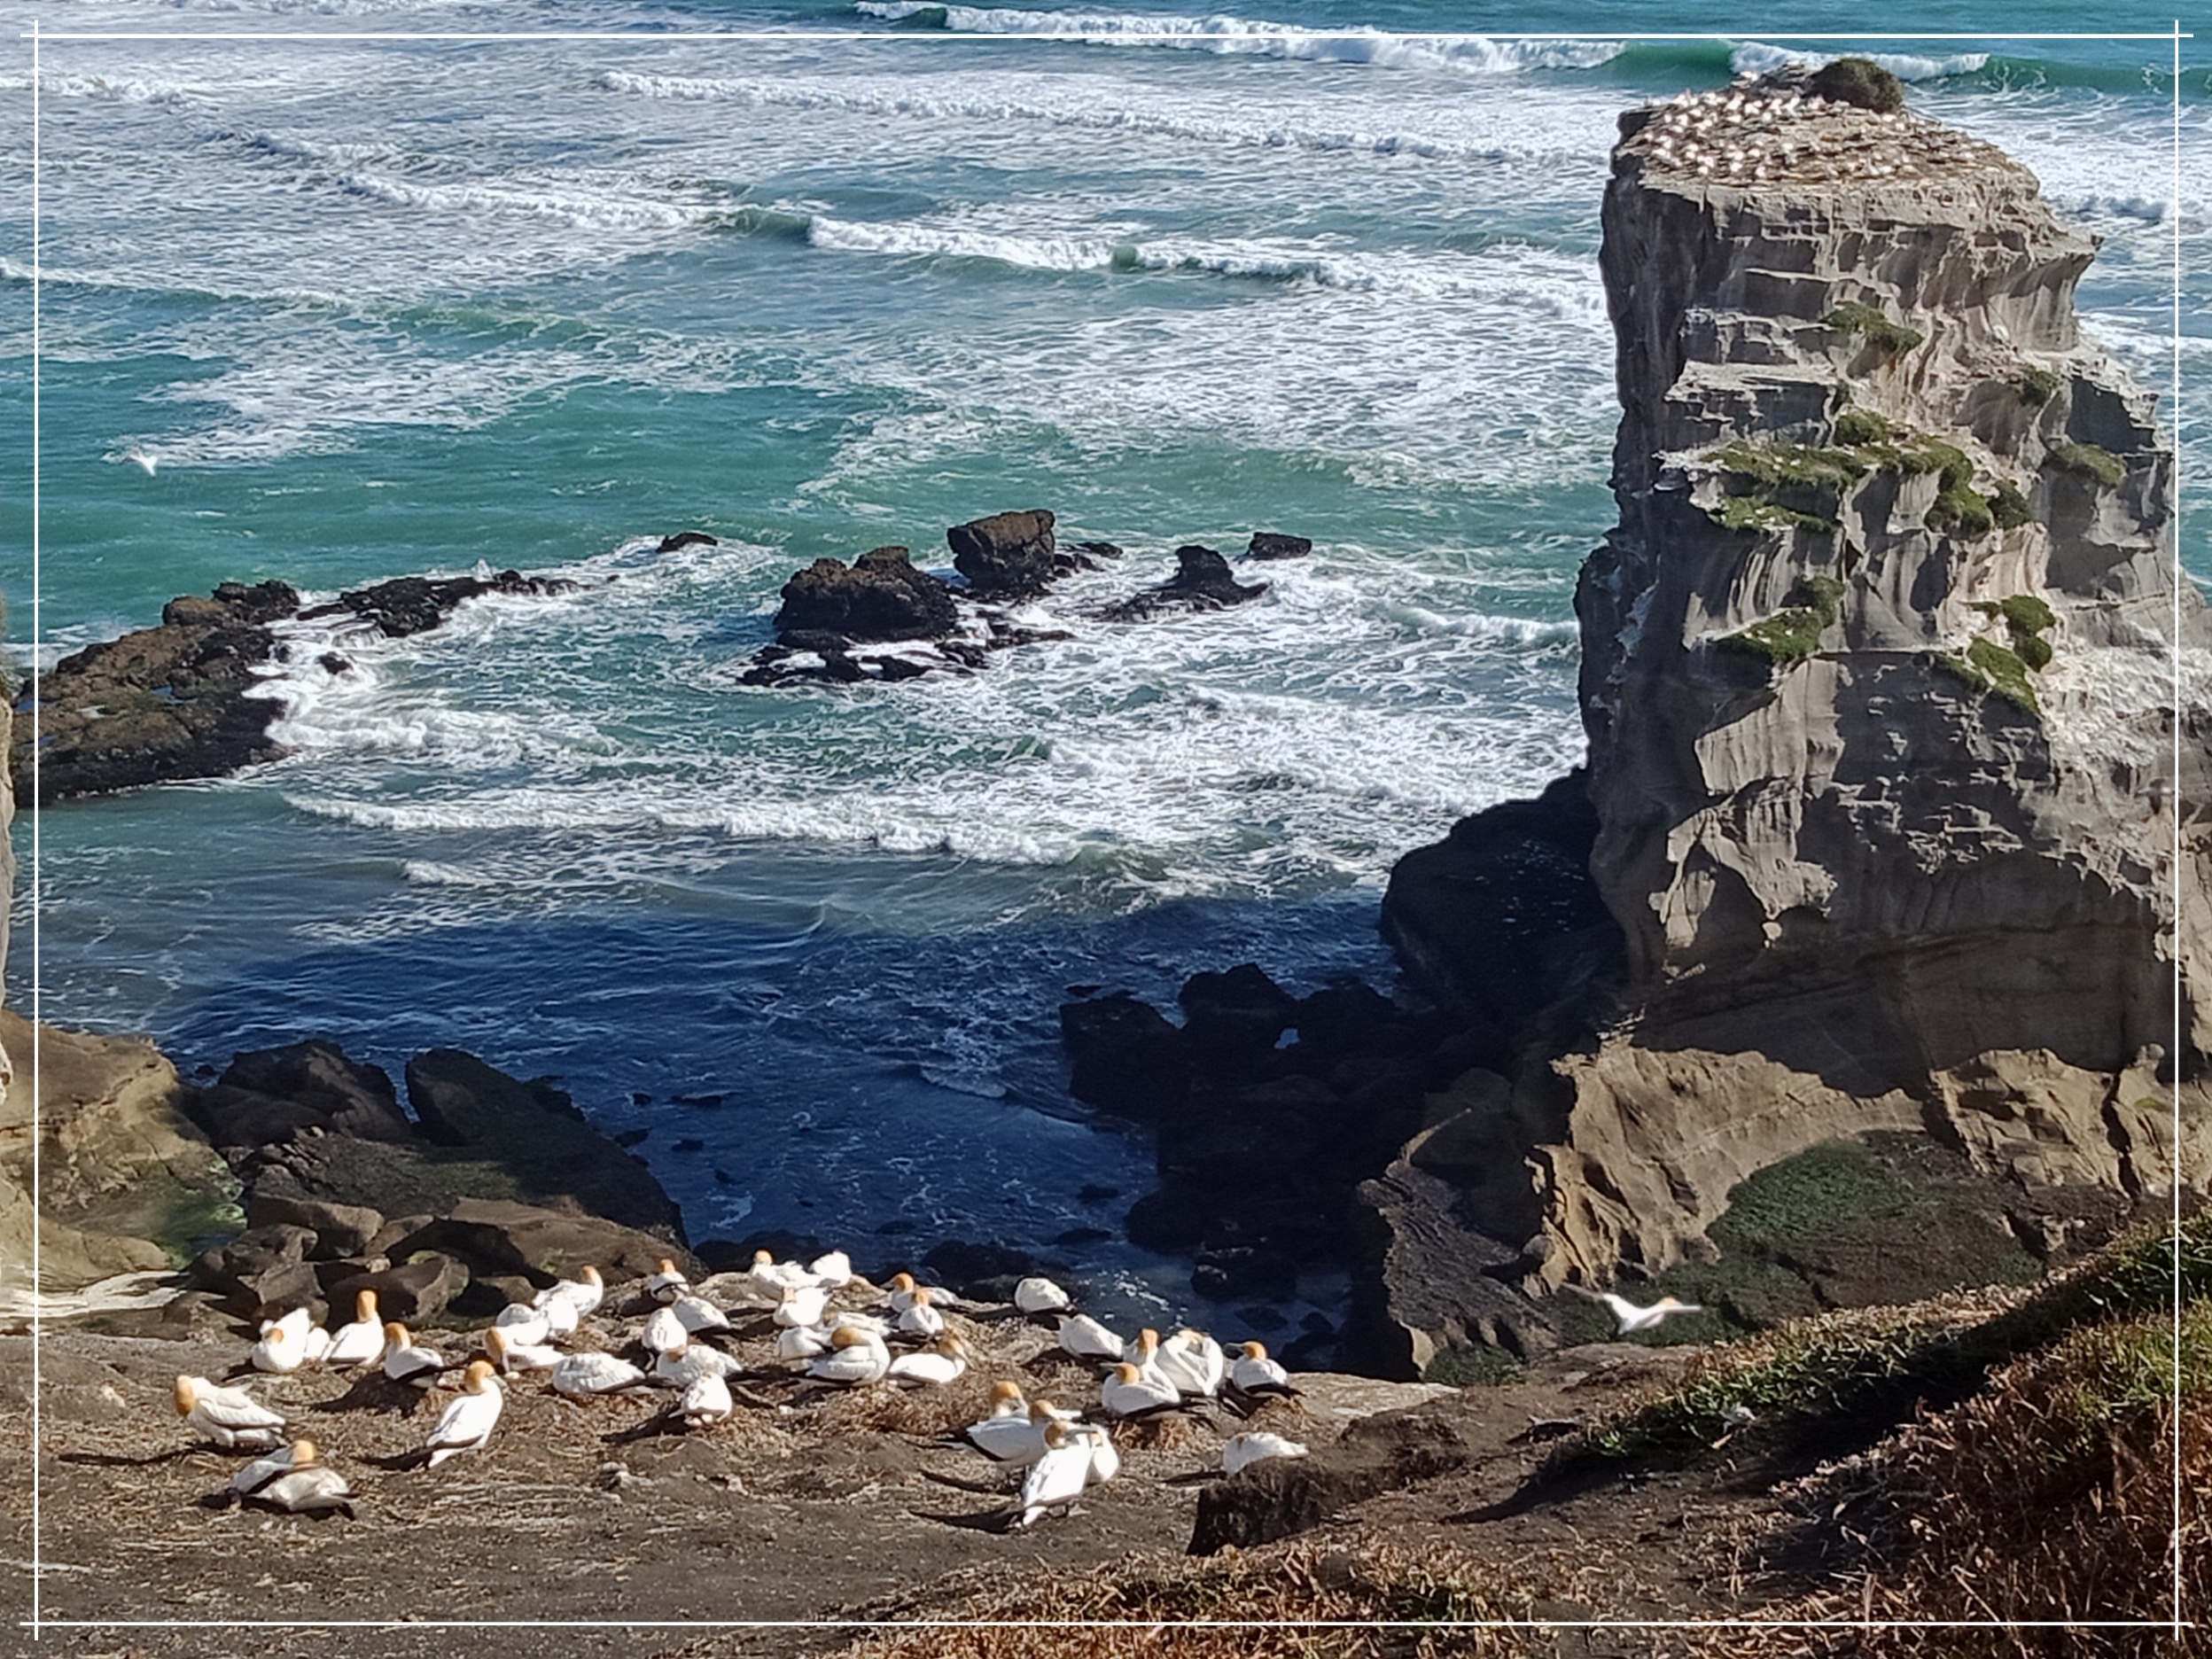
The Highlight of this day tour was definitely seeing flocks of migratory Gannet birds nesting on their natural habitat by the cliffs of Muriwai. Surreal experience to! I did not expect seeing this at all. Kuya Mario did not mention. It was a surprise!
Gannet Bird Sanctuary at Muriwai Cliffs
Here are some random shots and binge eating moments around Auckland City.
The Auckland Crew
And this concludes our two nights stay in Auckland. Christchurch and Queenstown are up next. Stay tuned.
We flew to Auckland, NZ with AirasiaX Via Kuala Lumpur; smooth nine hours travel time, with a quick – 90 minutes lay over in Gold Coast, Australia. Airport Transit Visa to Australia shall only apply if your lay over exceeds 4 hours. So for this trip, no need!
How we secured our NZ Tourist Visa? Check my detailed blog on the link below . below https://iamjosemanuel.com/2018/04/22/new-zealand-tourist-visa-for-filipinos-2018-online-application-guide-with-photos/
Hey,hey,hey! I just got my Australian Tourist Visa approval a few weeks ago. The process is relatively easy and is very much DIY-able. Aside from rejoicing for the approval, I am also thankful that the Aussie Immig was generous enough to grant a multiple entry ’til 2020. Cool, diba? As such, I will be sharing here the step by step DIY guide I did for this application, para naman sabay sabay tayo mag selfie duon with the Koala Bears!
This blog guide however, shall focus solely on Tourist Visa – Online Application for Filipinos living in the Philippines. If you are looking for Business, Study or Fiance Visa, I reco you visit the main Australian Immigration Website at https://www.homeaffairs.gov.au/ for the specific process.
Yes po, Australian Immigration now accepts visa application online. Meaning, no more personal interview. You only need to prepare and properly scan your valid requirements, submit online and pay by credit card. If accepted and approved,the grant certificate shall be emailed to you. No more submission of passport to the embassy for verification and stamping. Easy breezy!
If opted, you can still submit your traditional application personally at the Australian Embassy via VFS Agency. But since I reside in a city that is 2 hours away by plane from the capital, it is more practical for me to do all transactions via online.
The difference between personal and online application? Walang Visa Sticker when applied online. In lieu, a grant certificate shall be issued via email, which you have to print and carry with throughout the trip. The traditional sticker eklavu on the passport are only given when documents are personally submitted.
Online application however, may still be required a personal interview if the evaluators find your documents questionable. That being said, let me just cite na din my travel blogger idol Aileen Adalid’s disclaimer, “NO ONE can give you a guarantee on your approval — not even a lawyer, a consultant, a travel agent, or an embassy employee. Anyone who says otherwise is most likely going to be a scammer.”
So without dragging this further, here is the DIY step by step process I did,
Prepare basic visa requirements.
–Photograph file – Passport sized with very light gray background 500 KB Max. (Alam ng studio ang size, Raw file straight from camera, unedited, scanned photo not allowed )
–Evidence of Family Composition -Scanned Copy NSO Birth Certificate in Colored Paper
–Evidence of Employment – Current – Scanned Copy Employment Certificate with Salary Details and approved date of leave, signed by your boss.
–Evidence of Financial Capacity – Scanned Copy Current Bank Cert, Bank account statement, Credit Card statement , ITR or Business Permit (If available, but I did not submit. Instead, I scanned property titles under my name. Insurance policy and bonds may also count. I submitted my PRU Policy. This is optional)
–Evidence of Previous Travel – Scanned Copy of Past and Current Passport showing all stamps and visas.
–Evidence of Planned Tourism Activity – I made a mock up day to day itinerary. Hotel Reservation is optional, but may help. Don’t pay for this muna.
When scanning, only file formats .JPG, .PDF or .PNG are accepted. Each document must be of good quality but must not exceed 5MB in size. Except for the Passport photo which is ideally 500 KB size and of Jpg format. It i advised that filenames shall contain your name in it (example ” LIM,JOSE PASSPORT PHOTO.jpg”) . If this preparation is too difficult, then I recommend you rather apply though an agency than doing a DIY.
Lastly, as you noticed, AIRLINE TICKET OR EVEN A RESERVATION is NOT REQUIRED.
Log on to Australian Embassy Official Home Affairs Website
The page that will launch your ticket to a brighter future. click “start application“
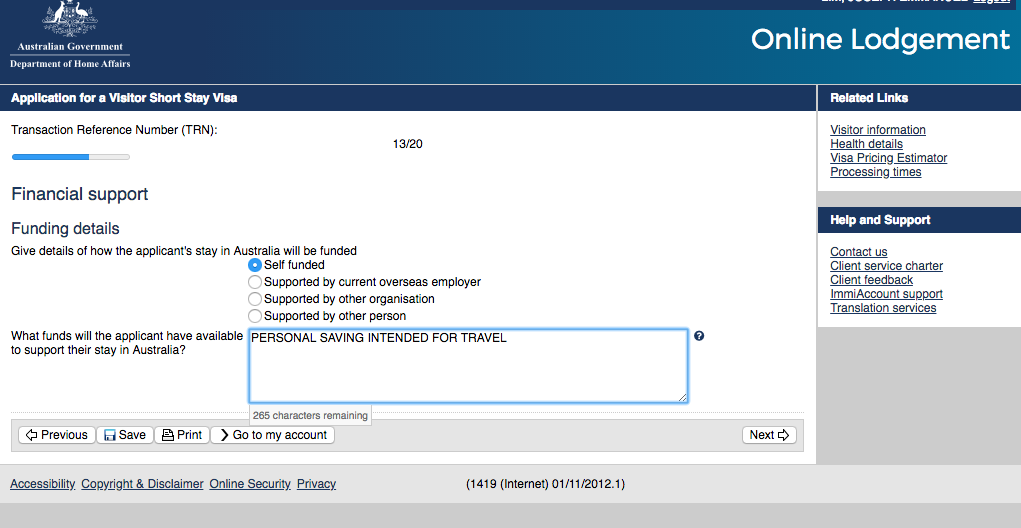
2. The “start application” with then prompt you to create an ImmiAccount. ImmiAccount is the main portal for accessing the online services of the Australian government’s Department of Immigration and Border Protection. Parang facebook lang ito that you have to provide basic information, contacts, a valid email add and a strong password. An email verification will be done. This Immi account shall become your official access and monitor this application and for future transaction with AU immigration.
If you already created an Immi account, click login.
click New Application at the upper left
3. Start filling up your e600 form. Here is what you will likely see. Easy to understand.
4. After filling up,you will be led to a document uploading interface which looks like this. inappropriate file type and size will be prompted. refer to requirements given above.
5. After all scanned files have been accepted by the online interface, you will be prompted to the payment page. I I paid mine via credit card for AUD 140 (Around 5,500 Pesos)
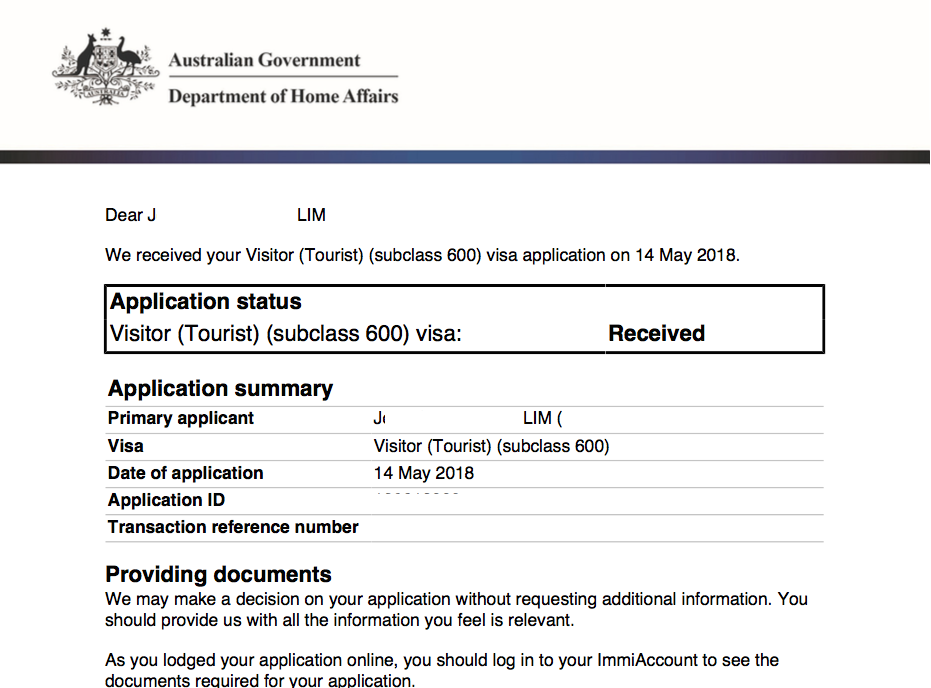
6. Submit and wait for Confirmation Email “Received”. This is the waiting time that your scanned documents will be evaluated. Also the perfect time for novena and pa-misa sa church for grace.
7. Receive decision via Email. I got mine after 10 days. The grant certificate will look like this. No need to submit your passport na to the embassy in Manila for verification and stamping. This certificate will suffice.
And that’s it! You have approval na and you’re ready to sell your kidney for travel funds.
Points to remember:
As per website, results are released 30 to 60 days after the submission. However, most of the recent applicants got their results earlier; provided, complete at valid ang scanned documents. I got mine after 10 days.
Since this is an online application, no need to print and submit paper requirements. Unless your uploads are not clear, then they may ask for those, or require you a personal appearance.
Bank account: As per usual travel blogs, bank accounts are ideally at 100 dollars x number of days stay x 2. better if more.
You can apply as early as 6 months before the trip.
Again, walang assurance ng approval. I feel that I got approved mainly because of the stamps I collected from my previous trips.
Lastly, IF UNSURE, WAG MAG DIY APPLICATION. Seek assistance from a reputable travel agency. PM me for recommendations. Chos! =)
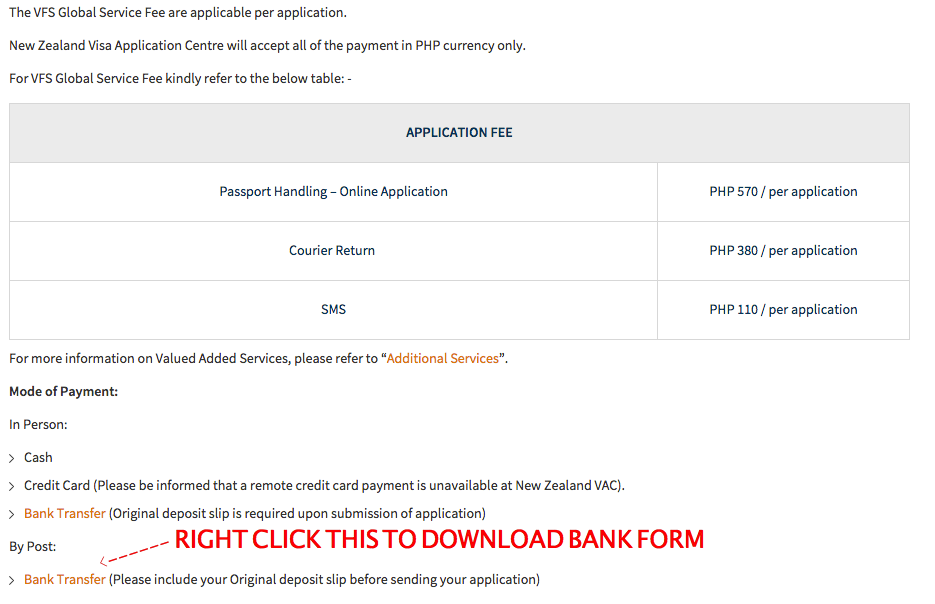
WAIVED NA PO ANG TOURIST VISA FEE FOR NEW ZEALAND!
True! Hindi po ito fake news. Before, it was mandatory to pay NZ$ 165. As of June 2017, A resolution has already been approved, stating that the Citizens of the Philippines do not have to pay anymore the fee or immigration levy for TOURIST/VISITOR VISA application, when coming to New Zealand for fewer than 60 days (Reference: https://www.immigration.govt.nz/new-zealand-visas/apply-for-a-visa/).
However, point out ko lang po clearly, NZ is NOT VISA FREE. It is only the big amount of fee that was taken out. We still have to submit necessary requirements to the NZ Embassy for the issuance of visa prior to our trip.
Traditional method of submitting paper requirements is still being implemented today. However, NZ Immigration already formulated a “Passport Handling-Online Application” method, which has taken visa application to the next level of easiness. With this method, applicants are only required to completely fill up a form on their website and then submit online the scanned copies of usual visa requirements. For this convenience,however,applicants shall pay a fee of less than 1,000 Pesos for the “Passport Handling”, which shall be discussed later. This is relatively a small amount compared to the big chunk of levy that has already been relieved from us. Passport handling fees may also be bank transferred na. This has made the application process more convenient, especially for us living far away from Manila/Cebu where embassy offices are located. This guide blog focuses solely onVisitors (Tourist) Visa via Online Application. For other types of Visa, refer to https://www.immigration.govt.nz.
So without further ado (Char), here is a step by step guide on how I completed my application.
STEP 1 : Gather the visa requirements,
Photo – passport sized (900 x 1200 pixels minimum), light colored background(except white, ideally light gray), JPEG Format straight from file. Bilhin nyo yung file ng picture sa studio. scanned from printed photo is not allowed; file size between 500KB and 3MB
Valid Passport – scan pages with personal information; PDF Format
Government issued Identification Card – either driver’s license, PRC, SSS, GSIS, TIN, Philhealth; PDF Format
Proof of Employment – letter of approved leave from employer ideally with salary and other details ; PDF Format
Evidence of Fund – Bank Certificate with ADB; Bank Statements; Updated Passbook; PDF Format
Evidence of Onward Travel – Airline confirmed booking(meaning, ticket reservation from a reputable travel agency); PDF Format ; pwede rin Airline ticket mismo if you already have one, but not advised.
Cover Letter – letter of intention. You may also put here your proposed day to day itinerary ; PDF Format
Other Financial Document – Credit card billing statement, ITR; ; PDF Format
For Self Employed – business permit, SEC or DTI registration. Annual ITR for the employed; PDF Format
Record of Previous Travels – Scanned copy of your past and current passport with all stamps
Copy of other Valid First World Visas (If available) – USA, Schengen, Japan or others; PDF Format
Re bank funds, some successful applicants mentioned “100 USD per day x # days stay x 2” maintaining balance. I guess we should prepare the same na din (or more) to prove our capacity to visit their country.
Select appropriate visa options. it will look something like this.
Click on the RealMe Link at the bottom to start application
Step 3: Create a RealMe Account which serves as your application form. This is where you will be uploading all your infos and scanned documents.
Provide usual infos, username and password. This step will also ask for an email verification.
After Email verification, your RealMe account will now look something like this. Click the “Visitor Visa” Highlighted in RED.
Step 4: Fill up RealMe Form in order that is given.
Fill up all the “Identity and Contact” requirements. one after the other. Save infos from time to time.
This may be intimidating, but just say No to all these entries, unless you seriously have a condition to declare.
The interface still asks for this stage even if you declared “single” early on. Samok ha!
This is the part where you upload your JPEG and PDF files
The good thing about this interface is that it prompts you for detected errors such as this. Cool! Very first world!
Step 5: Submit online your completed RealMe Form. In 24 hours, you will receive an email confirmation and instructions on where to submit your passport. This is not yet your approval.
Step 6: Payment of Passport Handling Fee thru Bank.
While it is most common for applicants to submit their passports personally, NZ offers an option to pay through Banco de Oro, which is very favourable for people away from Manila. Passport handling will be catered by VFS Global, which is NZ embassy’s partner agency. Details can be found at http://www.vfsglobal.com/NewZealand/Philippines/how-to-apply.html
Instructions on Bank Transfer Payments are detailed on this website.
For my application, I paid the 570 Handling fee plus 380 Courier Fee for them to return my passport after assessment. I did not avail the SMS assistance anymore, since the updates on my application can be monitored on my RealMe Account
Print the bank form and show to the bank during payment.
Step 7: Submit Passport to VFS Office for Assessment and Verification
Photocopy Bank Deposit Slip/ Transfer Slip and submit this to VFS together with your valid passport, the printed and signed bank form, a printed copy of “thank you” page and the Email Confirmation. Applicants from the province may send their documents ti VFS via any preferred courier.
Step 8: Result
Once the result is released, VFS will send your passport back to your given address. Courier fee for the return is part of the prior payment.
NZ Visitor Visa issuance is indeed fast. I got my approval 4 days after submission of passport to VFS.
Points to remember:
As per website, results are released 20 days after the submission. However, most of the recent applicants got their results within 3 to 4 days!
Since this is an online application, no need to print and submit paper requirements. Unless your uploads are not clear, then they may ask for those.
You can apply as early as 6 months before the trip.
Grant on duration of stay varies. Wala talagang template for this. But definitely, your stay will not exceed 59 days at a time.
For online application, No more sticker on your passport. The approval certificate that will be emailed to you shall serve its purpose.
—0—-
So there, hopefully this blog will be of help by the time you apply for your own. Though I am fully aware that this guide will not guarantee approval for everybody. Kaya sabayan nyo nalang din ng Novena for 14 days with miryenda cream bread and mayonnaise.
This guide,however, is focused purely on tourism/holiday visit. For other types of application, see https://www.immigration.govt.nz for details.
Re Waived visa fee, there is no information on until when this waived fee will last. So while we are enjoying the current privilege, might as well consider visiting this green country very soon.
Lastly, if you are unsure of your documents, or if you find the D.I.Y. online application too complicated, please get in touch na lang with a reputable travel agency to process your papers. Life is short, wag na pa stress!
With the clearest turquoise water and unspoilt shores, Balabac is one of the less visited destinations in the Philippines that deserves a spot on top of your travel bucket list. Here’s a quickie blog with nitty gritty details on how I reached the Balabac Group of Islands. But first, a little information muna about the place.
Balabac is a 2nd class municipality situated at the southwestern tip of Palawan province. Surrounded by the rich water of Sulu Sea, Balabac is a group of 31 islands and islets blessed with unspoiled fine sand beaches, wide sandbars and rich marine life. As per record, there are only about 40,000 inhabitants scattered around the islands. The province got much of its recent popularity after being featured by GMA’s Jessica Soho. As the show mentioned, this group of islands is our country’s last of the last frontier.
Balabac is only 8 hours away by boat to Malaysia. Kaya expect nalang that Malaysian products are a common thing in this very small province. Some locals do back door (paperless) entry to Malaysia, but as a responsible Filipino citizen, please do not consider doing that. No, no, no.
How to Get to Balabac – DIY Style
The municipality of Rio Tuba is the known gateway/commercial port with public boats traveling daily to Balabac main island where most of the community is located.
Puerto Princesa City — 6 hours –> Rio Tuba by bus + Rio Tuba — 3 to 4 hours –>Mainland Balabac by boat.
Public buses leave Puerto Princesa City (Palawan) from San Jose Terminal starting at 4AM. Fare is at P275++ for non-aircon bus and P450++ for aircon shuttle or bus, travel time is approximately six (6) hours.
From Rio Tuba, A public boat departs daily at around noon to mainland Balabac. Travel time is approximately four (4) hours and fare is P450 one-way. Please note that there is no fixed schedule of boat departure as it depends on sea condition and passenger traffic. Best to be at Rio Tuba as early as 10AM. You may also opt to stay overnight at Rio Tuba town. Basic pension houses at P 300-500/room can accommodate you.
Balabac Main IslandAccommodation As recommended by a friend, JD lodging: (0910 662 0073) at P400 per night for 2 pax.
DIY Island Hopping from Balabac Mainland. To go around the sub islands, the only mode of transport is by boat. There are no public boats that go from island to island since most locals here own their own motorised boats. Chartering a small boat (4 pax-6 pax) from the locals usually starts at P5000 per day. Lodging houses can recommend this to you.
If you intend to stay outside of mainland Balabac, expect to homestay or with guided camping for a fee. It is advised that you pass by the municipality tourism desk upon arrival and have yourself registered. Small amount may be imposed to visitors in the coming months, as Balabac Tourism Board is already being put up at the moment.
Budget for 4 days 3 nights? Probably around P 7,000 to 9,000, assuming you’d share the boat rentals with 4 -6 pax.
Pre-arranged Tour Style – I Prefer this!
Considering its isolated location and limited facility, Balabac is relatively new to the tourism industry. Tourism standards are yet to be formalised. For convenience, as well as safety, I HIGHLY recommend joining pre-arranged tour to take you around the islands. A number of independent tour providers offer “island camping” packages with rides, insurance and on board meals for P 10,000 to P 12,500, 4 days,three nights. Check out Biyahe ni Josemanuel on facebook for recommendations.
What to Expect. As a relatively isolated destination, do not expect fancy accommodations and the comforts you’d find in Boracay. Balabac is more on the rough side for the adventure seekers. Clearly, it is not a destination for everybody at the moment. In addition, there are no ATMs in the Island. Bring enough cash with you; preferably small bills.
Best Time to Visit. Summer . March to May when the sky is clear and the water is calm. Imagine island hopping with a nagbabadyang typhoon…. rainy season is a no, no!
Safety. Security concerns have been raised in the past, particularly on foreign travelers (you may google these issues). As such, joining a pre-arranged group tour an advantage for safety and monitoring.
The importance of Insect Repellent Lotion. Some of the stops during the island hop have lots of mosquito and sand fleas. More to that, some parts of Balabac experienced Malaria scare last December 2017. As a precaution, bring your off lotion everywhere you go. Sleeved tops and long pants are also recommended, especially at night.
Mobile Networks. Mobile networks were said to be moderate 2G on the mainland, but most of the islands have none. Prepare to disconnect with your social media hang ups.
Toilet and Water Supply. When camping, expect the most basic toilet there is. Deep well freshwater on the islands is very limited. As such, limit your flush and bathing requirements to the minimum.
Electricity. Electricity at the mainland is said to be up to 12 midnight only. For island camping, solar power is utilised to supply only basic light and gadget charging between 6 to 10 PM.
Snorkeling. Balabac offers the best snorkling sites I’ve visited to date. You can clearly see the corals from the boat as the water is super clear and calm, hindi mo na kailangan bumaba. As a safety reminder, never do snorkeling on shallow water. Only do this when the reefs are ideally 3.0 meters away from you.
Kill nothing but time. Leave nothing but footprints. Take nothing but pictures. Keep nothing but memories.
Checklist on Things to Bring
-A Lot of Sunblock (Organic/Reef Friendly Please!)
-Insect repellent lotion , moisturizing lotion, skin cooling mist spray
-Rashguard / Aqua Shoes
-Long sleeves / leggings
-Flash light / head lamp
-Powerbanks and extension wire
-Camera / Go pro (Having a drone would be perfect!)
-Snorkel gears
-Waterproof Bag
-First Aid Kit
-Sleeping bag ,Extra food/Snacks/Canned goods if you’re going camping.
Here’s a short video blog from by Balabac Tour. Enjoy =)